


Hardware components | ||||||
| × | 1 | ||||
| × | 1 | ||||
 |
| × | 4 | |||
| × | 2 | ||||
| × | 2 | ||||
| × | 1 | ||||
| × | 1 | ||||
| × | 2 | ||||
| × | 2 | ||||
| × | 2 | ||||
 |
| × | 1 | |||
| × | 1 | ||||
| × | 1 | ||||
| × | 1 | ||||
 |
| × | 1 | |||
| × | 1 | ||||
| × | 1 | ||||
| × | 1 | ||||
| × | 1 | ||||
| × | 1 | ||||
Software apps and online services | ||||||
| ||||||
| ||||||
| ||||||
| ||||||
| ||||||
| ||||||
Hand tools and fabrication machines | ||||||
 |
| |||||
 |
| |||||
 |
| |||||
 |
| |||||
 |
| |||||
| ||||||
Only two years ago, the biggest wildfire season swept up homes in an unprepared California. Smoke filled the air, blotting out the sun and emptying the streets. It was eerily familiar to my visit to China; there was heat without sun and the heavy smell of smoke plagued the air. But worst of all was the devastation caused to neighborhoods and communities.
Smoke filled the air, blotting out the sun and emptying the streets. It was eerily familiar to my visit to China; there was heat without sun and the heavy smell of smoke plagued the air.
California is in a fire season almost all year round. From June until September, high summer temperatures, in part due to climate change, pose a definite fire risk. Then from October until April, Santa Ana winds can cause wildfires to spread at an almost unstoppable rate. This combination of dry foliage and high winds create fires that spread quickly and burn slowly.
With the scary image of smoke billowing into our house whenever we opened our doors, we decided it was a perfect opportunity to deploy an application of our robotics knowledge. This Hackster competition was the perfect opportunity to give back to our community by developing FireFlight.
During our research into firefighting, we found that firefighting is a delicate dance between letting nature run its course and keeping its violent tendencies under control. The unpredictability of the fire and the costly nature of aerial surveillance meant firefighters often build a fireline in one place, but have to quickly manoeuvre as the wind changes direction. The worst cases of this randomness is when the fire suddenly leaps through the fireline, putting the time and effort as well as the lives of the firefighters in danger.
Taking our expertise, passion, and resources in robotics, we decided to craft a solution using aerial robotics to help aid firefighters in a collaborative effort to effectively control large fires and maco-manage them using data available through our solution.
Our solution incorporates a variety of benefits over traditional methods, and even quadcopters.
- By using fixed wing aircraft, we are able to create a drone with longer range, larger payload space, and greater assortment of sensors.
- With plenty of space for a variety of payload assortments, from first aid kits to additional sensors, our drone is modular and can be adapted to any situation.
- Fixed-wing aircraft offer superior range over quadcopters and can extend mission time 2-3x times that of conventional quadcopters.
- With an onboard ML algorithm and smart data acquisition, our drone can deliver reliable, real-time images to a command post using 4G lte. The data can be actively monitored to predict path of wildfire and even stored in databases for future use.
There are a myriad of opportunities open to the world of fixed-wing aircraft. With firefighting being a balance between nature and safety, we feel that equipping these drones will offer plenty of opportunities to mitigate, prevent, and control fire hazards as they pop up; through aerial surveillance, machine learning, and big data, we’re able to provide the most up-to-date technology to counter the growing wildfire threat across the state, and even across the world.
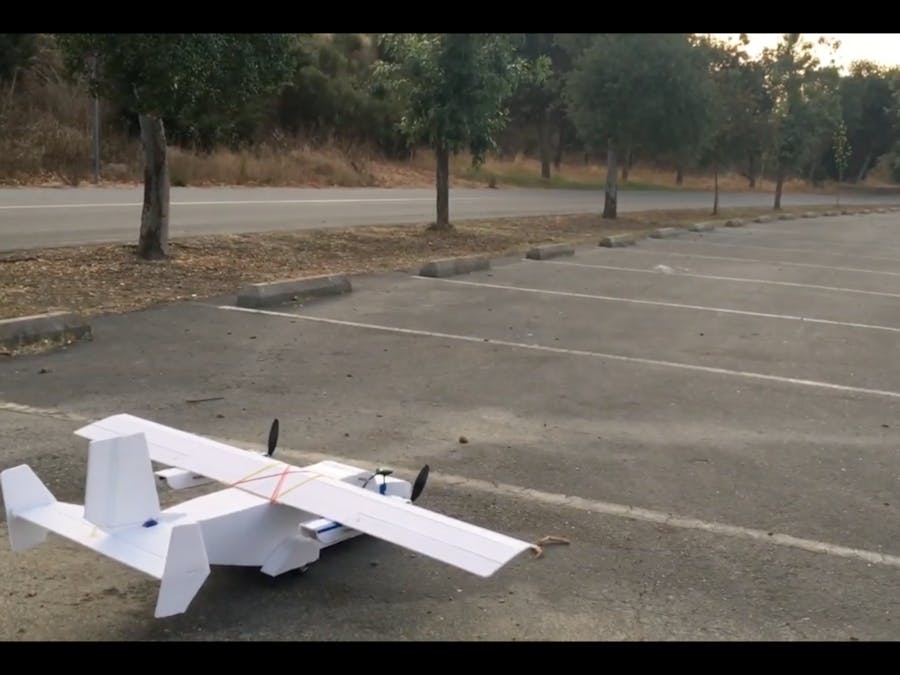
The fabrication process will assume that you did not buy the FliteTest parts I have listed on the bill of materials. I will walk you through step by step on creating the plane.
- Print the FliteTest Guinea Pig plane planning sheet
- Tape the pieces together and use binder clips to clip sheets to the foam. You need around 5 foam pieces for one plane.
- Use an Xacto Knife to cut through the pieces following the black lines. MAKE SURE NOT TO CUT THROUGH THE DOTTED LINES.
- Dotted Lines - Foam boards are made with two sheets of paper sandwiching foam in the middle. Cut the knife through the first sheet of paper and half of the foam. Then bend the foam board so that it creases in the same direction you want it to fold along. If you made a mistake, put some masking tape on it and redo it.
- Follow this video on making your plane.
- You can wire your plane here if you want. I recommend looking through the wiring portion of this article before continuing on.
- Now put together your powerpack using this video.
- Now is the time to make sure you put everything correctly together.
- Skewer sticks go through the small holes on the side of the power pod. If you ever find yourself needing more support, sticking a stick through the frame usually solves that problem.
After these steps, you should have finished fabricating the plane. The build video should have gone through all the steps that are needed in order to make the plane fly. Reinforce any sketchy connections with hot glue. Make sure to solidify the frame with packing tape as we found it to be highly effective despite numerous crashes. If you’re unsure, use tape or hot glue, or both. Epoxy might be overkill here. :)
Carve a hole roughly here for the pitot tube and antenna to stick out.
Fabrication Checklist:
- Looks like a plane (use video for reference)
- Center of Mass (COM) is correct
- Shake the plane. If there isn’t rattling you’re good.
- Go outside to a flat area with plenty of space for a glide test. You want to make sure your plane can glide. Throw the plane forward and see if it will glide a bit before coming to a landing.
- Make sure your plane can somewhat roll on the ground. This is how it will take off. On average, your plane should take off (given enough power) within 15 ft. See our video at the end for an example.
Wiring will take more skill so make sure you follow this part correctly if it is your first time. I recommend some basic wiring skills and knowing your way around these components. Otherwise, there are plenty of videos on youtube in case you are ever stuck. Make sure to watch this video first. Let’s begin.
Here’s is the wiring schematic for the main board. MAKE SURE TO FOLLOW IT PRECISELY.
Here’s a close-up of the PDB (Power Distribution Board).
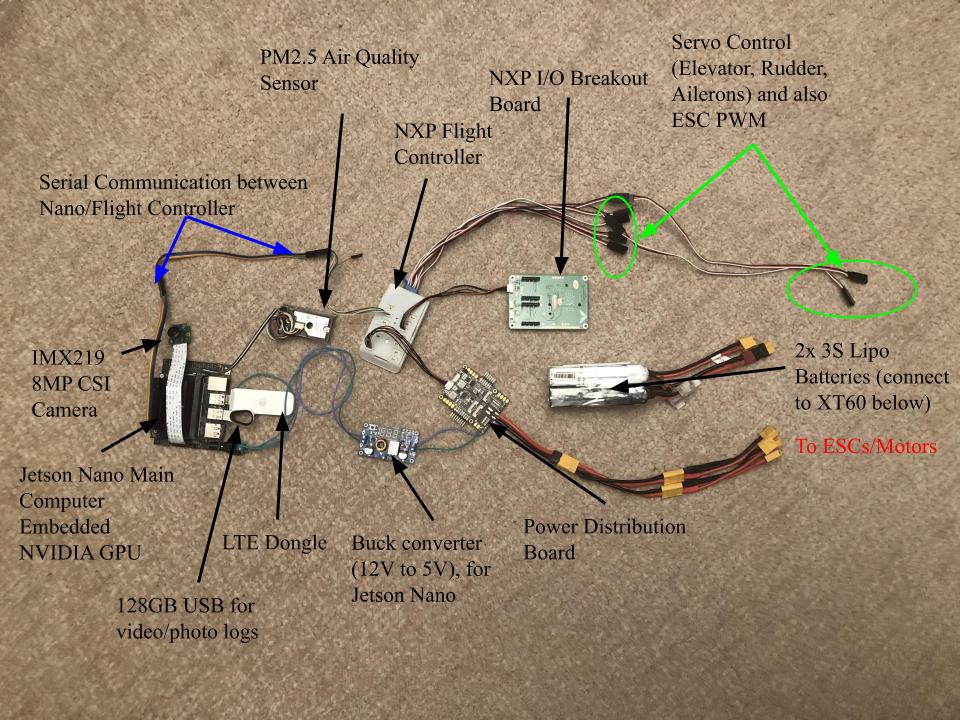
You can mount the electronics anywhere on the plane such that it doesn’t change the Center of Mass too much from the middle of the wings (check the video for how to figure out COM). Here are some pictures of how we mounted our electronics. [We chose to keep the pdb, flight controller and sensors in the nose of the plane while the jetson is located towards the rear]
*If you find you need some spacing between the frame and your electronics, cut out a piece of foam and hot glue it to the bottom of your electronic components.
Here’s a closeup of the wiring between the PDB and Flight Controller:
Some important things to keep in mind:
- All wires we use are pretty much regular 22-24 AWG wires with dupont connectors to connect between the different components. Between the pixhawk and other components, you have to use specialized JST-GH connectors. I recommend having a personal supply of dupont wires in case you need to connect using male or female leads.
- The JST-GH connectors connect the sensors in the nose of the plane to the Flight Controller board. Make sure to connect the Flight Controller and PDB through the JST-GH power ports.
- To power the Jetson Nano, we soldered wires to power pads on the PDB and connected them to a voltage step-down converter to supply 5V. Also make sure to connect the Jetson Nano and flight controller over UART. Connect the data pin of the air quality sensor to pin 5.
- The servos and ESCs are connected to the bottom of the flight controller board. Here is a list of connections
Channel 1: Ailerons(you can use a Y-splitter to connect to both aileron servos)
Channel 2: Elevator
Channel 3: Motor1
Channel 4: Rudder
Channel 7: Motor2
- We run our power to the ESC’s raw like normal. We have them run in parallel so that we don’t have to worry about discharge rate because it doesn’t exceed the max discharge rate of the batteries combined. If you soldered a connection the PDB, it practically does the same thing. Our method negates having to debug the PDB or accidentally fry it in case of a short.
We run our drone off of two 3S Lipo’s @ 2200 mAh which should be enough to run it for at least a half an hour. We soldered our own XT60 Y-connectors so if you want to do that watch this video to learn.
I suggest pieces of velcro so that you can attach electronics and take them out without having to take apart the plane.
Software***These installation instructions were tested on Ubuntu 18.10, and may not work on other operating systems/versions.
Overview
This is a diagram of the software stack.
A database stores information from the Drone and sends it to the server when requested.
Follow the installation instructions for MongoDB: https://docs.mongodb.com/manual/tutorial/install-mongodb-on-ubuntu/
Make sure to have run
sudo service mongod startAfter running it for a while, data should start to aggregate.
Run “mongo” and then follow the commands in the image:
The database “fireflight” will be created by the server and GPS logs, video and photos are stored in various collections inside.
Mission Software: QGroundControlTo install QgroundControl, see instructions here:
https://docs.qgroundcontrol.com/en/getting_started/download_and_install.html
Drone firmware: PX4First prepare the board by flashing the bootloader. Instruction found here:
https://nxp.gitbook.io/hovergames/userguide/programming
We used a twin engine fixed wing drone, which doesn’t apply to any of the airframes in the px4 default list.
I modified the standard plane airframe to fit two motors.
Follow these steps to upload the custom firmware to the flight controller.
1. Clone the repository: https://github.com/JermXT/Firmware/
2. Run “make px4_fmu-v4_default”
3. Connect the nxp board to the USB and upload the firmware through QGroundControl by selecting Custom firmware file from advanced settings. It should be located here: Firmware/build/px4_fmu-v5_default/px4_fmu-v5.bin
https://github.com/JermXT/FireFlightNano
The main computer, mounted in the drone, is a Jetson Nano. It communicates with the flight controller, runs image recognition and The code is written in python. To set it up, clone it onto the Jetson Nano and run
sudo python main.pyExample of the neural network:
Port forwarding
For testing purposes, I forwarded a port on my desktop so drones and clients could access both the server and mongodb. This will allow any device connected to the internet to access your computer. Opening a port will vary by the router. For AT&T,
https://www.att.com/support/article/u-verse-high-speed-internet/KM1010280/
provides a guide.
Mongodb usually uses port 27017. My code will also need ports 8000, 9000, and 9966 to run.
CAUTION: Port forwarding poses a security risk as it opens up your device to attack from any device on the internet. Proceed with caution.
Backend code
This is the backend code. It manages connections between the webserver, drones, and mongodb. To run it,
Clone the repository to the device with the open port and run
node server.jshttps://github.com/JermXT/FireFlightServer
Frontend codeThis is the webserver that clients access to view the drone. To run it, clone the repository to the device with the open port and run
beefyhttps://github.com/JermXT/FireFlight
In order to view the website from other devices/devices connected to the internet, find the ipv4 address of your host device from a searching google or running
curl ifconfig.mHowever, the second method is less secure. Use at your own risk.
Here we’ll go through some debugging and testing parts of the plane that we went through.
After you’ve connected everything, there will be some more things you need to do.
- Connect the telemetry radio to your QGroundControl device
- Select the correct airframe(Twin under Standard Plane)
- Set up your receiver/rc controller: https://docs.px4.io/v1.9.0/en/config/radio.html
- Walk through the calibration steps. For the batteries, nominal is 11.1 and max is 12.6
- You should now be able to move the ailerons, rudder and elevator but not the motors
IF THINGS DON’T WORK:
- Take a Multimeter and make sure that the voltage reading on the PDB from signal to ground is 0.3V high, 0.18V low, 0.24V neutral for servos. Voltages should all be below 0.2V for motors. The connection may be wrong if things aren’t working. Make sure not to reverse polarity for connections as well.
Arming
- Wait for the GPS to get a lock. It will beep loudly when the lock is achieved.
- Press the switch on the GPS to permit arming. The gps should glow green.
- Swipe the ARM slider on QGroundControl to arm the plane
Now that everything seems in order, it’s time to fly the plane!
Pick a flat area where you won’t be hindered by trees or power lines. You want to make sure it’s a place that you’ll be able to retrieve your airplane and also address any safety issues (power lines, roads, rivers, cliffs, etc.).
Test your controllers again by moving your control surfaces (Aileron, Rudder, Elevator). If this is your first time flying, please check out this video by FliteTest. It goes over the basics of beginner RC. I highly recommend bringing along someone who is accustomed to RC flying so that you can make the most out of your first flight.
MAKE SURE TO CHECK YOUR CONNECTION! You don’t want to have your plane in the air and then suddenly lose connection only to lose all your hard work or worse yet, crash into someone else’s property. Again, refer to the FliteTest video linked in the paragraph above if it is your first time flying.
To fly the drone,
- Arm the plane; (1) Go to QGroundControl and arm the plane. (2) Press the button on your GPS (the one that says “switch”)
- Test your control surfaces by moving your joystick (MAKE SURE NOT TO INCREASE THROTTLE)
- Now turn your throttle on just a little bit, enough to taxi. You want to make sure your motors are working. If you find that your plane is turning, either your wheels are misaligned or you have differential thrust for your motors. Make sure to fix this problem before going on.
- Now all should be clear. Position your drone towards the open ground, and turn the throttle up (usually to the max, or just a little under it is fine – depends on how powerful your motors are). In our experience, 80-90% is a good throttle for takeoff.
- You’re flying the plane!
Things to keep in mind:
- I recommend attaching some bubble wrap or packaging air to protect the plane, especially at the nose and inside your plane in case it crashes. Something that comes in amazon packages or other delivery services should do.
- The video by FliteTest should have gone through what good flying looks like. They do a really good job leading you through. Make sure you’re accurately following their directions to tune your plane in the air so that you know the limits of your plane.
This is still a project very much in the developmental phase, and there are still plenty of upgrades that we are planning for our prototype. However, we currently lack the funding to carry on as all of these have been out-of-pocket costs (we’ve used up all our allowances) and we are currently only high schoolers. We’re hoping to gain support through the community to help continue our project.
What we want to add in the near future:
- Heat Sensor (need to find a way to differentiate between hot weather, low specific heat (metal))
- Higher MegaPixel camera for better image resolution. This would cause a significant increase in latency for upload, but we can choose to store images locally as a plane with this camera on it will likely be returning back to base.
- Autonomous flight. We are looking into better collision-avoidance and autonomous pathing algorithms that would allow macro-level commands to be sent and micro-level decisions be made on a local level. Here is a research paperregarding the implementation of an algorithm.
- Improve website to accommodate live video feeds and live image requests
- Incorporate sensor and image probabilities into a binary classifier
- Improved frame out of lighter and sturdier material (ex. Carbon fiber, fiberglass)
We have debugged through most of the problems we encountered and we are ready for Phase II of our project, which will see a refinement of our proof of concept into a full-blown prototype. We currently lack funding to fully realize this prospect. We are trying to find grants to help fund our project further.
We hope you like our project, and if so, please make sure to click on the thumbs up below!
If you have any questions or comments, feel free to comment down below and we’ll get to them when we can.


Comments