

Hardware components | ||||||
| × | 1 | ||||
| × | 1 | ||||
| × | 1 | ||||
 |
| × | 1 | |||
Software apps and online services | ||||||
 |
| |||||
Every time I arrived home at night, in the garage, I wasn't able to see anything. Having a little baby, was always hard for me or my wife, to get out of the car and take the baby out in the dark. We need to turn the lights on.
So, I started automating my house and one of the things I did was to put a shelly 2.5 connected to the lights switch. Using a motion sensor, everything connected to Home Assistant, the lights turn on every time motion was detected.
But, this was happening either at night or day. To prevent turning the light in the day, I've decided to create a luminosity sensor, interface it with Home Assistant and only turn the light if the luminosity was bellow a certain value.
It had to be small, cheap and easy for anyone to create, thus this project was born.
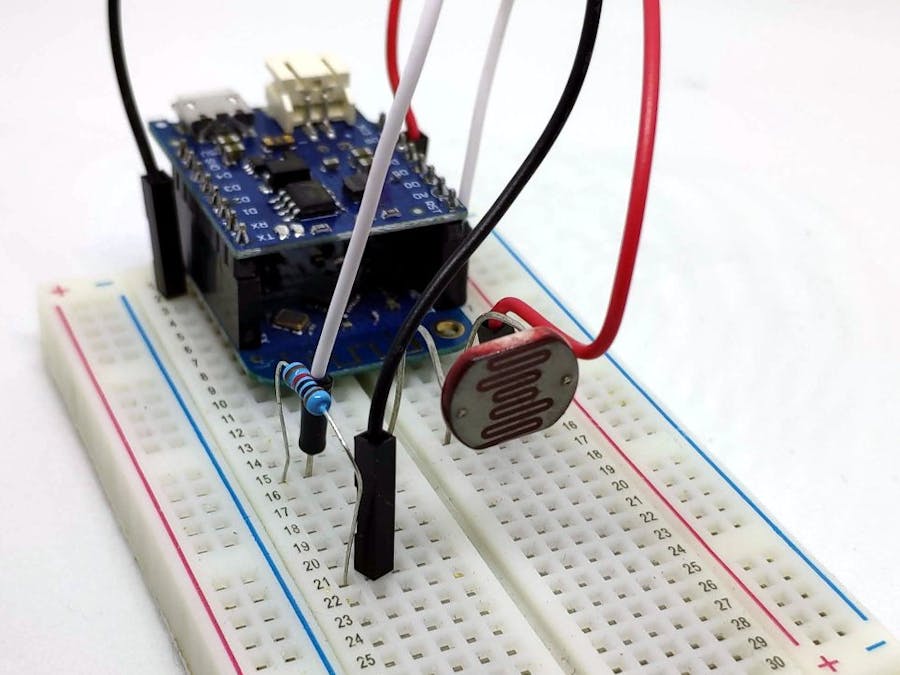
Building itTo build it, just follow the schematics, choose Option 1 or Option 2 - or come up with one yourself to power the Wemos
Here's one in a breadboard and with a 3D printed case
To save battery, the code uses the Wemos deep sleep mode to save battery.
For deep sleep to work, you need to put a blob of solder in the Wemos were it says "sleep".
WARNING: After you put the solder blob, uploading sketches to the Wemos becomes much harder. It is possible, but involves having to reset the board a lot of times.
Only do this after uploading the code if you don't want to have to reset the board a lot of times.
CodeThe code doesn't have a lot of configurations. Just fill the following parameters to reflect your configurations
- MQTT_SERVER
- MQTT_USER
- MQTT_PASSWORD
- MQTT_PORT (if not standard)
- MQTT_TOPIC (you can put whatever you want here, but in home assistant configuration must be the same)
- *ssid - wifi network name
- *password - wifi password
- SLEEP_TIME (in seconds): The frequency of updates to HA
In Home Assistant, we just need to add a new sensor and I'm going to show how you can get the values from the new sensor.
The following lines are to be added to sensor.yaml file (or configuration.yaml if you don't have them separated).
# Sensor luminosity
- platform: mqtt
  name: "Luminosidade_garagem"
  state_topic: "sensor/luminosity"
  qos: 0
  unit_of_measurement: "cd"
Restart Home Assistant after adding the sensor.
And here's an example on how to get the values from the sensor
- condition: numeric_state
  entity_id: 'sensor.Luminosidade_garagem'
  below: 450
And here's the sensor values in Home Assistant entity
If you don't see any values, after you power on the sensor, check in Home Assistant Mosquitto broker logs if it's getting there:
1568668671: New connection from 192.168.12.22 on port 1883.
1568668671: New client connected from 192.168.12.22 as LightSensor (p2, c1, k15, u'mosquittouser').You can adjust, in the Arduino code, the frequency in which the sensor sends updates on the luminosity (and consequentially the sleep time) to HA.
What can and will happen is, sometimes the sensor just finished sending an update (let's say 900) and your sensor detects movement and the lights don't turn on because there's enough luminosity. But, the luminosity drops to almost pitch black, but the lights don't turn on because the last update was a value of 900 and the sensor hasn't updated the HA.
You can play with the time to best suit your needs.
TODOI need to design a better case for the sensor


Comments