

Hardware components | ||||||
 |
| × | 1 | |||
 |
| × | 1 | |||
| × | 1 | ||||
| × | 1 | ||||
 |
| × | 1 | |||
 |
| × | 1 | |||
 |
| × | 1 | |||
Software apps and online services | ||||||
 |
| |||||
Hand tools and fabrication machines | ||||||
 |
| |||||
 |
| |||||
In this tutorial I'm going to show you how to set up an Arduino temperature controller that send values to an Android app by Bluetooth connection.
Let's start with the material you will need to build this project:
- Arduino nano.
- NTC thermistor, check the 25°C resistance as this will be needed in the arduino code to correctly evaluate the temperature using the beta formula.
- Resistors, 2k, 1k and one of the same magnitude of the thermistor.
- HC 06 bluetooth module.
- Various jumpers.
First of all you will need to start assembling the voltage divider used for the thermistor, figure 1 shows the connection you will need to make in order to calculate the unknown resistance of the thermistor as a fuction of temperature.
Figure 1 Voltage divider for thermistor resistance evaluation.
This circuit allows the Arduino to determine the voltage drop after the unknown resistor. Using the other resistance value, we are able to calculate the value of the unknown resistor using the following part of the code (figure 2).
raw= analogRead(analogPin);
if(raw) {
 ratio = raw * Vin;
 Vout = (ratio)/1024.0;
 ratio = (Vin/Vout) -1;
 R2= R1 * ratio;
Figure 2 Arduino code for thermistor resistance evaluation.
The obtained resistance is then converted to temperature using the beta formula (figura 3).
NOTE: the beta value of you thermistorand Ro at 25°C are available on the datasheet of your thermistor! Check it out before running the code!
Temp = Beta/log(R2/(Ro*exp(-Beta/To)));
Temp = Temp -273.15;
Figure3 Arduino code for temperature convertion.
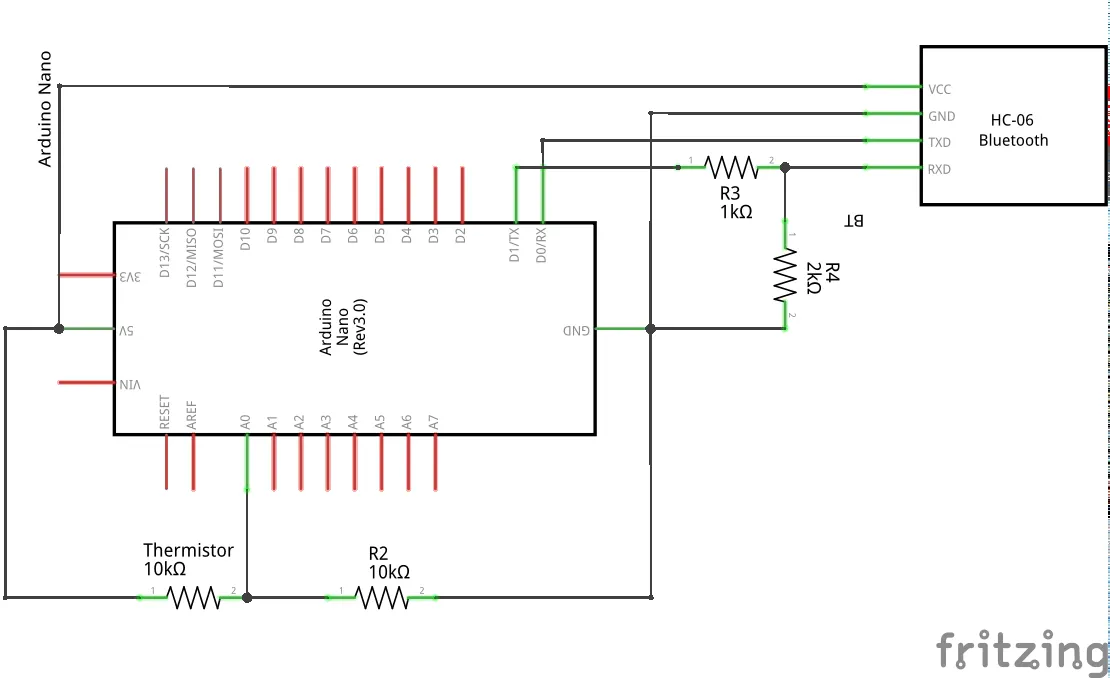
You will then need to set up your Bluetooth module, figure 4 will show how to connect a Bluetooth module like the one I used in this project to the previous. A voltage divider is required to connect the TX1 pin of Arduino to RX pin of the module since this accept online 3.3V as input.
Figure 4 Arduino schematics with HC 06 module.
Data can then be sent trough bluetooth module by initializing the serial door and printing the wanted values. In this example I needed the device to measure the temperature in the range 25 -75°C, to start counting approximately 300 seconds at high temperature and then changing the printed message (figure 5).
void setup()
{
Serial.begin(9600);
}

void loop(){

if(Temp >= 74) {
   for (int i = 0; i <= 30; i++) {
     Serial.print("Temperature >= 74 °C");
     delay(10000);
   }
   Serial.print("Heating Complete");
   delay(10000);
 } else if (Temp <= 26){
     Serial.print("Temperature <= 25 °C");
     delay(10000);
   } else {
     Serial.print("Temperature: ");
     Serial.println(Temp);
     delay(10000);
 }
}
Figure 5 Arduino Code per serial initialization and value printing.
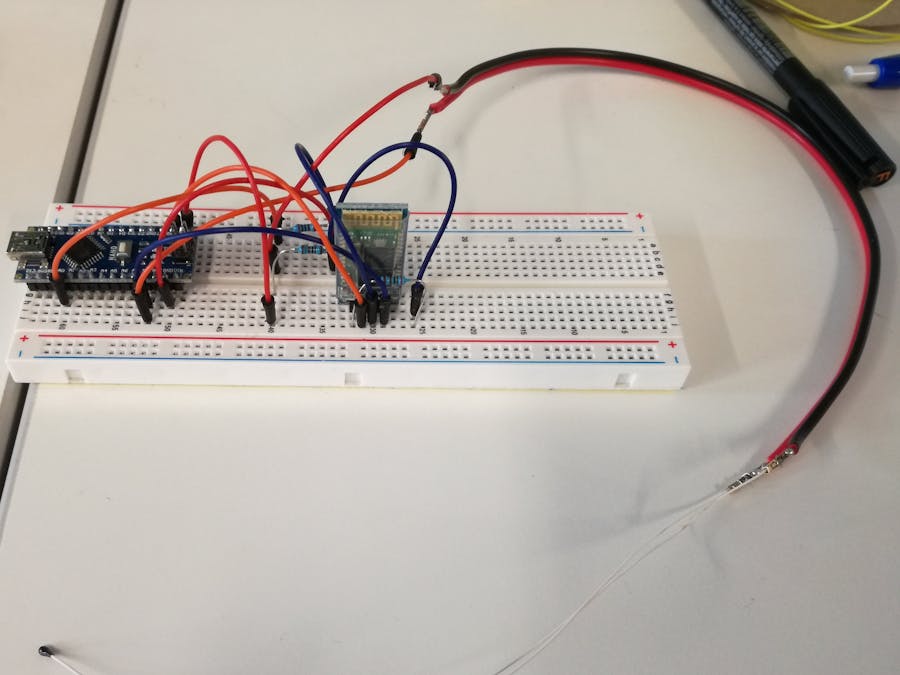
The final device assembled on a breadboard can be seen in figure 6.
Figure 6 Full device on a breadboard.
The final step is the connection of the Bluetooth module to an Android phone for data visualization. A simple app has been programmed using MIT AppInventor 2. Figure 7 and figure 8 show respectively the user interface and the programming blocks.
Figure 7 User interface made with AppInventor2.
Figure 8 Programming blocks of AppInventor2.
The proposed app is available on App inventor gallery at the following link: http://ai2.appinventor.mit.edu/#5876233188016128
Anyway using the simple and intuitive block programming system of app inventor many other app can be built to fulfill any purpose you want. For example I needed the app to notify me with a sound if temperature gets lower than 25°C in order to perform some measurement and to notify after 5 minutes at 75°C that my heating cycle is complete.
Optional: A final step could be the soldering of the components and 3D print some box to keep the parts together. Figure 9 shows the result of such approach.
Figure 9 Full device ready to be used.
A hole has been made on the side of this box in order to power the Arduino with the mini usb cable. The long cable red and black has been added just to increase the distance between the thermistor and the rest of the device (I need the thermistor in order to check solutions temperature, so I wanted the electronic components as far as possible).
I hope this simple project will help you understand the basics for serial communication with bluetooth module in order to apply this to your own project.
If you find some errors or simply you want to ask something please let me know.
EDIT: I found an error in schematics wiring for the voltage divider need for the bluetooth module. It has been solved.
EDIT2: If you have problems uploading your code on the board try by disconnecting the bluetooth module.


Comments