
Hardware components | ||||||
 |
| × | 1 | |||
_ztBMuBhMHo.jpg?auto=compress%2Cformat&w=48&h=48&fit=fill&bg=ffffff) |
| × | 1 | |||
| × | 1 | ||||
 |
| × | 2 | |||
| × | 1 | ||||
| × | 1 | ||||
| × | 1 | ||||
| × | 1 | ||||
| × | 1 | ||||
| × | 1 | ||||
| × | 1 | ||||
| × | 1 | ||||
You can read more about this and other Esmacat tutorials on the official Esmacat website. Check out our other Hackster.io demos as well.
Detailed documentation of the codes and steps for this tutorial can be found here
Check out our EASE Crowd Supply Campaign Page: https://www.crowdsupply.com/harmonic-bionics/ease
Overview:
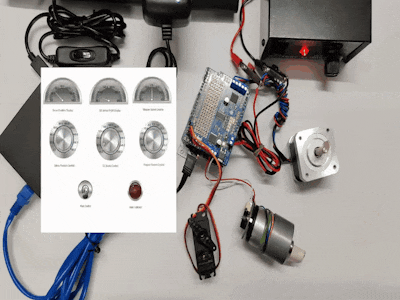
In this tutorial, you will learn how to set up a Raspberry Pi with Codesys to act as both a PLC and an EtherCAT master. It will be used to control the motors attached to the EtherCAT Arduino Shield by Esmacat (EASE) Slave device that is attached to an Arduino Uno.
- First, some general information about Raspberry Pi and Codesys is discussed.
- After learning to set up the Pi and Codesys, you will learn to implement a practical project to control the motors attached to the Arduino Uno and EASE based on user input by updating EASE registers using Codesys.
EASE is an EtherCAT slave that connects to an EtherCAT master (PC/ Laptop/ Dedicated Master devices like the Esmacat Master S and Esmacat Master C.) It can be stacked on top of Arduino, other MCU boards with an Arduino Uno form factor, and shields. This shield allows high-speed communication with an industry-standard EtherCAT protocol for high-performance robotic applications. Esmacat's simple to use Arduino and Mbed libraries allow for easy coding on the base board and Esmacat's free open source master software has a high-level abstraction so users can run applications within minutes!
- EASE connects Arduino boards, Arduino-like boards, and Arduino Shields for large-scale applications.
- High-speed communication (200Mbps, 200x faster than CAN bus) is supported with EtherCAT which is an industrial-standard fieldbus for automation.
- The EtherCAT hardware/software is present only on EASE so there is no performance lost on the MCU baseboard
- EASE has the form factor of Arduino Uno, and thus can take advantage of the Arduino ecosystem.
- Daisy chain connection between multiple EASE simplifies the topology of wiring.
- Power-over-EtherCAT (POE) technology reduces the number of required wires and power outlets.
- The data packet between Arduino Board and EASE is communicated via SPI, allowing EASE to be compatible with many different types of boards including Arduino boards and MBed boards.
- Arduino and Mbed developed by Esmacat library allow users to easily develop code between the base board and EASE within minutes.
- This shield has 8 registers that can be used to send/receive data between devices through the EtherCAT master via Ethernet cables attached to the shield.
More info: https://www.esmacat.com/ease
Suggested Reading: EASE Datasheet.
Raspberry Pi:Raspberry Pi is a tiny, dual-display, low-cost desktop computer that is used widely in robot brains, smart home hubs, media centers, as a networked AI core and factory controllers. It can also be used as an EtherCAT master just like a Laptop/PC. However, it should be noted that the Pi is a Linux based computer.
Suggested Reading:Section 4.2 Getting Started with EASE, Motor & LCD Shield
Codesys:CODESYS is a PLC programming environment that is used widely by many industrial automation companies like Beckhoff, Bosch, Wago, etc. You can program in Codesys using the traditional Ladder Logic or using Structured text and Continuous Flow Chart (IEC 61131-3 standards).
For this tutorial, the following packages must be downloaded from the links below,
Note: You must create a Codesys account in order to download the above files.
Note: The ESI (EtherCAT Slave Information) of EASE must be added to Codesys to use it in the program. Refer to the documentation (section 3.2.2) below to get detailed steps for the initial setup of Codesys for Raspberry Pi.
Suggested Reading: Section 3.2.3 Getting started with EASE and Codesys
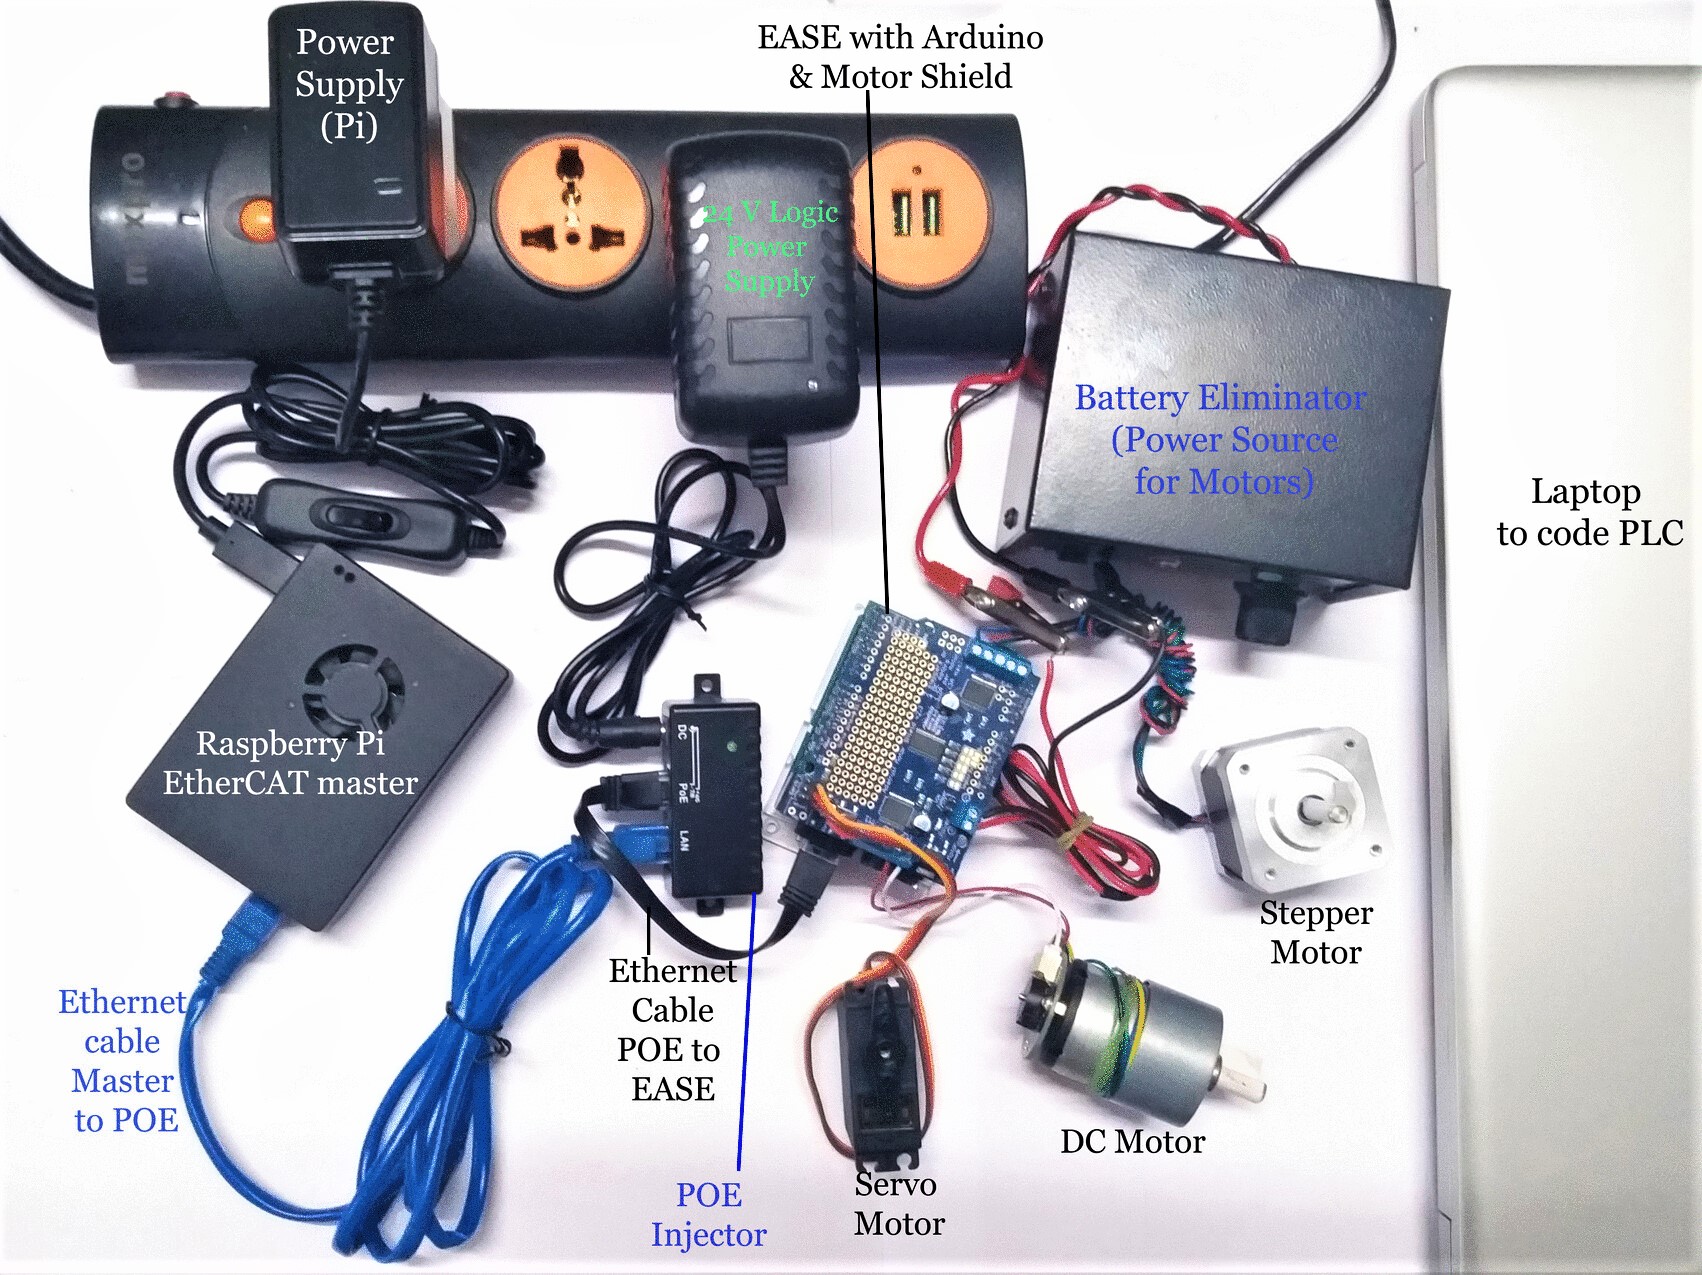
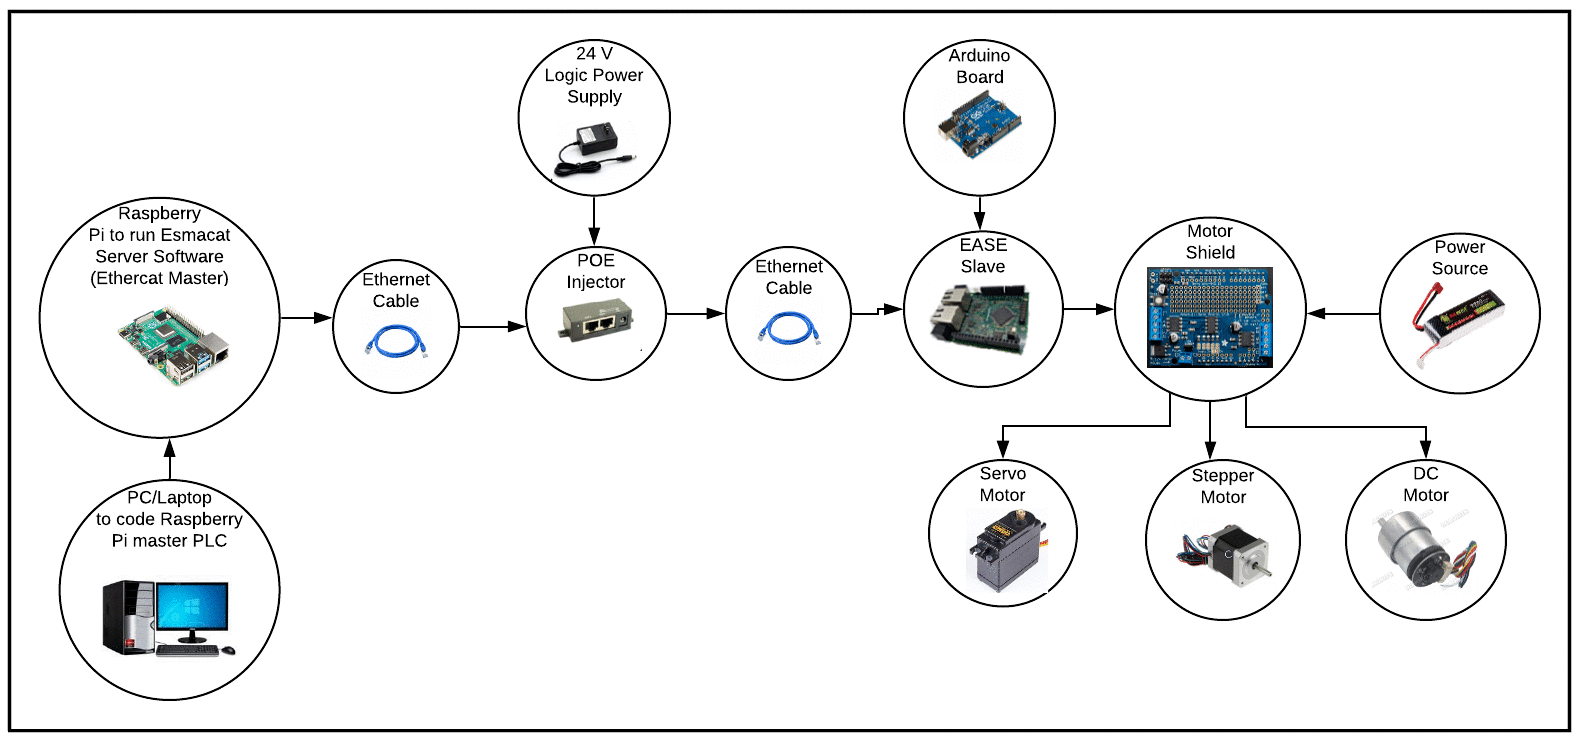
Hardware Connections:The primary hardware components include,
- EtherCAT slave (EASE with Arduino)
- EtherCAT Master (Raspberry Pi)
- Power Over Ethernet (POE Injector)
- Ethernet cables
- Power Source (for Motors)
- Motors to test the code
- DC Adapter (for POE)
Since EASE uses a POE injector, there is no need to power the Arduino board separately. EASE can power the board andany other boards connected through EtherCAT!
The connections are as shown in the two schematics attached in the "Schematics" section of this tutorial. "The Hardware setup schematic" gives an overview of the connections to be made while the "Physical connection schematic" shows the setup once all the connections are made.
Note: Make sure the Ethernet connections are fit tightly into the sockets. (Loose connections may lead to the slave device not being recognized.)
Required Libraries:- An EASE Library for Arduino to communicate with the Arduino subsystem.
The link to the library has been included under the Code section. Download the library and add it to the Arduino IDE (Sketch-> Include Library-> Add.ZIP library and select the file) to get started with the coding part.
Suggested Reading:Getting started with EASE.
Software :The software required for this tutorial involves coding for
- the Esmacat Master and
- the Arduino.
Programming the Esmacat Master:
Open the Codesys software and import the.project file downloaded from the Code section and build the source code.
Suggested Reading: Section 8 Getting Started with EASE & Codesys.
Coding the Arduino:
Open the Arduino IDE and create a new sketch file. The complete code for this tutorial is available under the Code section named "EASE_codesys_motor_control".
Compile and Upload this code into the Arduino board connected with EASE.
Note: Make sure you check whether the Board and Port are chosen correctly in the IDE.
Running the Master Code:When running the master code you get a result similar to the following on the Codesys environment (with a graphical UI showing the update of registers in EASE).
By now you have successfully programmed the Arduino boards and the Esmacat master! The visualization tool in Codesys gives a graphical UI to control the on-board LED in Arduino similar to the GIF attachment at the start of the tutorial and the YouTube video below.
Final Notes: A detailed step by step tutorial for this project can be found in the document attached below.
Suggested Reading: EASE & Codesys Motor Control.


Comments