

Hardware components | ||||||
| × | 1 | ||||
| × | 1 | ||||
_ztBMuBhMHo.jpg?auto=compress%2Cformat&w=48&h=48&fit=fill&bg=ffffff) |
| × | 2 | |||
| × | 2 | ||||
 |
| × | 3 | |||
| × | 1 | ||||
| × | 1 | ||||
| × | 1 | ||||
| × | 1 | ||||
| × | 1 | ||||
| × | 1 | ||||
| × | 1 | ||||
| × | 1 | ||||
Software apps and online services | ||||||
 |
| |||||
| ||||||
 |
| |||||
You can read more about this and other Esmacat tutorials on the official Esmacat website. You can also learn more about us on our main website.
Detailed documentation of the codes and steps for this tutorial can be found here.
Check out our EASE Crowd Supply Campaign Page: https://www.crowdsupply.com/harmonic-bionics/ease
Overview:
In this tutorial, you will learn how to set up and use the EtherCAT Arduino Shield by Esmacat (EASE) Slave device on top of an Arduino subsystem and interface it with a Touch LCD and Motor Shield to enable data transfer between the two slave devices via the EtherCAT master (Laptop/PC).
- First, some general information about the shields is discussed.
- After learning to set up the devices, you will learn to implement a practical project involving both the Touch LCD and Motor Shields to control the Motors connected via the buttons on the LCD Shield by exchanging data between the 2 slave devices and the EtherCAT master. The data about the current motor to be controlled and its state (speed/position) is also printed on the terminal of the master.
EASE is an EtherCAT slave that connects to an EtherCAT master (PC/ Laptop/ Dedicated Master devices like the Esmacat Master S and Esmacat Master C.) It can be stacked on top of Arduino and other MCU boards capable of connecting a shield with an Arduino Uno form factor. This shield allows high-speed communication with an industry-standard EtherCAT protocol for high-performance robotic applications.
This shield has 8 registers that can be used to send/receive data between devices via Ethernet cables attached to the shield.
More info: https://www.esmacat.com/ease
Suggested Reading: EASE Datasheet.
Touch LCD Shield:Display screens can be of very simple types such as 7 Segment or character LCDs or more advanced models like OLEDs and TFT LCDs.
2.4” TFT (Thin film Transistor) shield is one of the most widely used graphic screens with "Touch" input. Here are its most important features:
- 240*320 pixels resolution
- Ability to display 262000 different colors
- Includes a touchpad
- 5v supply voltage
Suggested Reference: Absolute Beginner’s Guide to TFT LCD Displays by Arduino
In order to use the Touch Shield, 3 libraries are required to be added to the Arduino IDE,
1)Adafruit-GFZ-Library. (Adafruit Graphics Library)
3)Adafruit-TouchScreen Library.
Download the above files and add them to the Libraries folder of Arduino IDE.
Note: The Touch LCD values must be calibrated before using and must be updated in the Arduino code (comments provided) for accurate touch control.
Motor Shield:The Adafruit Motor Shield is a stackable motor shield that allows up to a maximum of 2 Servo motors, 4 DC motors or 2 Stepper Motors to be controlled using a single shield. By configuring the shield for our requirement one can control the motors as per the need. In this tutorial 1 servo motor, 1 dc motor and 1 stepper motor has been controlled as a proof of concept.
Suggested Reference: Adafruit Motor Shield V2 datasheet.
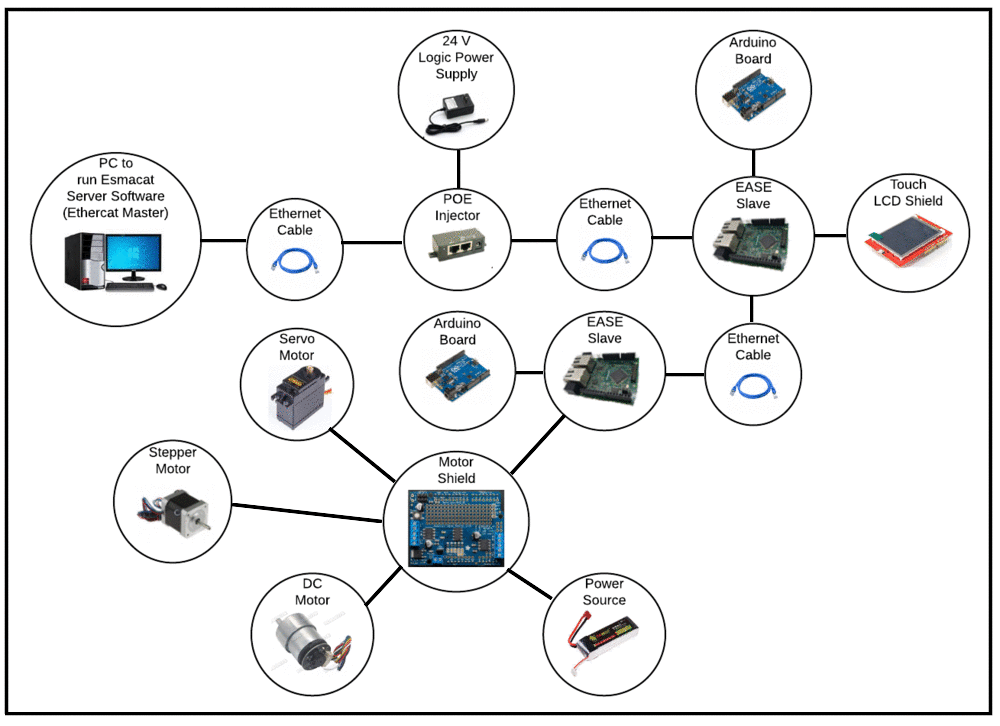
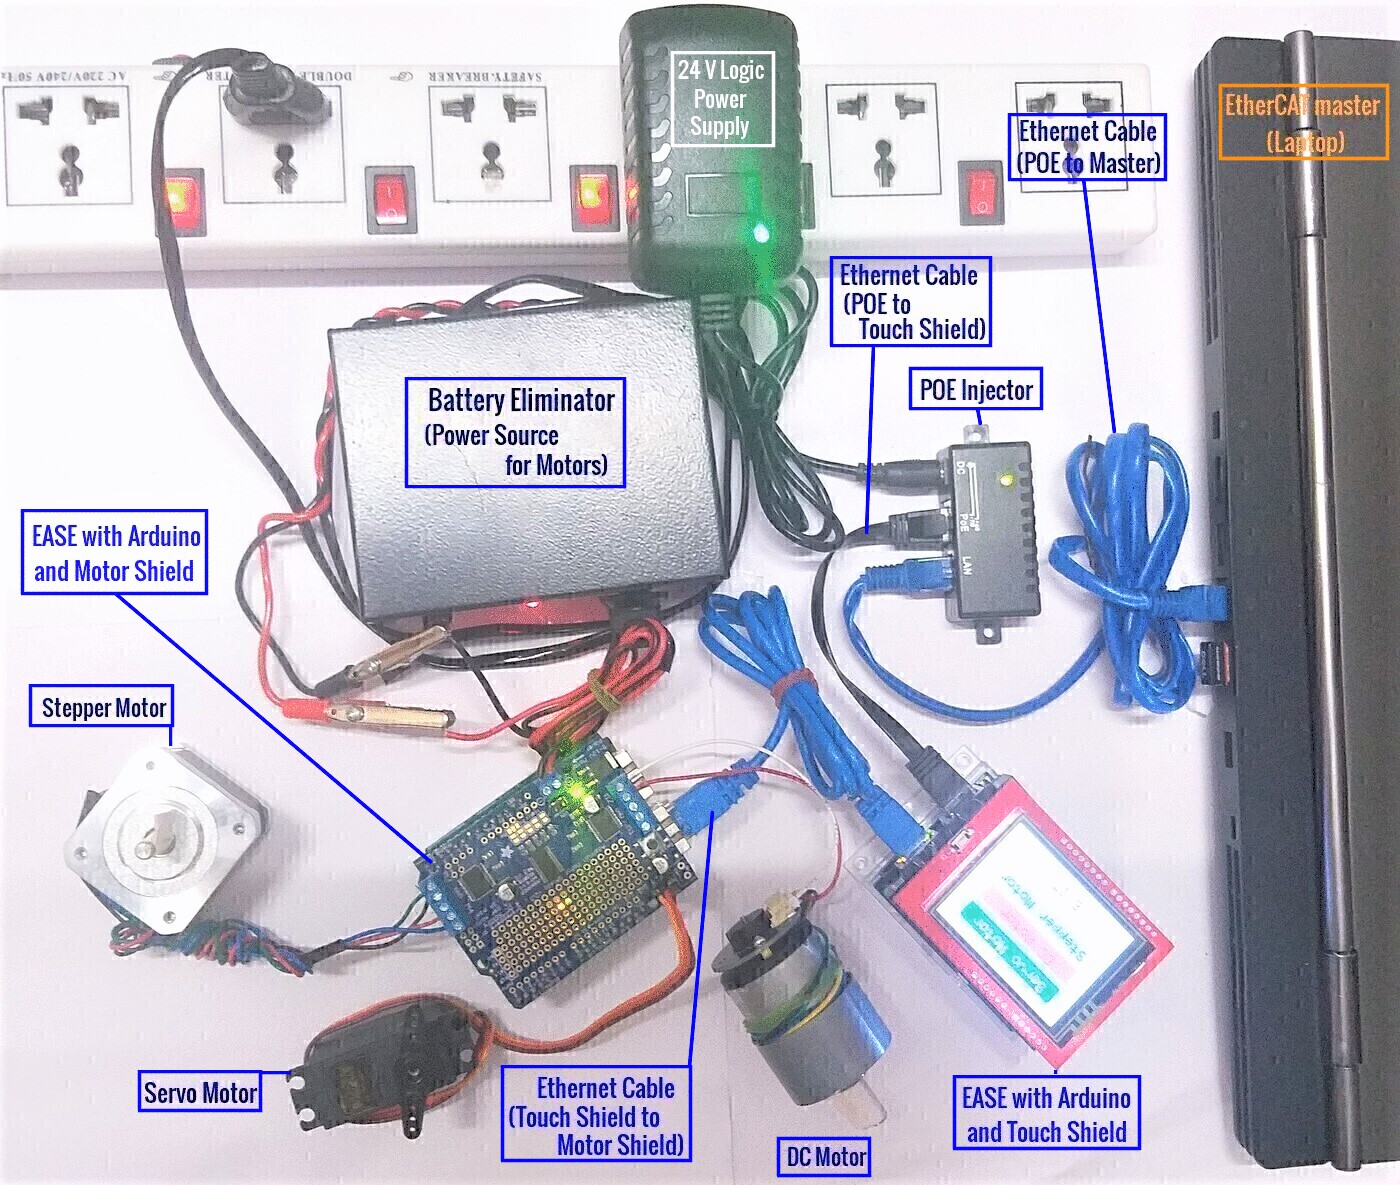
Hardware Connections:The primary hardware components include,
- EtherCAT slave1 (EASE with Arduino)
- EtherCAT slave2 (EASE with Arduino)
- EtherCAT Master (PC/Laptop)
- Power Over Ethernet (POE Injector)
- Motor Shield
- Touch LCD Shield
- Motors
- Ethernet cables
- DC Adapter (for POE) and
- Power Source (battery to power the motors)
Since EASE uses a POE injector, there is no need to power the Arduino boards separately. EASE can power the baseboard through EtherCAT!
The connections are as shown in the two schematics attached in the "Schematics" section of this tutorial. "The Hardware setup schematic" gives an overview of the connections to be made while the "Physical connection schematic" shows the setup once all the connections are made.
Note: Make sure the Ethernet connections are fitting tightly into the sockets. (Loose connections may lead to the slave device not being recognized.)
Required Libraries:There are two libraries that will be used for this tutorial.
- An EASE Library for Arduino to communicate with the Arduino subsystem.
- An Esmacat Master Library for the master (PC) to communicate with the EASE slave device.
The link to both the libraries have been included under the Code section. Install these libraries to get started with the coding part.
Refer to the links below to get more detailed step by step help with installing these libraries.
Suggested Reading: EASE Master Software structure.
Suggested Reading:Getting started with EASE.
Software :The software required for this tutorial involves coding for
- the Esmacat Master and
- the Arduino.
Programming the Esmacat Master:
Open Visual Studio or any other (IDE) and copy all the 4 C++ codes available from the Code section (source files starting with ease_lcd_motor_control/) into a new project folder and build the source code.
Refer to the links below to get more detailed step by step help with building source codes in EtherCAT Master,
Suggesting Reading:Getting started with the Esmacat Master (Windows).
Suggesting Reading:Getting started with the Esmacat Master (Linux).
Coding the Arduino:
Open the Arduino IDE and create 2 new sketch files. The complete code for this tutorial is available under the Code section.
Copy and paste the code within the "Arduino with EASE and MotorShield Code" into one of the sketch files. Compile and Upload this code into the Arduino board connected with EASE and Motor Shield.
Repeat the same process by copying the "Arduino with EASE and LCD Shield Code" into the other sketch file and upload the code into the Arduino board connected with EASE and LCD Shield.
Note: Make sure you check whether the Board and Port are chosen correctly in the IDE.
Running the Master Code:On running the master code you get a result similar to the following on the Master terminal (the result attached below is an example result on execution on a Windows PC) with the motor selected and the desired position/speed change.
Results:
By now you have successfully programmed the 2 Arduino boards and the Esmacat master! The touch input from the LCD Shield can be used to control the motors connected to the Motor Shield similar to the GIF attachment at the start of this tutorial and the video below.
Final Notes: A detailed step by step tutorial for this project can be found in the document attached below.
Suggested Reading: EASE with Touch LCD & Motor Shields.


Comments