

Hardware components | ||||||
 |
| × | 1 | |||
| × | 1 | ||||
| × | 1 | ||||
Software apps and online services | ||||||
| ||||||
Hand tools and fabrication machines | ||||||
 |
| |||||
| ||||||
This guild was created on behalf of the Arm Software Developers team, follow us on Twitter: @ArmSoftwareDev and YouTube: Arm Software Developers for more resources!
OverviewTensorFlow Lite enables easy and fast on-device machine learning inference and provides a wide range of delegates to accelerate inference. The framework supports multiple platforms such as embedded Linux, microcontrollers, Android, and iOS. In this guide, we will introduce the Arm NNand Arm NN TensorFlow Lite Delegate and you will learn how to integrate the Arm NN delegate into your existing TensorFlow lite projects to accelerate image classification inference on Raspberry Pi 4. Finally, we will show some benchmarks achieved by comparing TensorFlow Lite with and without Arm NN Delegate on Raspberry Pi OS 64-bit.
Introduction to Arm NN and Arm NN DelegateArm NN is an open-source software stack that enables ML workloads on power-efficient devices. It bridges the gap between training frameworks and deployment on NN accelerated devices such as Arm Cortex-A CPUs. The Arm Cortex-A CPUs are accelerated for ARMv7 and ARMv8 architectures supporting 32-bit and 64-bit instruction sets.
Arm NN Software Components
Arm NN TensorFlow Lite Parser and Neon Backends are two main software components of Arm NN that enable rapid TensorFlow Lite application development for Cortex-A CPUs. You can load your TensorFlow Lite model directly into Arm NN SDK via Arm NN TensorFlow Lite Parser. Then to run TensorFlow Lite inference on Cortex-A CPUs, Neon backend interacts with Arm Compute Library which optimizes ML workloads for Arm hardware. The library offers the best performance compared to other open-source options with immediate support for new Arm technologies.
Although Arm NN allows you to run your model efficiently without any modification across Arm based hardware, it does not support all operators available in TensorFlow Lite (TFLite). Therefore, you would need to write custom code for those unsupported operators in your neural network model.
The Arm NN TensorFlow Lite Delegate on the other hand allows TensorFlow Lite users to harness the power of both TensorFlow Lite and Arm NN and enables greater performance and operator coverage.
To get started with Arm NN Delegate and try the acceleration of Arm NN TensorFlow Lite Delegate, a Raspberry Pi 4 Model B development board based on Arm Cortex-A processor is needed. Raspberry Pi 4 Model B has a quad-core Cortex-A72 processor with TensorFlow Lite support. You can accelerate any TensorFlow Lite model on Raspberry Pi 4 by integrating Arm NN delegate into your TensorFlow Lite interpreter.
Set up Raspberry Pi 4Before starting to work with your Raspberry Pi computer, you need to install an operating system on your Raspberry Pi, and we recommend a Raspberry Pi OS. The Raspberry Pi OS is the official operating system for a Raspberry Pi available in 32-bit version and 64-bit versions. The 64-bit version is in development and improves the overall performance on a 64-bit processor. Both versions are based on Debian with better performance compared to Ubuntu.
Follow these instructions to set up your Pi 4:
- Download and install the Raspberry Pi imager for your operating system.
- Download the 64-bit version of the Raspberry Pi OS and extract the zip file.
For the best ML performance 64-bit OS is recommended.
- Insert your SD card into your computer.
- Launch Raspberry Pi Imager.
- Select “CHOOSE OS” and scroll down and click “use custom”
- Select Raspberry Pi OS (64-bit) you downloaded before
- Select “CHOOSE STORAGE” and open the microSD card you have inserted (here we used 32 GB)
- Select “WRITE” and verify the SD Card. The Installation will take a few minutes depending on your internet and SD card speed.
Once it is done, insert the SD card into your Raspberry Pi and configure Raspberry Pi OS with setting up a new username and password, your country and keyboard language, and finally your Wi-Fi details.
Note: The default ‘pi’ user is being removed with the latest RPi OS released so you will need to create a new user when booting a Raspberry Pi OS image.
Install Dependencies and Download Arm NN TensorFlow DelegateThe Arm NN Delegate pre-built binaries can be installed through the Arm NN repository and integrated into your TensorFlow Lite project quickly.
- Run the
apt updateandapt upgradecommands to ensure all packages are the latest versions:
$ sudo apt update
$ sudo apt upgrade- Install the required packages that build and install the TensorFlow Lite runtime with Arm NN support.
$ sudo apt-get install git wget unzip zip python python3 python3-pip- Install the TensorFlow Lite runtime package from source, which is smaller, simplified Python package. It includes the bare minimum code required to run inference with TensorFlow Lite.
$ pip3 install --extra-index-url https://google-coral.github.io/py-repo/ tflite_runtime==2.8- Download the pre-built binaries for Arm NN 22.05 for 64-bit Arm systems. The following commands download version 22.05.01 of the Arm NN binaries and place them into a directory called ArmNN-aarch64:
$ wget -O https://github.com/ARM-software/armnn/releases/download/v22.05.01/ArmNN-linux-aarch64.tar.gz mkdir ArmNN-aarch64 tar -xvf ArmNN-aarch64.tgz -C ArmNN-aarch64Image classification refers to classifying the image by assigning it to a specific label. TensorFlow Lite provides several pre-trained image classification models that perform efficiently on edge devices. The MobileNet model is one of the most popular pre-trained models for on-device image classification inferencing that proposes the fastest performance and smallest size compared to other popular image classification models such as VGG 16 and GoogleNet. The model architecture uses depth wise separable convolution layers which have less parameters and fewer operations compared to the standard CNNs and makes deeper architecture possible for resource-constrained embedded devices. There are three available versions of pre-trained MobileNet in TensorFlow Model Garden and the model's performance and accuracies are summarized in terms of MACs (Multiply-Accumulates). You can choose the right model to fit your latency and size budget from the available pre-trained model.
In this guide, we are going to use MobileNet V1 trained on the input image size of 224 x 224 with 3 color channels per pixel. The model outputs a single vector that has probabilities of the image representing each of the types of categories it was trained in. For example, an output of dog image might be as follows:
+---------------------------+---------------------------+
|      Type                 |      Probability          |
+===========================+===========================+
|    German Shepherd        |        0.06               |
+---------------------------+---------------------------+
|    Bulldog                |        0.04               |
+---------------------------+---------------------------+
|    Alaskan Malamute       |        0.91               |
+---------------------------+---------------------------+
Note that, if the model cannot recognize the image confidently to each class, the model will output the distributed probabilities throughout the labels without any one value being significantly larger.
There are also optimized versions of MobileNet model in TensorFlow Model Garden. These models are optimized for inferencing on embedded devices and offer the fastest performance and smallest size at the expense of accuracy. The trade-off between model accuracy and size should be considered during the application development process. For further information on the compression benefits versus accuracy loss using optimization techniques, please visit this blog post.
Steps of Inferencing MobileNet V1 using Arm NN Delegate:
The following steps describe how to accelerate MobileNet V1 inference on Raspberry Pi by integrating Arm NN TensorFlow Lite Delegate into TensorFlow lite interpreter.
- Download a sample image and corresponding label mapping to feed into the model for classification
$ curl https://raw.githubusercontent.com/tensorflow/tensorflow/master/tensorflow/lite/examples/label_image/testdata/grace_hopper.bmp > grace_hopper.bmp$ curl https://storage.googleapis.com/download.tensorflow.org/models/mobilenet_v1_1.0_224_frozen.tgz | tar xzv –C ./ mobilenet_v1_1.0_224/labels.txt- Download the tflite MobileNet V1 model
$ mkdir models && cd models
$ wget http://download.tensorflow.org/models/mobilenet_v1_2018_08_02/mobilenet_v1_1.0_224.tgz
$ tar -xvf mobilenet_v1_1.0_224.tgzNote: To use different input image size or quantized version of the model, right click on the model, copy the model link from the available pre-trained models, and then replace the model link with the new link in the above command.
You can also use your own tflite image classification model that takes greyscale or RGB input image and outputs probabilities of each class in a single vector.
Copy libarmnn.so and libarmnnDelegate.so libraries into your project directory
$ cp ~/ArmNN-aarch64/libarmnn.so.29 .
$ cp ~/ArmNN-aarch64/libarmnnDelegate.so.26 .
Note: These binaries are for Raspberry Pi 64-bit OS.
- Run an image classification inference with Arm NN TensorFlow Lite Delegate by running the following python snipped codes.
# Loading Arm NN Delegate binary
armnn_delegate = tflite.load_delegate('./libarmnnDelegate.so.26',
 options={"backends": "CpuAcc, CpuRef ", "logging-severity": "info"})
Building the interpreter with Arm NN delegate and loading the .tflite model into memory.
# Enabling Delegate with experimental parameter
interpreter = tflite.Interpreter(model_path='models/mobilenet_v1_1.0_224.tflite',experimental_delegates=[armnn_delegate])Allocating model input and output tensors in memory.
interpreter.allocate_tensors()Setting input and output tensor values from the model. The get_input_details() method returns model information such as width and height of the input image which here is 224x224
input_details = interpreter.get_input_details()
output_details = interpreter.get_output_details()
height = input_details[0]['shape'][1]
width = input_details[0]['shape'][2]
Reading and resizing the input image data according to the trained model input shape
img = Image.open('grace_hopper.bmp').resize((width, height))
input_data = np.expand_dims(img, axis=0)
Invoking the interpreter to execute the model and classify the image. Note that the first invoke is for the warmup and tensor allocation and the values are defined before the first invoke.
interpreter.invoke()Interpreting output by mapping the class probabilities to relevant categories
output_data = interpreter.get_tensor(output_details[0]['index'])There may be a minor accuracy tradeoff associated with using Arm NN delegate. TensorFlow Lite provides a tool to evaluate the accuracy of your image classification model with delegate and without delegate on ILSVRC image-based task.
You can find the complete code here.
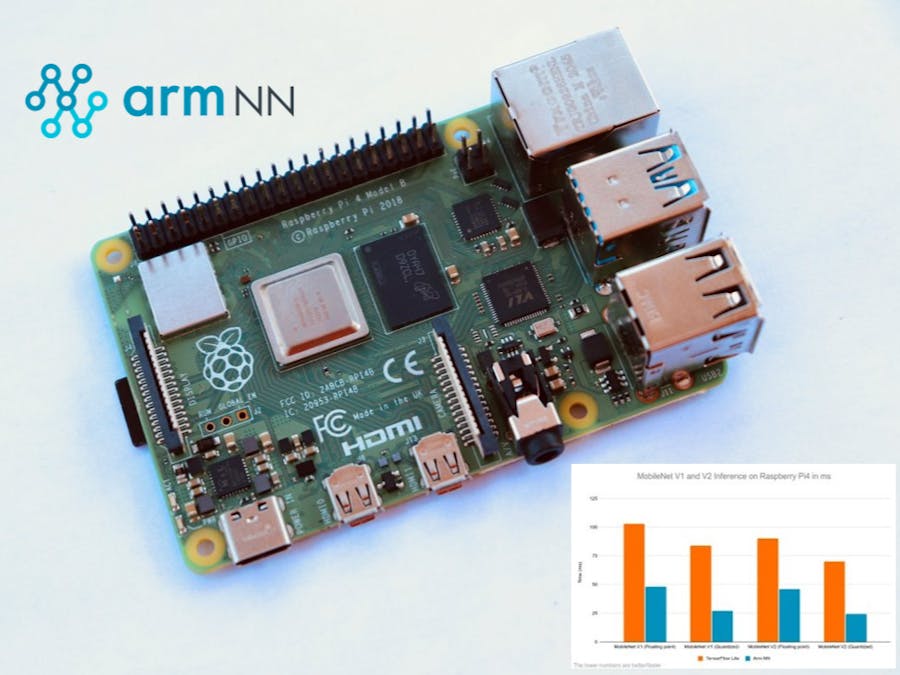
Performance Benchmarks with the Arm NN DelegateThe performance benchmarks of the MobileNet V1 and V2 are measured in terms of the amount of time it takes for the model to run inference on Raspberry Pi 4 64-bit. The lower the time, the faster the model. The full size MobileNet V2 on image size 224 uses~300million MACs with accuracy of 71.8%while MobileNet V1 uses ~569 million MACs with accuracy of 70.1%. You can get faster inference and better accuracy with MobileNet V2 compared to MobileNetV1.
These benchmarks are collected with Arm NN Delegate vs TensorFlow Lite by running interference for two warm up iterations. Note that, the first inference time is slow
+--------------+-----------------------------+----------------------------+
|              |  TensorFlow Lite Delegate   |      Arm NN Delegate       |
+     Model    +-----------------------------+----------------------------+
|              |Floating point | Quantized   |Floating point  | Quantized |
+==============+===============+=============+================+===========+
| MobileNet V1 |  102.89ms     |  83.80ms    |   48.16ms      |  26.99ms  |
+--------------+---------------+-------------+----------------+-----------+
| MobileNet V2 |  89.96ms      |  69.89ms    |    46.08ms     |  24.29ms  |
+===========================+=============================================+The results that are achieved for MobileNet V1 model with floating point and 8-bit precision have the same behavior as MobileNet V2. However, MobileNet V2 has a slightly better performance compared to MobileNet V1 with and without Arm NN Delegate. For example, the TensorFlow Lite MobileNet V2 model’s performance ranges from 24.29ms to 89.96ms and the TensorFlow Lite MobileNet V1 model’s performance ranges from 26.99ms to 102.90ms.
As you can see, both models with floating point precision are about 2x faster using Arm NN Delegate, and the performance benchmark of the quantized models is about 3x faster with Arm NN Delegate. This shows that quantized versions of both MobileNet V1 and V2 have the best performance with Arm NN Delegate compared to floating points.
ConclusionIn this blog, we introduced the Arm NN TensorFlow Lite Delegate and learned how to integrate Arm NN Delegate with the TensorFlow Lite python package in just one extra step. Finally, we showed some benchmarks achieved by comparing TensorFlow Lite and Arm NN Delegate on Raspberry Pi 64-bit. These benchmarks show that the Arm NN Delegate offers the best performance compared to default TensorFlow Lite backend. Therefore, if your application requires the best ML inferencing performance, we recommend you use quantized version of your model on a 64-bit version of Raspberry Pi OS.
Try Arm NN Delegate for yourself and update your existing ML applications on Raspberry Pi with just one line code change!
You can also try this out on other Arm Cortex-A based boards with some popular ML models such as YOLO, Wave2Letter, and DS-CNN. All three of these models can be found on the Arm ML-Zoo.
For further resources and information about Arm NN, visit https://github.com/ARM-software/armnn.


Comments