

Hardware components | ||||||
 |
| × | 1 | |||
 |
| × | 1 | |||
 |
| × | 1 | |||
| × | 1 | ||||
| × | 1 | ||||
| × | 1 | ||||
| × | 1 | ||||
| × | 1 | ||||
| × | 1 | ||||
 |
| × | 1 | |||
 |
| × | 1 | |||
Pediatric urologists, pediatric surgeons, and children’s hospitals represent the primary stakeholders for this device, as they routinely manage procedures that require precise, reliable, and reproducible tissue positioning. Across these clinical environments, devices that offer rapid deployment, consistent performance, and ease of cleaning are valued because they reduce setup burden and increase surgical workflow efficiency. Solutions that also enable fine positional adjustments provide an added benefit, particularly in pediatric cases where anatomical structures are smaller and more delicate, making precision even more essential.
From a broader market perspective, the total addressable market (TAM) can be estimated from the annual volume of pediatric surgeries in the United States and Europe, totaling approximately 13 million procedures. Assuming that roughly 30% of these procedures could involve an assistive device of this type, the TAM corresponds to ~3.9 million uses, translating to an estimated $390M USD annual market assuming a ~$100 disposable. The serviceable available market (SAM) narrows to dedicated pediatric surgical centers, representing roughly 80% of pediatric surgical volume, or $312M USD. With a conservative serviceable obtainable market (SOM) of 3%, the near-term revenue opportunity is approximately $9.36M USD. (Agency for Healthcare Research and Quality, Eurostat)
These estimates highlight that even a modest penetration of specialized pediatric surgical environments offers a viable commercial pathway, supporting both disposable and reusable form factors depending on sterilization requirements. The market analysis also reinforces a consistent theme across stakeholder priorities: solutions must integrate seamlessly into existing workflows, minimize time between cases, and maintain reliability regardless of operator.
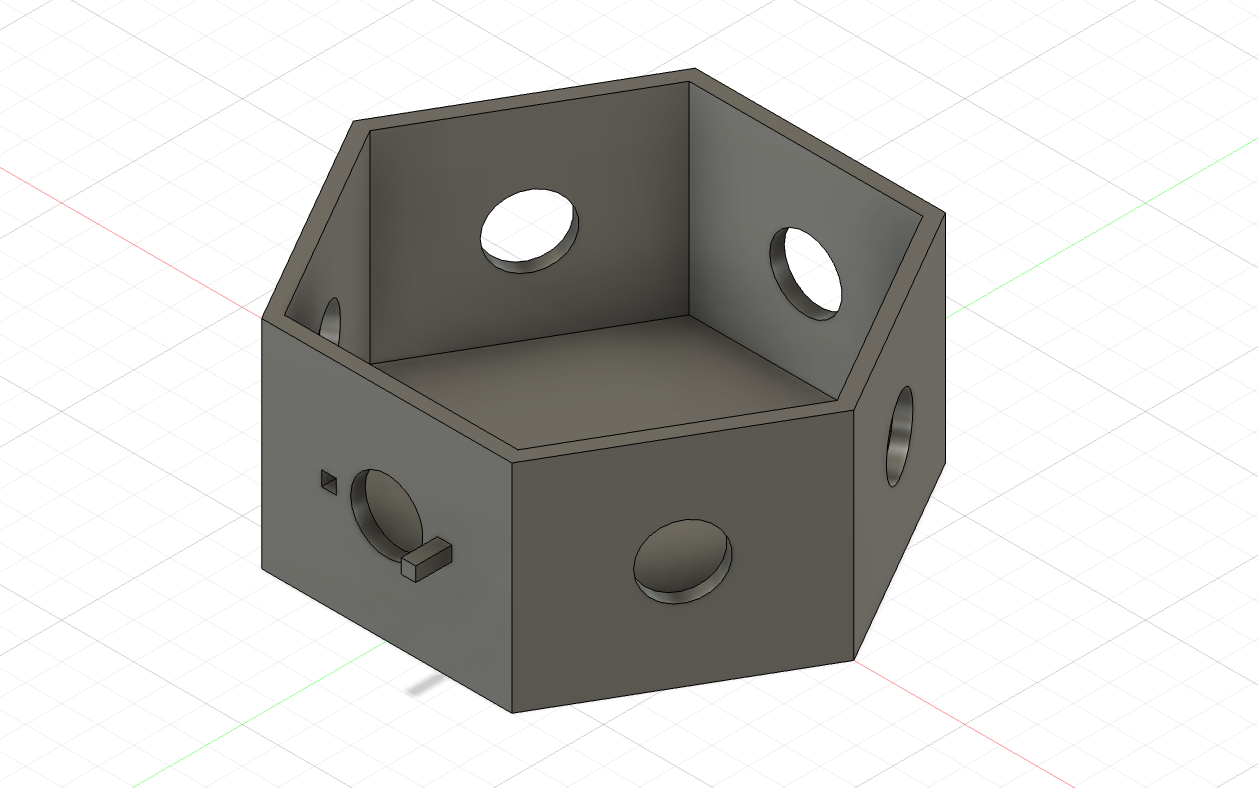
Our concept draws inspiration from a familiar system, a pin-style impression board. (Figure 1.) This would conform the surface around a user’s form. Translating these ideas to the surgical environment led us to envision a surface composed of independently inflatable hexagonal units, a dynamic “shape-shifting” support that conforms to a patient’s body and can be modified with precision at any time.
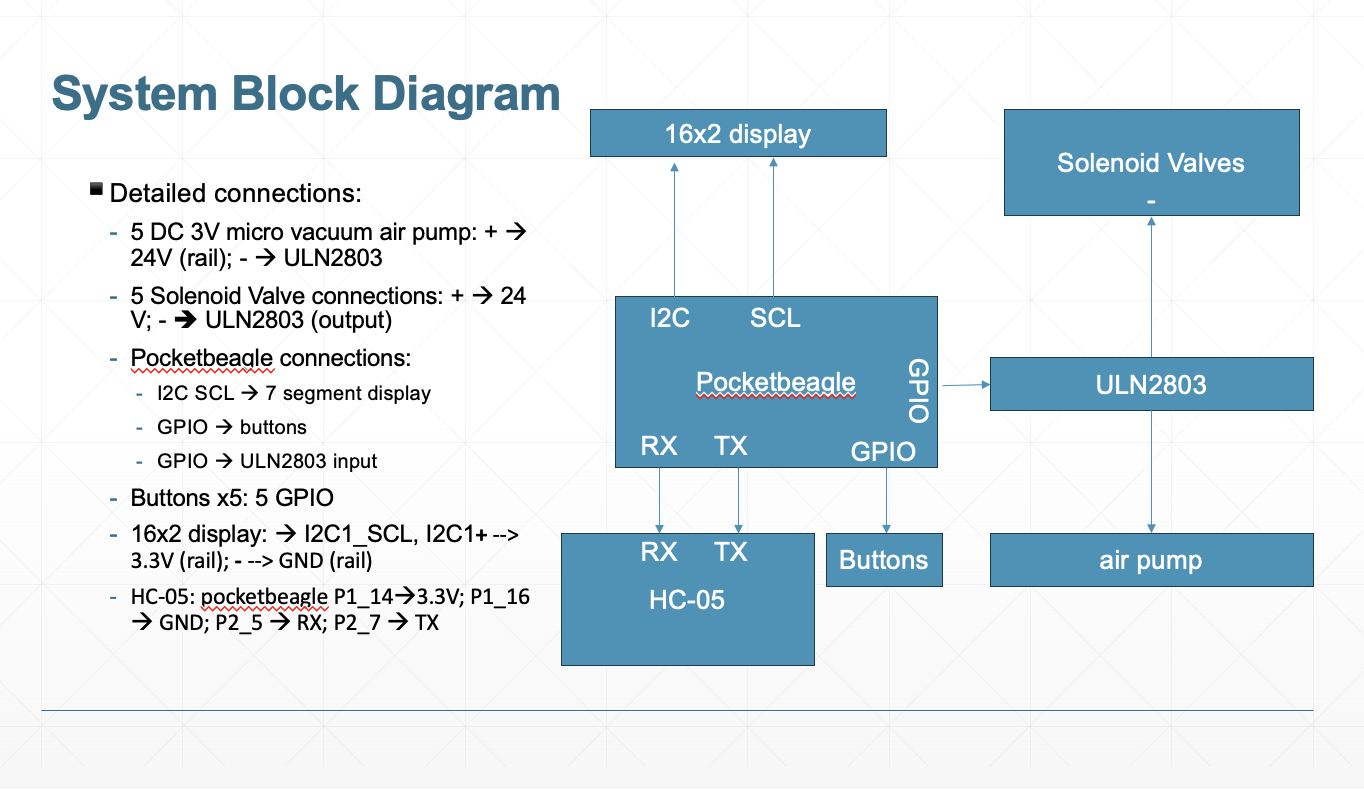
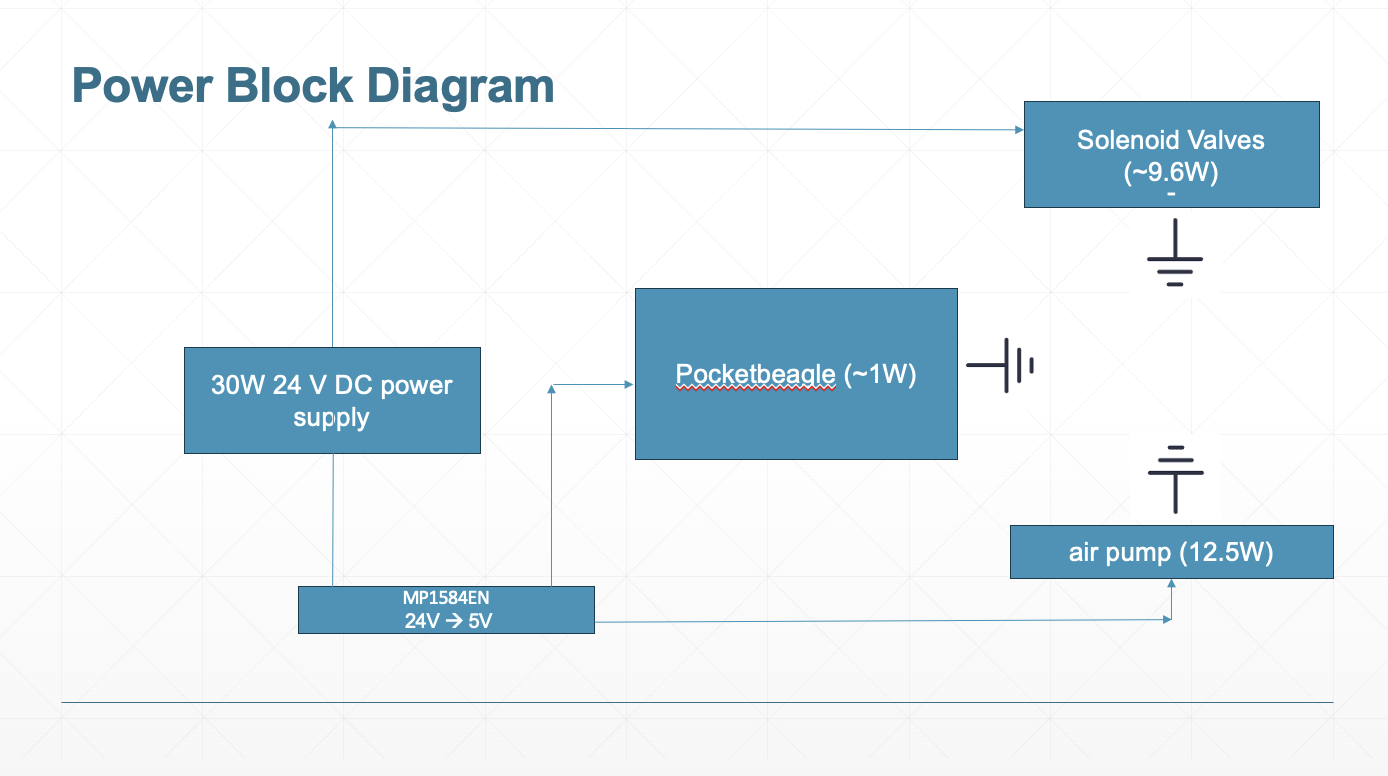
HexaForm uses an air pump and an array of solenoid-controlled air chambers to rapidly inflate/deflate specific geometric segments (a hexagonal layout), allowing clinicians to fine-tune patient position with button-press control. It is powered by a 24V supply, controlled by a PocketBeagle microcomputer, and driven through a ULN2803 transistor array that safely interfaces the pumps and valves.
To make the system intuitive, the clinician will be able to control the system via Bluetooth. A Bluetooth dongle communicates with the PocketBeagle, letting the user send inflate/deflate commands remotely. This is useful for prototyping, user studies, or demonstrating the physical system without touching the sterile field. For system visualization, a 16×2 character LCD is used for user feedback and basic diagnostics.
HexaForm is designed with clinical usability in mind: fast setup, rapid response, and robust electronics that integrate safely with the 24V actuation system.
By combining pneumatic actuation with electronic control, this platform aims to replace static supports with a responsive, geometry-configurable surface that improves ergonomics for surgeons and comfort for patients, while also reducing setup time. Ultimately, the motivation for this project is the opportunity to modernize and streamline intraoperative positioning through accessible, modular, and technology-forward design.
Build InstructionsPower SystemThe power system utilized by this solenoid valve was 24V, while the pump and the microcontroller utilize 5V. To accomodate this, I had to step down the 24V to 5V with a buck converter, ensuring that all of the grounds are tied together.
Electronics and Control HardwareFirst, I installed the ULN2803 driver by connecting the PocketBeagle GPIO pins to the ULN inputs and routing the pump/solenoid negatives to the ULN outputs. Then, I connected the SDA/SCL lines to the PocketBeagle and supplied them with 5V from the PocketBeagle's VIN. I tried using the 3.3V supply first, but realized it was not enough power for the LCD screen to light up, so I switched to the 5V supply. Next, I set up the Bluetooth system by connecting the Bluetooth dongle through a USB-to-serial adaptor and wiring the adaptor’s TX/RX pins to the corresponding PocketBeagle UART pins for wireless UART communication.
I wired each micro vacuum pump so its positive lead drew power from the designated supply rail, while its negative lead passed through the ULN2803, giving us clean, switchable control from the PocketBeagle. The solenoid valves followed the same logic, where each one tapped directly into the 24-volt rail for power, with its return line routed through a ULN output so the system could open or close airflow on command. With the electronics in place, I connected the air system by running tubing from each chamber to its matching solenoid valve and pump channel so every hexagon could inflate or deflate independently.
Here is the working prototype of my project! I was able to get the pocket beagle to turn on the air pump and change the display, but since the bluetooth is not working yet, I am inputting the pump and solenoid's ON/OFF system through the pocketbeagle Cloud9 itself.
One of the biggest failures I encountered was when I accidentally wired the ULN2803 incorrectly, switching the COM pin and VCC. Because of that, the 24V line from the solenoid ended up feeding straight into the PocketBeagle’s 3.3-volt rail, and the board instantly died. That was the moment I learned how important it is to double-check power domains, label wires, and avoid mixing high voltage with a tiny microcontroller unless there’s proper isolation. Next time, I’d recommend using lower-voltage solenoid valves to make the whole setup safer.
The second failure was with the Bluetooth system. I tried to use a USB Bluetooth dongle connected through an adapter to the PocketBeagle’s UART pins. I was able to connect the Bluetooth to my computer, but it would soon disconnect after a couple of seconds. I will continue to troubleshoot this and try to have a working module as my next step.
Future StepsLooking ahead, I plan on integrating the CAD 3D printed hardware with the actuation system and testing different materials so that we don't have any air leakage, and the system is able to go up and down without fail. Our team will also advance the Bluetooth subsystem by building a dedicated mobile app that enables wireless actuation, preset inflation patterns, and real-time feedback, bringing the system closer to a clinically usable, user-friendly platform.


Comments