


Hardware components | ||||||
| × | 1 | ||||
 |
| × | 1 | |||
 |
| × | 1 | |||
 |
| × | 6 | |||
_zhWsCcSEcl.jpg?auto=compress%2Cformat&w=48&h=48&fit=fill&bg=ffffff) |
| × | 1 | |||
| × | 1 | ||||
 |
| × | 2 | |||
Software apps and online services | ||||||
| ||||||
 |
| |||||
Hand tools and fabrication machines | ||||||
 |
| |||||
 |
| |||||
 |
| |||||
Ever since I was little, I've been fascinated with the infamous 1998 smash-hit toy Furby. After becoming fixated on the Sony AIBO, I quickly found a vast selection of blogs that mentioned both AIBO and Furby -- the rest is history. A lot of people are sort of intimidated by Furby, and I don't blame them. I decided to tap into this reputation to scare people into completing their everyday tasks with a calendaractivated Furby. Worry about missing important events no more -- an eldrich beast's got your back!
The Physiology of FurbyThe majority of my time was spent reverse-engineering Furby and getting to the bottom of how it works. I had a couple of leads -- first, my previous experience with Furby as a user, and the fact that the daughterboards were conveniently seated on the outside of the unit.
Furby's sensors are:
- IR send/recieve
- Light sensor
- Sound sensor
- Back sensor
- Tilt/motion sensor
All of them are off-the-shelf components you can find in a typical Arduino kit. The EEPROM is located underneath the motor assembly and labelled 93LC46, but it's covered in epoxy and so far no-one has found success prying it off.
Speaking of the motor assembly, it's probably the most interesting part of Furby. All of Furby's intricate motions, including moving ears, eyes, mouth, and shifting forward and back are driven by one low-power motor that you can easily hack. This is our in!
Arguably, Furby's most crucial components are its brains. Yeah, brains, plural. There are two daughterboards at the back of the unit. The larger one is the main processor, and the smaller one is a Texas Instruments speech synthesizer. My initial plan was to totally rip out these processors and jump onto their pins to send in my own inputs, but this wasn't successful.
I tried desoldering the boards with a solder sucker and solder wick, which was a completely lost cause. Eventually I gave up and decided to rip the boards directly out of the bottom of the Furby, which, miraculously, worked!
Unfortunately, my luck ended here. With Furby lobotomized, I still had to reheat the extremely cheap, 2 decade old solder to be able to add my own leads, and this is where I promptly burned through two important pads.
At least we got some schematics out of it! These are based on my own testing for the sake of my project, but later on I learned that there have been similar schematic efforts made in the past. Please test your own Furby before making any crazy changes, because there are slight manufacturing differences depending on year of production and factory.
As it turns out, the mostly handmade, definitely jank nature of the Furby would make the project possible.
Preparing your Furby- Remove the fur of your Furby and unscrew the outer "shell". The exact method you use to do this does not matter -- they are all the same. Please refer to any of the dozens of tutorials online!
- Locate this plastic clip on the side of the unit connected to two wires. These are the leads for motor power.
- Unclip it. Be careful not to let the spring from underneath the top half of the Furby body slip out. Make sure there are no batteries in the unit.
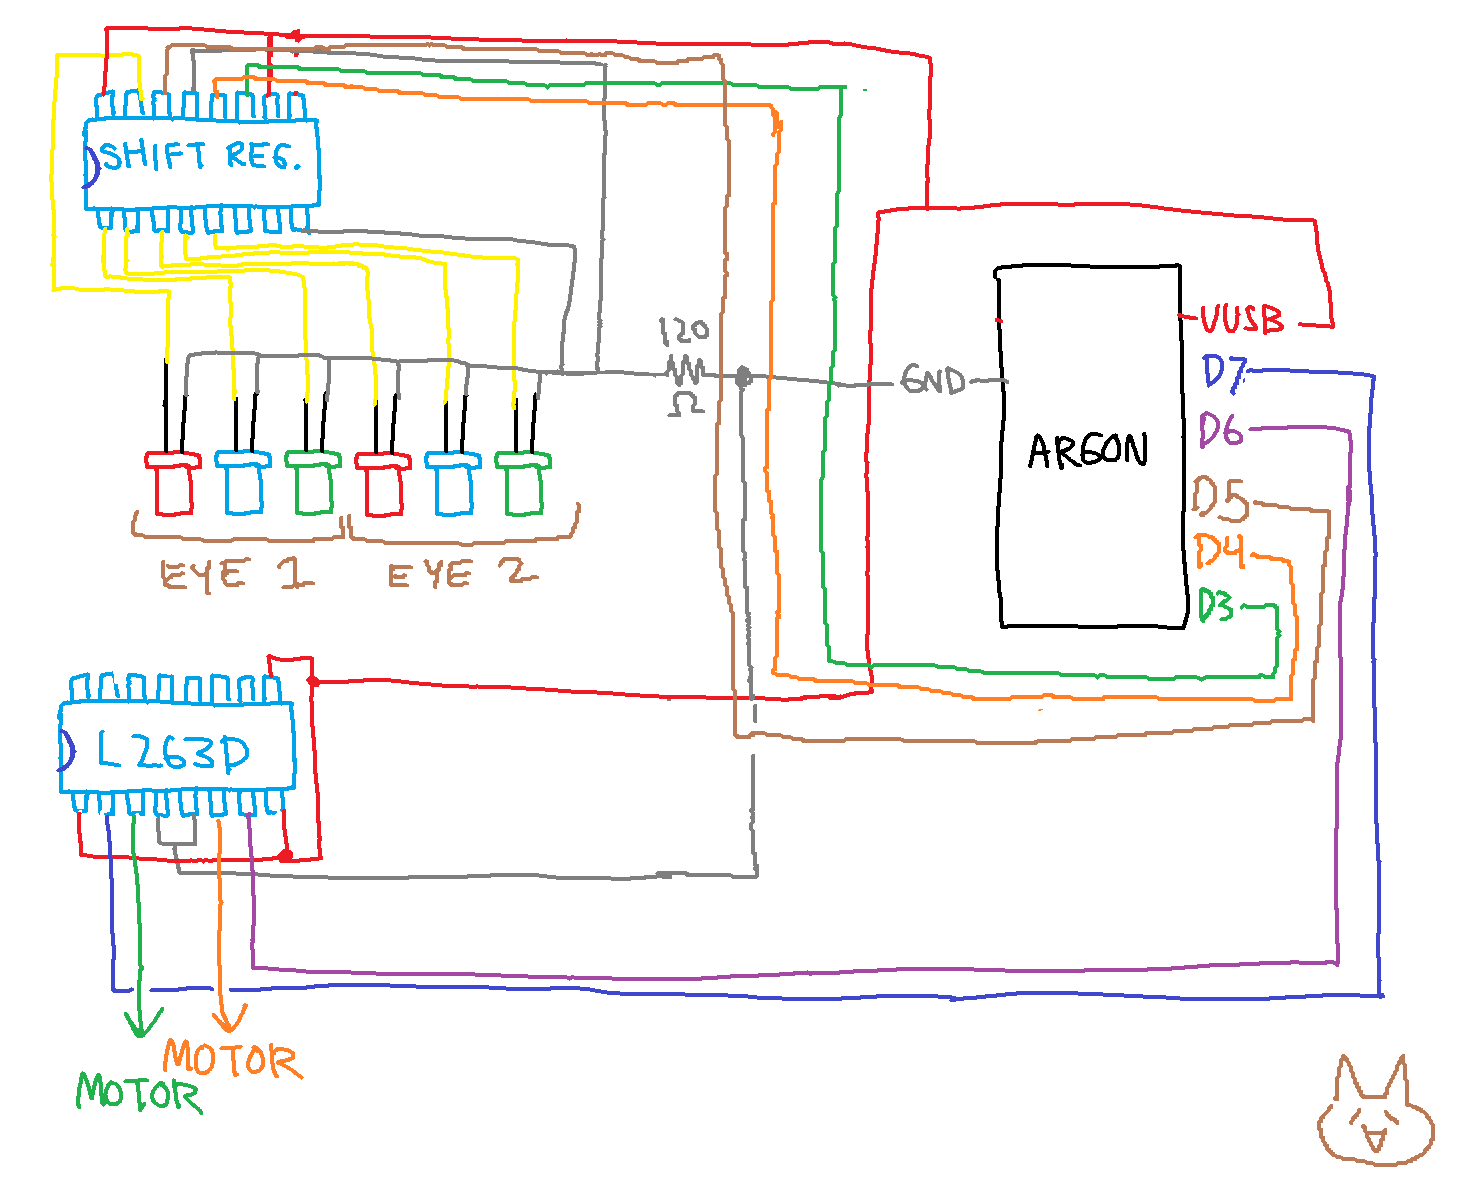
For this project, we're going to make 3 separate 'pieces' -- the eye LEDs, the motor control, and the control of the eye LEDs.
Let's start with the motor control. We will use one side of the L293d motor driver and plug the output pins into the plastic casing of the connector.
I decided to put mine on a piece of perfboard. Sorry for the low quality of the rest of these images. I stabbed myself on a pin and my phone didn't recognize my finger through the band-aid, so these were pretty guerilla.
From the upper side, this is what it looks like. You should connect the input pins to digital pins on your microcontroller and the power and ground with their respective pins.
For the LEDs, I simply wired 3 LEDs together in parallel with a 220 ohm resistor. These are intended to be placed behind the eyes.
The positive ends of these LEDs are, in turn, connected to an 8-bit shift register.
Now, let's connect our monstrosity to the internet. We will use the Google Calendar API to monitor our calendar for new events, and when an event begins on the calendar, the Furby will begin to move and its eyes will turn on in one of 3 colors. The code will look for a keyword in the event -- either 'notif', 'info', or 'alert', to select the eye color.
int motorPin1 = 6;
int motorPin2 = 7;

// define pins for shift register
int dataPin = 3;
int latchPin = 4;
int clockPin = 5;

void setup() {

    // configure pins for shift register
    pinMode(dataPin, OUTPUT);
    pinMode(latchPin, OUTPUT);
    pinMode(clockPin, OUTPUT);

    //subscribe to alert IFTTT trigger
    Particle.subscribe("alert", alertHandler);

    // subscribe to alert IFTTT trigger
    Particle.subscribe("notif", notifHandler);

    // subscribe to alert IFTTT trigger
    Particle.subscribe("info", infoHandler);

    pinMode(motorPin1, OUTPUT);
    pinMode(motorPin2, OUTPUT);

}

void loop() {

    // hi

}


void alertHandler(const char *event, const char *data){
    for (int i = 3; i--; i == 0) {
        digitalWrite(latchPin, LOW);
        shiftOut(dataPin, clockPin, MSBFIRST, 36);
        delay(1000);
        digitalWrite(latchPin, HIGH);
        digitalWrite(motorPin1, LOW);
        digitalWrite(motorPin2, HIGH);
        delay(1000);
        digitalWrite(latchPin, LOW);
        digitalWrite(motorPin2, LOW);
    }

}

void notifHandler(const char *event, const char *data){
    for (int i = 3; i--; i == 0) {
        digitalWrite(motorPin1, HIGH);

        digitalWrite(latchPin, LOW);
        shiftOut(dataPin, clockPin, MSBFIRST, 18);
        delay(1000);
        digitalWrite(latchPin, HIGH);
        digitalWrite(motorPin1, LOW);
        digitalWrite(motorPin2, HIGH);
        delay(1000);
        digitalWrite(latchPin, LOW);
        digitalWrite(motorPin2, LOW);
    }

void infoHandler(const char *event, const char *data){
    for (int i = 3; i--; i == 0) {
        digitalWrite(motorPin1, HIGH);

        digitalWrite(latchPin, LOW);
        shiftOut(dataPin, clockPin, MSBFIRST, 9);
        delay(1000);
        digitalWrite(latchPin, HIGH);
        digitalWrite(motorPin1, LOW);
        digitalWrite(motorPin2, HIGH);
        delay(1000);
        digitalWrite(latchPin, LOW);
        digitalWrite(motorPin2, LOW);
    }


}
Because we're using a Particle device, we'll use Particle.subscribe(); to look for the webhook response.
This is optional, but you can use an IFTTT trigger to set up the webhook.


Comments