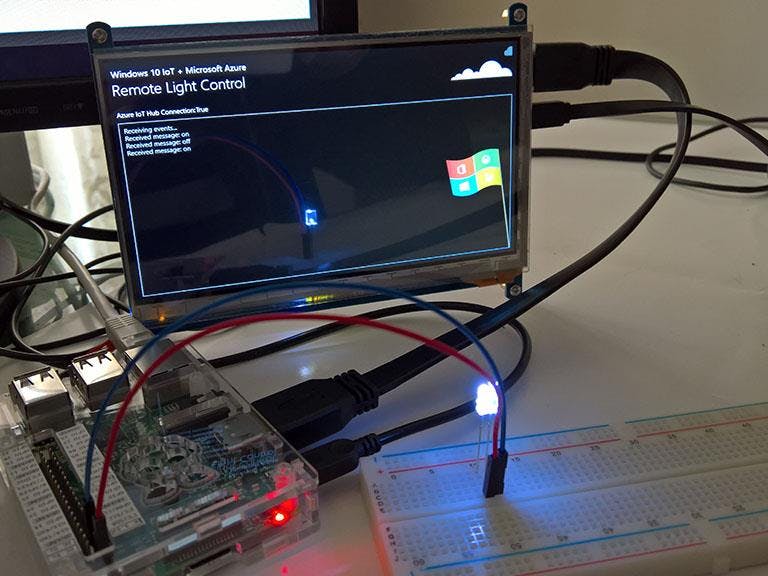
For those who have watched the "Big Bang Theory", you would probably remember that those physicists build an Internet controlled lamp. The signal send from their laptop traveled around the world and come back to their house to light up the lamp. Now, with Windows 10 IoT Core and Microsoft Azure, we could also achieve the same thing on a Raspberry Pi 3.
First, I strongly recommend you to read these 2 Azure documents first:
Get started with Azure IoT Hub for .NET
https://azure.microsoft.com/en-us/documentation/articles/iot-hub-csharp-csharp-c2d/
1. Create an Azure IoT Hub and Register the DevicePlease refer to the document Get started with Azure IoT Hub for .NET to create an IoT Hub. The process is same.
For registering the device, I found an easy way. There is a tool by Microsoft here https://github.com/Azure/azure-iot-sdks/tree/master/tools/DeviceExplorer
After download and install. Copy your IoT Hub connection string and paste it into the main tab. Then hit "Update" button.
You can find the connection string in your Azure portal. The key parameters needed are:
Hostname,SharedAccessKeyName,SharedAccessKey
The connection string format is:
HostName=YOURIOTHUBNAME.azure-devices.net;SharedAccessKeyName=iothubowner;SharedAccessKey=YOURKEY
Then go to "Management" tab, click "Create", enter your device name for your Raspberry Pi 3 and select "Auto Generate Keys"
After the registration, you would see the result listed in the grid view.
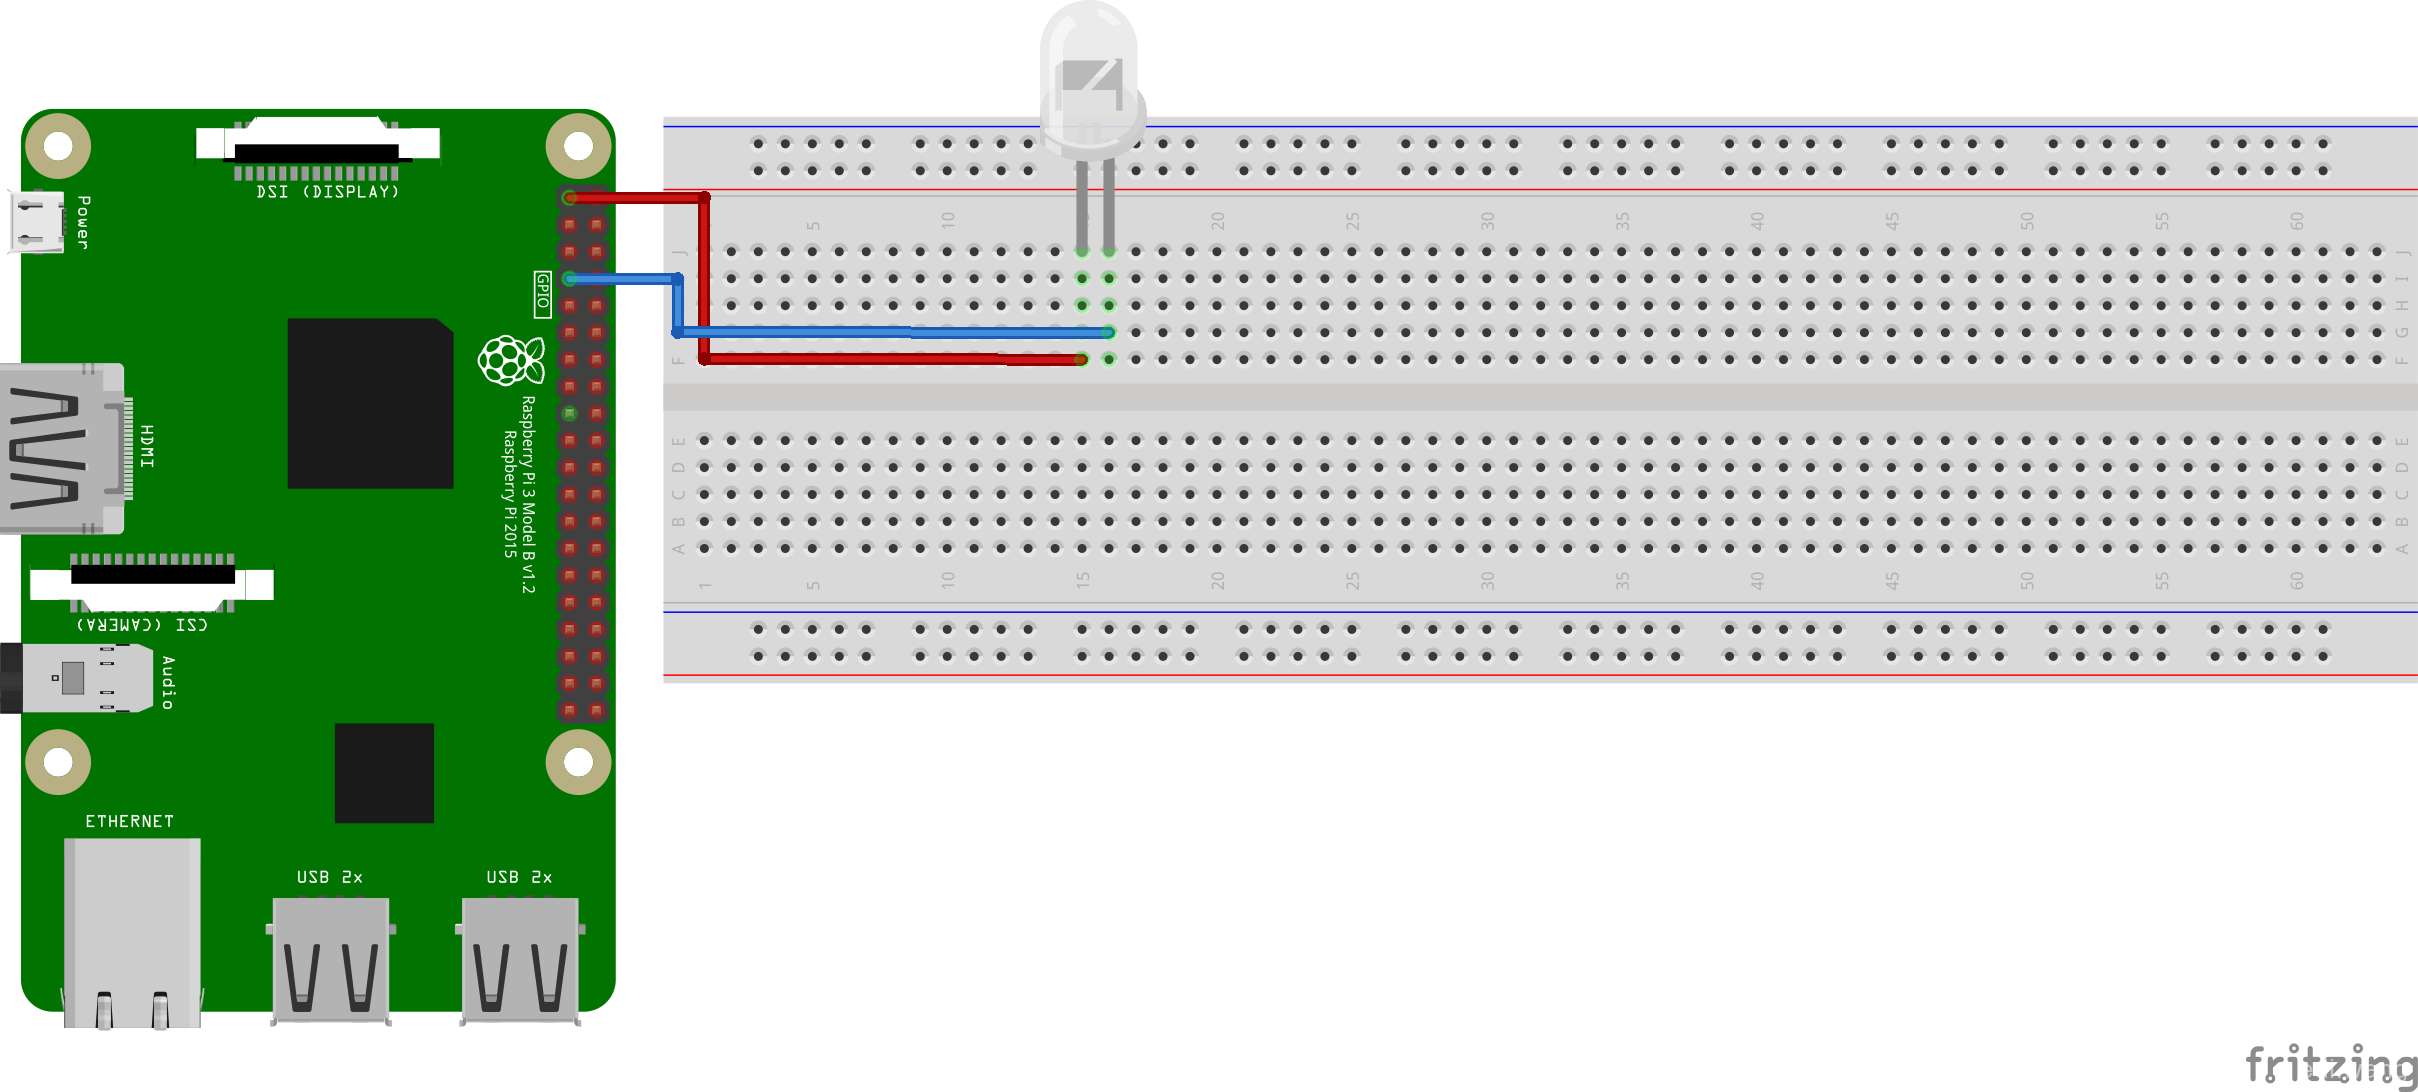
2. Physical Connection on the PiRequired Items: 1 LED, 2 Jump Wires.
Connect the long leg of LED to DC3.3V, short leg to GPIO 04. Please be careful if your LED is not standard 3.3V, you will need to put a resistor to it.
After the connection, it looks like this:
We need 2 projects. One is for running on the Raspberry Pi, as a signal receiver, seeking messages coming from Azure and switch the LED. Another is for running on your PC, as a controller to send message to Azure.
The project structure looks like:
Raspberry Pi Project
Use Visual Studio 2015 to create a new UWP project, for example "AzureRemoteLight", add reference to "Windows IoT Extensions for the UWP"
Install this package from NuGet:
"Microsoft.Azure.Devices.Client": "1.0.5"
BTW, recommend to update Json.NET to the latest version, which is now:
"Newtonsoft.Json": "8.0.3"
I also use MVVMLight and Edi.UWP.Helpers, these are not necessary, just make the code looks cooler. My project.json:
{
  "dependencies": {
    "Edi.UWP.Helpers": "1.0.11",
    "Microsoft.Azure.Devices.Client": "1.0.5",
    "Microsoft.NETCore.UniversalWindowsPlatform": "5.0.0",
    "MvvmLight": "5.2.0",
    "Newtonsoft.Json": "8.0.3"
  },
  "frameworks": {
    "uap10.0": {}
  },
  "runtimes": {
    "win10-arm": {},
    "win10-arm-aot": {},
    "win10-x86": {},
    "win10-x86-aot": {},
    "win10-x64": {},
    "win10-x64-aot": {}
  }
}
UI
As for switching the light, the UI won't be necessary. However, getting a UI will make your project looks cooler, so I make a simple UI like this:
There are 2 points in the UI: Azure IoT Hub Connection will show the connection status to Azure. CloudToDeviceLog is showing the operation details.
You can find the complete XAML code in the attachments.
ViewModel Code
First, we need to define the GPIO Controller and the PIN for the LED
#region GPIO Settings
public GpioController GpioController { get; }
public GpioPin LedPin { get; }
#endregion
And also, Azure IoT Hub Connection Properties
#region Azure IoT Hub Settings
public DeviceClient DeviceClient { get; }
public string IotHubUri { get; } = "YOURIOTHUBNAME.azure-devices.net";
public string DeviceKey { get; } = "YOUR DEVICE KEY";
public string DeviceId => "YOUR DEVICE NAME";
#endregion
You can find these properties under the "Management" tab in Device Explorer.
Finally, define 2 properties for showing on the UI.
#region Display Fields
private bool _isAzureConnected;
private string _cloudToDeviceLog;
public bool IsAzureConnected
{
    get { return _isAzureConnected; }
    set { _isAzureConnected = value; RaisePropertyChanged(); }
}
public string CloudToDeviceLog
{
    get { return _cloudToDeviceLog; }
    set { _cloudToDeviceLog = value; RaisePropertyChanged(); }
}
#endregion
In the constructor, initiate the GPIO controller and LED PIN.
public MainViewModel()
{
    DeviceClient = DeviceClient.Create(IotHubUri, new DeviceAuthenticationWithRegistrySymmetricKey(DeviceId, DeviceKey));
    GpioController = GpioController.GetDefault();
    if (null != GpioController)
    {
        LedPin = GpioController.OpenPin(4);
        LedPin.SetDriveMode(GpioPinDriveMode.Output);
    }
}
Then Create a method to send a message to Azure to ensure the connection is success.
public async Task SendDeviceToCloudMessagesAsync()
{
    try
    {
        var telemetryDataPoint = new
        {
            deviceId = DeviceId,
            message = "Hello"
        };
        var messageString = JsonConvert.SerializeObject(telemetryDataPoint);
        var message = new Message(Encoding.ASCII.GetBytes(messageString));
        await DeviceClient.SendEventAsync(message);
        Debug.WriteLine("{0} > Sending message: {1}", DateTime.Now, messageString);
        IsAzureConnected = true;
    }
    catch (Exception ex)
    {
        Debug.WriteLine(ex.Message);
    }
}
Don't forget to invoke the method in the MainPage.xaml.cs
public sealed partial class MainPage : Page
{
    private MainViewModel _vm;
    public MainPage()
    {
        this.InitializeComponent();
        _vm = this.DataContext as MainViewModel;
        Loaded += async (sender, args) =>
        {
            // send device connected message
            await _vm.SendDeviceToCloudMessagesAsync();
        };
    }
}
Running
IMPORTANT: PLEASE ENSURE YOUR SYSTEM TIME IS UP TO DATE ON THE RASPBERRY PI, OTHERWISE THE SAS TOKEN WILL EXPIRE.
Before running the application, switch to "Data" tab in the Device Explorer. Click "Monitor" to receive message sent from your Raspberry Pi to Azure.
Deploy your project by ARM/Remote Machine to your Pi. If you got a successful run, you will get the message in the Device Explorer:
Then we can continue coding.
In the ViewModel, create another method to receive message from Azure, and switch the LED on or off according to message content.
public async Task ReceiveCloudToDeviceMessageAsync()
{
    CloudToDeviceLog = "Receiving events...";
    Debug.WriteLine("\nReceiving cloud to device messages from service");
    while (true)
    {
        Message receivedMessage = await DeviceClient.ReceiveAsync();
        if (receivedMessage == null) continue;
        var msg = Encoding.ASCII.GetString(receivedMessage.GetBytes());
        CloudToDeviceLog += "\nReceived message: " + msg;
        if (msg == "on")
        {
            LedPin.Write(GpioPinValue.Low);
        }
        if (msg == "off")
        {
            LedPin.Write(GpioPinValue.High);
        }
        await DeviceClient.CompleteAsync(receivedMessage);
    }
}
The message I used is type of string, "on" means turn on the LED, "off" means turn off the LED.
And also, you need to execute this method in MainPage.xaml.cs
public sealed partial class MainPage : Page
{
    private MainViewModel _vm;
    public MainPage()
    {
        this.InitializeComponent();
        _vm = this.DataContext as MainViewModel;
        Loaded += async (sender, args) =>
        {
            // send device connected message
            await _vm.SendDeviceToCloudMessagesAsync();
            // receive remote light control events
            await _vm.ReceiveCloudToDeviceMessageAsync();
        };
    }
}
Now, run again your application. You should see the result from your Raspberry Pi Screen.
So far, the work on Raspberry Pi is complete.
The Controller Project
Create a WPF project, e.g. LightController, it can not be UWP, and add NuGet package "Microsoft.Azure.Devices". This package is not supporting UWP, that's why I have to create a WPF application instead.
Add 2 buttons in MainWindow for turn on and turn off the LED.
You can find the XAML UI code in the attachment.
Logic Code:
public partial class MainWindow : Window
{
    static ServiceClient serviceClient;
    static string connectionString = "YOU IOT HUB CONNECTION STRING";
    public MainWindow()
    {
        InitializeComponent();
        serviceClient = ServiceClient.CreateFromConnectionString(connectionString);
    }
    private async Task TurnLight(bool isOn)
    {
        await SendCloudToDeviceMessageAsync(isOn);
    }
    private static async Task SendCloudToDeviceMessageAsync(bool isOn)
    {
        var commandMessage = new Message(Encoding.ASCII.GetBytes(isOn ? "on" : "off"));
        await serviceClient.SendAsync("你的设备名称", commandMessage);
    }
    private async void BtnTurnOn_OnClick(object sender, RoutedEventArgs e)
    {
        await TurnLight(true);
    }
    private async void BtnTurnOff_OnClick(object sender, RoutedEventArgs e)
    {
        await TurnLight(false);
    }
}
The message send here is also type of string, consistent with the program on Raspberry Pi.
The IoT Hub Connection string used here are exactly the same you used in the main page of Device Explorer.
4. Trying OutBecause we got the controller and the client project, we need to start them together. In Visual Studio, right click on your solution, choose "property" and select multiple start up projects like this:
After starting the project. You will be able to control the light on your PC using the WPF application. And your Raspberry Pi will show the detail operation log on the screen.
Original Blog Post (Chinese) on my site:
http://edi.wang/post/2016/4/10/windows-10-iot-azure-remote-light


_Mka4Nfm6gI.jpg?auto=compress%2Cformat&w=40&h=40&fit=min&dpr=2)


_Mka4Nfm6gI.jpg?auto=compress%2Cformat&w=60&h=60&fit=min&dpr=2)


Comments