

Hardware components | ||||||
 |
| × | 1 | |||
 |
| × | 1 | |||
 |
| × | 1 | |||
 |
| × | 1 | |||
 |
| × | 1 | |||
Software apps and online services | ||||||
| ||||||
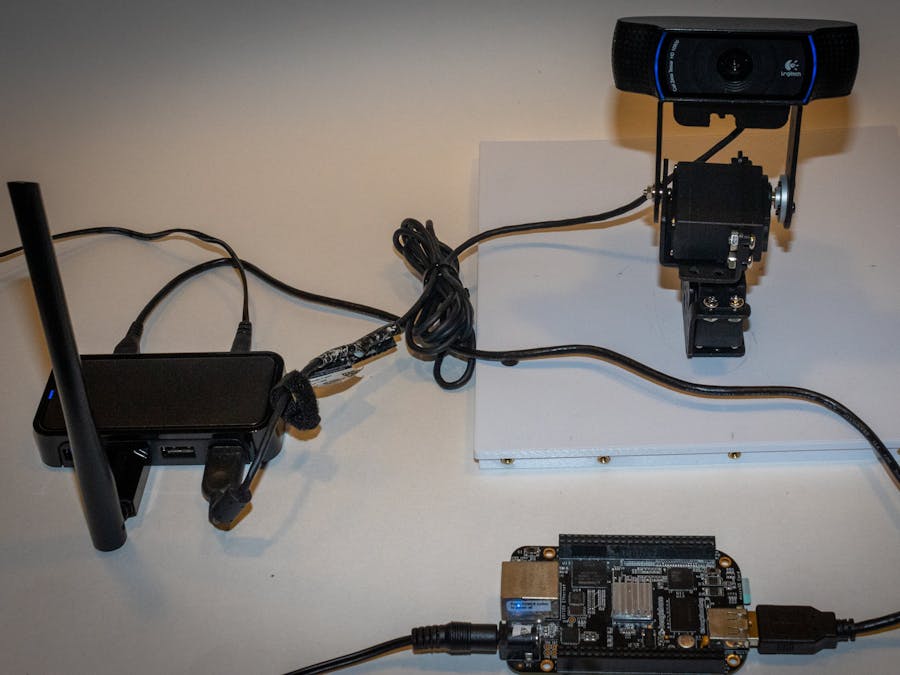
In this document we go over on how to add a USB HD camera to a BeagleBone Black. The live video will be streamed to either a Windows system or Linux system through the network with very small delay (in order to see real-time video and be used to control robotics systems for example). GStreamer, an open-source program, will be used to stream the video. The setup in this guide will use a small percentage of the CPU. GStreamer will be compiled from source code to enable the required features to make the small footprint requirement possible.
Where to use it:In many embedded systems projects, it’s desired to have remote vision of the project. For example, in projects related to UAV (Unmanned Aereal Vehicle), mobile robots, surveillance, or anything that requires low-latency remote vision. This guide provides a method that can be used to add video streaming capabilities to a system with low latency for real-time requirements. It also has low processing power requirements as can be seen in Figure 1, that even after managing a network connection, two SSH instances, fetching video feed from a USB webcam, and streaming it over the network, the BBB is utilizing less than half of its processor power. This project can be used in conjunction with my two previous projects in hackster.io to build a system that has Wi-Fi, video and UART capabilities.
To follow this guide successfully it's assumed that the following list has been gathered/followed prior to starting:
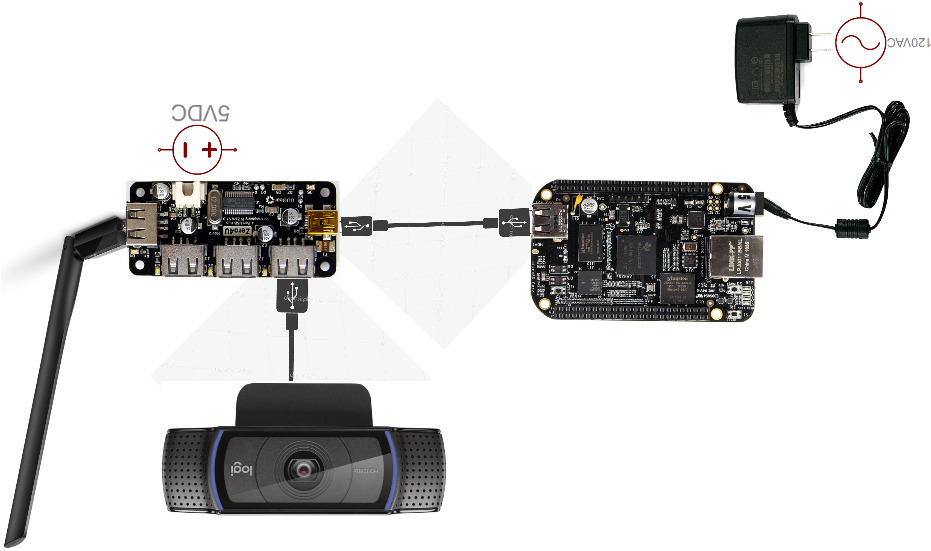
- BeagleBone Black powered through the barrel connector, 5V and at least 1A
- Webcam with internal H.264 encoder and UVC such as the older Logitech C920, Logitech C930e and others
- Second computer (host computer), it can be either a Windows or Linux Machine, it must be connected to the same network as the BBB
- Followed the instruction in the following link that I have posted in hackster.io: https://www.hackster.io/ederfernandotorres3/setup-beaglebone-black-with-device-tree-overlays-9e0ded
- OPTIONAL: If streaming though Wi-Fi is desired, follow the link that I have posted in hackster.io: https://www.hackster.io/ederfernandotorres3/8821au-wifi-card-and-bbb-22a7ac
- NOTE: If this project will be done using a USB Wi-Fi adapter, an externally powered USB hub will be needed as well
For all the commands that will be run on the BBB terminal, a quick explanation of what the command does or a side note might be given before or after the command, for example:
sudo apt updateFetches the updated catalog for updates and apps that can be installed or updated
Don't expect to see the words "type", "execute" or "enter" before the command.
1. Install Dependencies to Build the Cource CodeAfter the BeagleBone has been setup and is running, we need to make sure that we have a proper build environment and XZ compression utility to build GStreamer from source.
A build environment, XZ compression utility, and lexer and parser generators need to be installed. Enter the user password if asked while installing any of the following utilities. Some of these programs might already be installed on your board depending on if they have been installed some other way (like following my previous guides).
sudo apt updateLooks for available updates
sudo apt upgradeInstalls any available updates
sudo apt install gccInstalls the gnu C compiler
sudo apt install g++Installs the gnu C++ compiler
sudo apt install pkg-configInstalls a helper tool used to compile applications
sudo apt install makeInstalls a utility for building and maintaining groups of programs
sudo apt install xz-utilsInstalls a general-purpose data compression software
sudo apt install libglib2.0-devInstalls a general-purpose C library that is used in many projects
sudo apt install flexInstalls a program that generates lexical analyzer
sudo apt install bisonInstalls a parser generator
sudo apt install liborc-0.4-devInstalls a library for compiling programs that operate on arrays of data
sudo apt install libasound2-devThis package contains files needed to develop software that makes use of libasound2
sudo apt install libssl-devInstalls a library needed since the configuration process of the bad-plugins will halt halfway if it doesn’t detect this library
Alternatively, we can install all the programs in the same command:
sudo apt install gcc g++ pkg-config make xz-utils libglib2.0-dev flex bison liborc-0.4-dev libasound2-dev libssl-devsudo apt install v4l-utilsIt provides a series of utilities for media devices, allowing GStreamer to handle the proprietary formats available on most webcams, etc.
sudo apt install gudev-1.0This is a requirement for uvh264 plugin
sudo apt install libusb-1.0This is to install USB header to compile the uvh264 plugin
sudo apt install libv4l-devThis will install video4linux libraries as an abstraction layer to support devices without having to write separate code
Alternatively, we can install all the programs in a single command:
sudo apt install v4l-utils gudev-1.0 libusb-1.0 libv4l-devIn this step, use “wget” to download the GStreamer source code from GitHub. There are four packages that we are interested in, the first one is the main GStreamer app, the other three are plug-ins used by GStreamer. All of them must be compiled. We’ll use version 1.16.2 since the newer versions use other build tools and some basic executables seemed to not compile by default. The source code and built code will be contained in a single folder for easy access.
mkdir gst-buildMakes a new directory inside the current directory we are currently located
cd gst-buildIt changes our current directory to the one that was just created
“wget” is a command used to retrieve (download) content from web servers, it will be used to download the source code. The source file have the extension “.tar.xz”, it means that is a Tar archive, compressed with “xz”, which is a lossless data compression tool. “tar” is just an archive used to store several files into one manageable file.
wget http://gstreamer.freedesktop.org/src/gstreamer/gstreamer-1.16.2.tar.xz
wget http://gstreamer.freedesktop.org/src/gst-plugins-base/gst-plugins-base-1.16.2.tar.xz
wget http://gstreamer.freedesktop.org/src/gst-plugins-good/gst-plugins-good-1.16.2.tar.xz
wget http://gstreamer.freedesktop.org/src/gst-plugins-bad/gst-plugins-bad-1.16.2.tar.xz”
ls
use ls command to list the files and directories located in your current location
After downloading all the files, the current directory should look as in Figure 2:
To build the code that was downloaded, it must be decompressed and extracted first. The “tar” command will be used with some arguments to decompress the files. The general process for each of the archives is to: decompress and extract the files (which will create a new folder with the decompressed content) inside that folder. Run a script file named “configure” that is provided by GStreamer that will modify and localize the source code so it can be compatible with the current operating system, in this case, it is a Debian distribution running on an ARM processor. While the script is running, it will let us know if any errors happened, and in the case of the plug-ins, it will let us know which plug-ins will be installed or not (this will depend on dependencies for those individual plug-ins can be found). After running that script, the “make” command must be executed to compile and build the code. After that step finishes, the application or plug-ins need to be installed to be used. The steps for all four archives are like each other.
4.1 GStreamer Main Program:
tar -xJf gstreamer-1.16.2.tar.xzDecompresses the archive
cd gstreamer-1.16.2Moves into the directory that was just created after decompressing the archive
./configure -prefix=/usrIt runs the “configure” script file and it starts checking if all dependencies are installed and what functions are available for the compiler. When finished, it shows a report of what configuration will be used. This process will take about 5 minutes
makeThis command will start the compilation process, it will take about 20 minutes
sudo make installThis will install the compiled code so it can be used by the user, it should be installed in the “/home/<user>/gst-build/gstreamer-1.16.2” directory by default. It takes less than a minute to do this process
4.2 Base Plug-ins:
cd ..This is to move back to the previous directory, “gst-build”
tar -xJf gst-plugins-base-1.16.2.tar.xzDecompresses the archive
cd gst-plugins-base-1.16.2Changes current directory to the one that was just created after decompressing the archive
./configure -prefix=/usrSame as before, it took about 4 minutes to finish
makeThis command will start the compilation process, it will take about 30 minutes to compile
sudo make installThis will install the compiled code so it can be used by the user, it took about 3 minutes
4.3 Good Plug-ins:
cd ..This is to move back to the previous directory, “gst-build”
tar -xJf gst-plugins-good-1.16.2.tar.xzDecompresses the archive
cd gst-plugins-good-1.16.2Moves into the directory that was just created after decompressing the archive
./configure -prefix=/usrSame as before, it took about 5 minutes to finish
makeThis command will start the compilation process, it will take about 40 minutes to compile
sudo make installThis will install the compiled code so it can be used by the user, it took about 1 minute
4.4 Bad Plug-ins:
cd ..This is to move back to the previous directory, “gst-build”
tar -xJf gst-plugins-bad-1.16.2.tar.xzDecompresses the archive
cd gst-plugins-bad-1.16.2”Moves into the directory that was just created after decompressing the archive
./configure -prefix=/usrSame as before, it took about 5 minutes to finish
In this step, make sure that the uvch264 plug in will be installed, it is the heart of the project, it makes it possible to grab h264 video feed directly from the web camera. If it doesn’t show under plug-ins that will be built, make sure that “gudev-1.0” and “libusb-1.0” are installed!
makeThis command will start the compilation process, it will take about 35 minutes to compile
sudo make installThis will install the compiled code so it can be used by the user, it took about 4 minutes5. Test GStreamer and the USB Camera
Before continuing further, we need to check if GStreamer works and if it can read the USB camera. In this step we will connect the camera to the USB port (or USB Hub if using a Wi-Fi adapter). A small program compiled along with Base-Plug-ins can read the properties of video sources such as web cameras. In this case, it should be able to detect if the C920 webcam can provide h264 video steam.
We will now connect the webcam into the BBB's USB port (or hub) and then run:
gst-device-monitor-1.0It will read the properties of all video sources.
After running the command “gst-device-monitor-1.0”, the media sources get listed, in this case we have a video source with the name: HD Pro Webcam C920. It also lists the video properties it can stream and can be read by GStreamer such as: video/x-raw (which is raw video from the sensor, it needs to be encoded/decoded), image/jpeg (it can source still images), and video/x-h264 (which is video encoded with the camera's internal h264-encoder). Resolution, frame-rate, pixel aspect ratio, etc. are included too. So, whenever we want to grab video from this video source, it needs to match one of these properties.
6. Install GStreamer on separate Computer and Test the SystemTo see the video sent by the BBB, setup a computer that can receive RTP video through an RTP player. VLC player can do it, but the delay can be as long as two seconds. In this case we will install GStreamer on a Windows and a Linux machine to play the RTP video stream. In Windows, the installation folder must be added to the system’s path to be able to call GStreamer’s executables from either the Command Prompt or the PowerShell, this is not the case while running GStreamer on a Linux system.
- Install on windows
i. Download the MSVC 64-bit executable, this was done using the runtime installer. The link to download it is: https://gstreamer.freedesktop.org/download/
ii. Run the installer and follow the installation, on the page where it asks for to “Choose Setup Type”, select: “Custom”
iii. On the following window, choose the location where you want to have GStreamer installed. It’s important to remember the path to add it to the Windows environment path. In this case, I chose the “E:” drive and created a folder named “gstreamer”. Also, make sure that none of the features are deselected (have a red “x”). Again, make sure to install all plugins and features (click on the “down arrow” on the left of “GStreamer 1.0” and make sure everything is selected to install.)
iv. Press the “Start” key and type “env” and click on “Edit the system environment variables”
v. The “System Properties” windows will open. Click on “Environment Variables”
vi. On the “Environment Variables” windows, under the “System Variables” section, select “Path” and then select “Edit”
vii. On the “Edit environment variable” windows, click on “Browse”. Once the “Browse For Folder” opens, search for the path of the installation of “gstreamer”. Navigate inside that folder, go inside “msvc_x86_64” and select the “bin” folder
viii. After finding the folder, the path will be added to the previous window
ix. Click “OK” on all windows to accept the modifications
- Streaming camera on Windows
To test the functionality on Windows, we need to connect to the BBB through SSH. We will also need the IP address of the Windows machine, we can do it the same way it was done to find the IP address of the BBB on the guide: https://www.hackster.io/ederfernandotorres3/setup-beaglebone-black-with-device-tree-overlays-9e0ded
1. Once connected to the BBB, enter the following command on the BBB's terminal (modify “host=192.168.1.162” to match your Windows machine”):
gst-launch-1.0 uvch264src initial-bitrate=800000 average-bitratge=800000 iframe-period=1000 name=src auto-start=true src.vidsrc ! video/x-h264,width=640,height=480,framerate=30/1 ! h264parse ! rtph264pay ! udpsink host=192.168.1.162 port=4000Note that there is no space between the words joint by dashes, for example: “video/x-h264” and “iframe-period=1000”.
This will run “gst-launch-1.0” which is one of the applications that was built when compiling GStreamer and its plugins. The rest of the words are arguments telling “gst-launch” how we want to fetch the video: uvch264src is used to tell gst-launch to use that plug-in to read the video feed and use a UVC video source that provides a h264 stream, in our case, the C920 camera. Initial and average bitrate let us specify how many bits per seconds should the transmission use, by default it uses around 3, 000, 000 bits per second, which is too much data for the kind of video we want to fetch. Video/x-h264 specifies which stream to get from the camera, as previously shown, C920 can give us three different types of video streams, we want h264 which is already compressed. Width, height, and frame rate is to specify the corresponding specifications, they must be available in the list of formats available that was given by “gst-monitor” previously. H264parse and rtph264pay are meant to extract missing information, and if needed, split the video into packets and/or transforming the packets’ format. Also, they are used to prepare the stream to be sent through the network. Udpsink is used to let “gst-launch” know that it is going to be “sinking into the host” or sending video through the UDP protocol. In this argument, the IP address belongs to the computer that will be receiving the video, a port number is arbitrarily chosen, 4000 was chosen since it’s a high number and unlikely to be taken in the current network.
After entering the command successfully, the camera’s front blue led light will turn on.
2. Open the Command Prompt or PowerShell from the Windows computer and enter the following command:
gst-launch-1.0 -v udpsrc port=4000 caps='application/x-rtp, media=(string)video, clock-rate=(int)90000, encoding-name=(string)H264' ! rtph264depay ! avdec_h264 ! autovideosink sync=falseAfter entering the command, gst-launch will return a lot of information about the stream, it will also open a window with a video renderer.
- Install on LinuxMachine
Ubuntu is the Linux flavor that is chosen to host the video being stream by the BBB. To install it in Fedora, follow the following link: https://gstreamer.freedesktop.org/documentation/installing/on-linux.html?gi-language=c
Run the following command in the terminal to install all pre-compiled GStreamer apps and plugins:
sudo apt install libgstreamer1.0-dev libgstreamer-plugins-base1.0-dev libgstreamer-plugins-bad1.0-dev gstreamer1.0-plugins-base gstreamer1.0-plugins-good gstreamer1.0-plugins-bad gstreamer1.0-plugins-ugly gstreamer1.0-libav gstreamer1.0-tools gstreamer1.0-x gstreamer1.0-alsa gstreamer1.0-gl gstreamer1.0-gtk3 gstreamer1.0-qt5 gstreamer1.0-pulseaudio- Streaming Video on Linux Machine
To start streaming using GStreamer, we use almost the same command as we did for Windows with just one difference, “autovideosink gets replaced with “xvimagesink”:
Enter this command into the terminal:
gst-launch-1.0 -v udpsrc port=4000 caps='application/x-rtp, media=(string)video, clock-rate=(int)90000, encoding-name=(string)H264' ! rtph264depay ! avdec_h264 ! xvimagesink sync=falseThree different scripts have been used in order to not type all the gst-launch-1.0 command every time we want to send and receive video. The scripts will be attached under code.
ConclusionAlthough there are newer single board computers available such as the Raspberry Pi, which contain an internal h264 encoder. This guide is still useful to enable boards such as the BBB to be able to stream video and not bottleneck the processor. The BBB is still a desirable computer since it's low-priced and contains two internal microcontrollers that have direct access to many GPIOs that allow real-time communication with the external world. If desirable, these steps should work with any Linux machine that have the proper Build Environment.
References and Additional Informationhttps://www.javatpoint.com/create-and-run-a-powershell-script
This link will help you to run PowerShell Scripts
https://gstreamer.freedesktop.org/download/
https://gstreamer.freedesktop.org/documentation/installing/on-linux.html?gi-language=c
https://www.hackster.io/ederfernandotorres3/setup-beaglebone-black-with-device-tree-overlays-9e0ded
https://www.hackster.io/ederfernandotorres3/8821au-wifi-card-and-bbb-22a7ac
Special thanks to soren.kuula@gmail.com who had posted a guide back when Ubuntu was still in version 13 and GStreamer had just made the jump from 0.10 to 1.0, I can’t longer find the guide but I hope this guide to be as useful as the original.


Comments