


Hardware components | ||||||
 |
| × | 1 | |||
| × | 1 | ||||
| × | 1 | ||||
| × | 1 | ||||
Software apps and online services | ||||||
| ||||||
 |
| |||||
Hand tools and fabrication machines | ||||||
 |
| |||||
So you want to take your selfies to the next level? Or you want an easy way of doing long exposure photography? Or maybe you just want to say "Look! I can control my camera with my phone!" Look no further than my first Hackster project.
I have been playing with wired and wireless remote triggers for party photobooths and experimental photography the last 5-6 years, but I have never used WiFi before. When I was sent a link to the IoT For Everyone contest I saw my chance to finally test a new and hopefully easy way of making a remote trigger.
I have tested this remote on different models so I know it should work on lots of brands as long as they have a similar 3-pin remote control plug. I do of course not take any responsibilities if you manage to break your camera by doing this, but if you do break anything then I am very interested in knowing how you did it.
To get going you need a cable for the kind of plug your camera has, and the fastest way of figuring out what you need is to ask ebay. Search for "wired remote" + [camera model] and you should get lots of hits. Buy one of those manual remotes and cut the cable to the desired length. Now you have two usable parts, one lockable dual-stage tactile switch for other projects and one camera cable for your wireless remote.
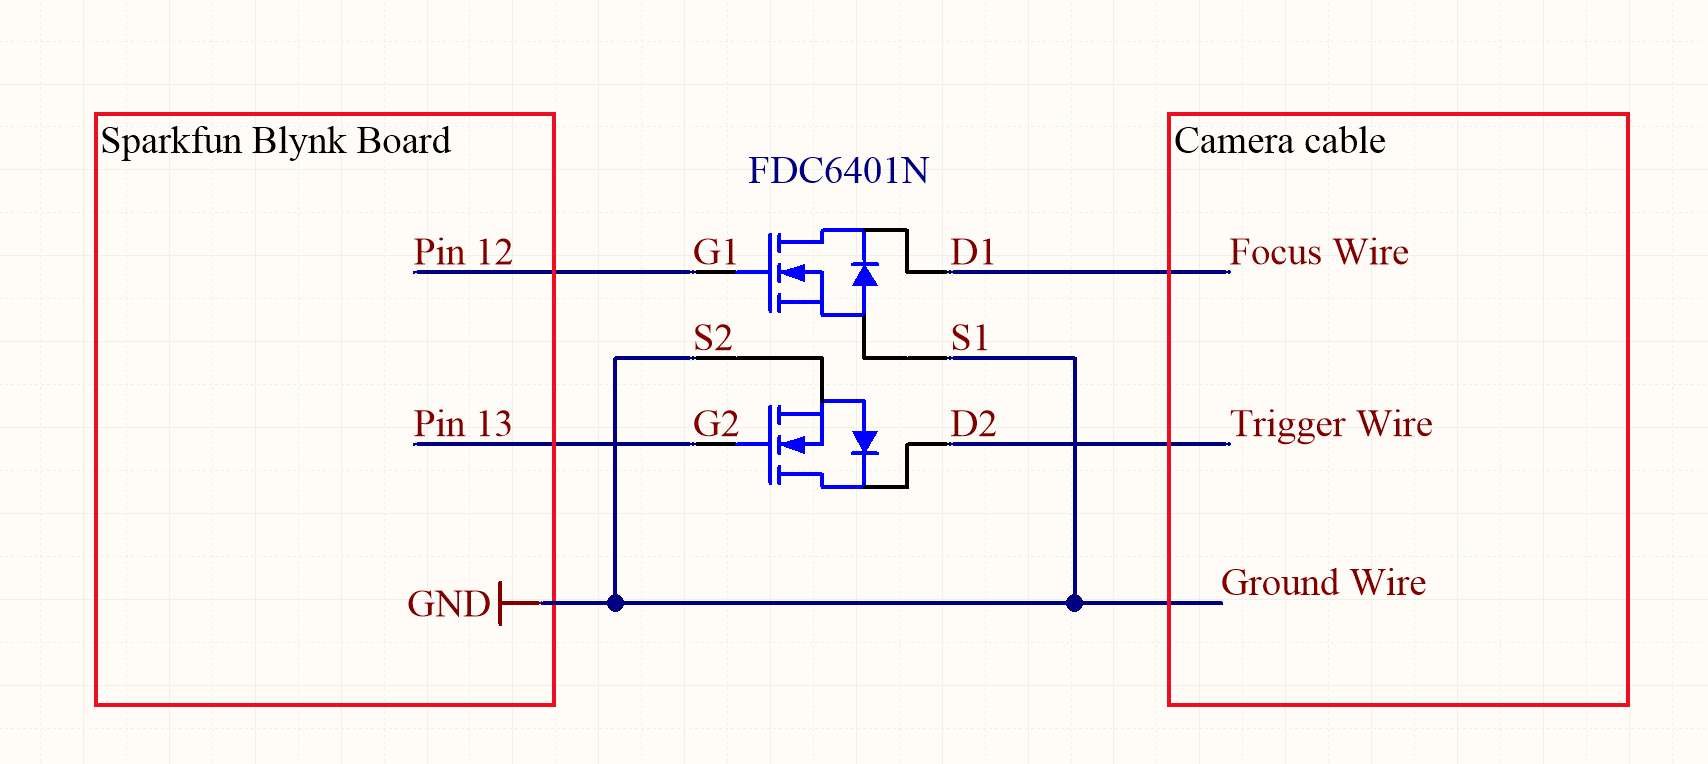
So the concept of triggering the camera is super easy. You have 3 wires for the remote; Trigger, Focus and ground. When you short Focus to ground your camera will focus, when you short all three you will trigger an exposure.
To make it possible to control the shorting to ground from a microcontroller you need relays or transistors. I use two NMOS transistors to do the work, they do not require any complicated circuits or calculations as long as the threshold voltage for turning the gate completely on is lower than the logic signal from the controller (3.3V on the Sparkfun Blynk board). The FDC6401N is two of these in one packace, in addition it is tiny and can tolerate really high currents so I use these for almost anything that needs switching.
You connect the pins the following way to get things working:
- Ground wire: Sparkfun Blynk board GND and Source on both transistors
- Focus wire: Drain on NMOS1
- Trigger wire: Drain on NMOS2
- Gate on NMOS1: Sparkfun Blynk board pin 12
- Gate on NMOS2: Sparkfun Blynk board pin 13
Unfortunately I have managed to delete the PCB design i have used here, it is more or less a breakout board for the ssot-6 package, so if you are skilled at soldering and gluegunning you don't acutally need a PCB at all. Upon request I will make a new PCB design as a shield to connect directly to the Blynk board pins.
When soldering is complete and with some too long jumper wires the wireless remote is complete!
The next step is firmware. My first attempt at using Arduino code was a pleasant surprise, I love the infinite amount of libraries! I only used SimpleTimer in addition to the ones i got when following the Sparkfun Blynk board tutorial.
On the Blynk app I have one button for focus, one for trigger and a slider for selecting how long the exposure will last. If the slider is set to 0 the trigger will last for 1/10 s, enough to capture one photo with normal settings on the camera. If you set the camera exposure time to "bulb" you can capture a long exposure photo with the time set by the slider.
The Arduino code and link to the Blynk app is attached, so test for yourself!
This is where the super cool video of my phone with the Blynk app and the camera triggering next to it should be. The only two gadgets I have that can film are the phone and the camera I want in the video. It is 2 am local time and the deadline for the contest is right around the corner. I had not planned this well enough...
Tips and Tricks:- If you want to make sure you have the fastest triggering possible, set the focus where you want it and turn off autofocus on the camera itself.
- When using autofocus it may be a bit slow to react, so setting the slider to a couple of seconds may be necessary to make sure you focus before the camera is triggered.
- If you want to make the remote a bit more modular, go for the 2.5mm jack to camera plug cables you find on ebay, by using those and a female 2.5mm 3-pin jack connected to the transistors you can connect to "any" camera.
My original plan was a bit more optimistic, but time has a way of passing too fast, if you want inspiration for making this remote a bit more advanced you can check the initial idea out here: https://www.hackster.io/challenges/sparkfun-blynk-contest/ideas/3780


_3u05Tpwasz.png?auto=compress%2Cformat&w=40&h=40&fit=fillmax&bg=fff&dpr=2)
Comments