


Hardware components | ||||||
 |
| × | 1 | |||
| × | 1 | ||||
 |
| × | 3 | |||
 |
| × | 1 | |||
| × | 1 | ||||
| × | 1 | ||||
Software apps and online services | ||||||
 |
| |||||
Can a microcontroller play smooth video with audio? Absolutely. In this project, we push the ESP32-S3 to its limits by building a fully functional video player with an ST7789 display and I2S audio.
📺 Video Tutorial(Start here! Watch the full build process and demo before diving into the details.)
💡 The IdeaI’ve been spending a lot of time with the ESP32-S3 and high-quality TFT displays recently, and I started wondering: Where is the edge? Just how powerful is this chip?
To find out, I decided to build a dedicated video player. The goal was smooth video playback (MJPEG) with synchronized audio, running entirely on the microcontroller. The result is surprisingly capable!
🛠️ Hardware ListTo build this, you need the following:
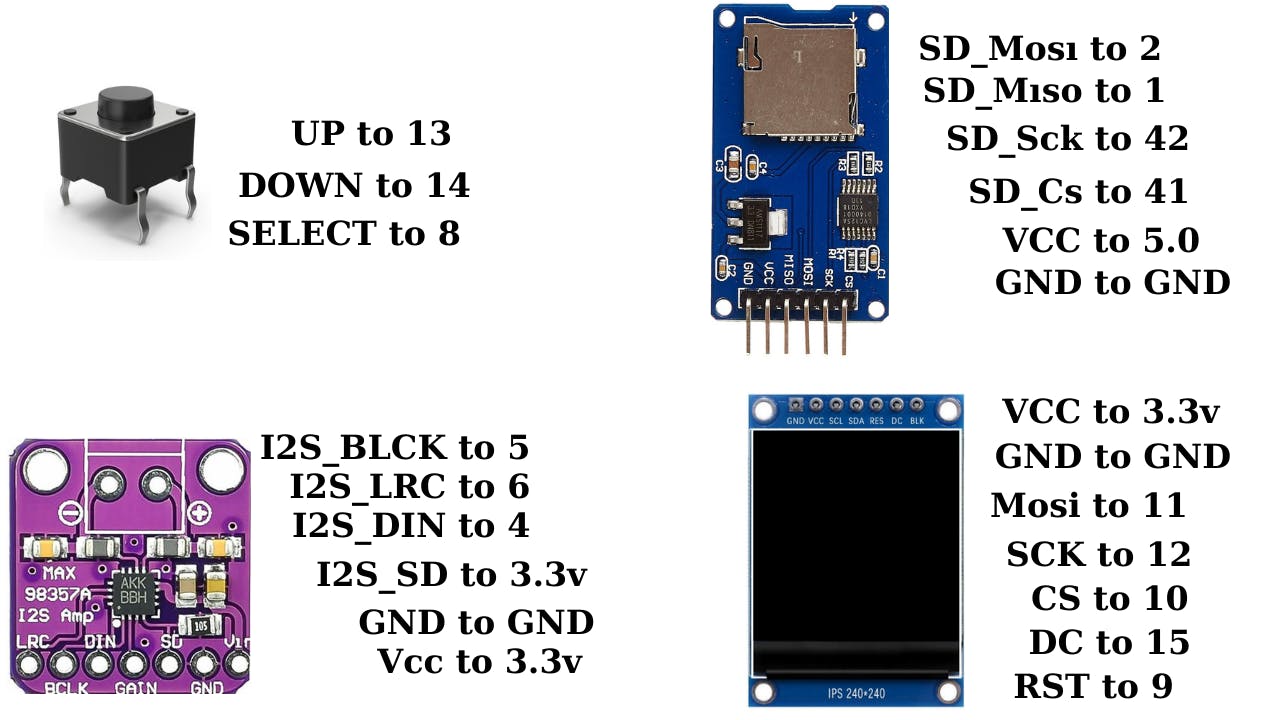
- Microcontroller: ESP32-S3 Dev Board (Recommended: 16MB Flash / 8MB RAM version for best performance).
- Display: ST7789 TFT Display (Compatible with 240x280 or similar resolutions).
- Audio: MAX98357A I2S Amplifier + 3W Speaker.
- Storage: Micro SD Card Module + SD Card (Formatted FAT32).
- Controls: 3x Tactile Buttons.
- Misc: Wires, Breadboard or Perfboard.
Since the ESP32-S3 isn't installed by default, we need to set up our environment
- Open Arduino IDE preferences and paste the ESP32 Board Manager URL.
https://raw.githubusercontent.com/espressif/arduino-esp32/gh-pages/package_esp32_index.json- Go to Boards Manager, search for
ESP32, and install the latest version. - Libraries: We need two specific libraries for this project. Search for and install:
TFT_eSPI(by Bodmer)JPEGDEC
- Important Configuration: Navigate to your Arduino libraries folder, open the
TFT_eSPIfolder, and editUser_Setup.h. You need to uncomment the driver for ST7789 and define your specific pin connections to match your wiring.I showed in tutorial.
We can't just drag and drop MP4 files onto the SD card. The ESP32 needs a lighter format to process frames quickly. We use MJPEG.
I have created a Python script (available in the GitHub repo below) to automate this:
- Install VS Code and Python.
- https://code.visualstudio.com/downloadhttps://www.python.org/downloads/
- Install the Python extension in VS Code.
pip install imageio-ffmpeg- Open the script terminal and install the required library:
- Place your video files in the
inputfolder and run the script. It will automatically convert, resize (fixed width), and save them to theoutputfolder.
- Take the converted files from the
outputfolder. - Copy them to the root directory of your Micro SD card.
- Crucial: Ensure the SD card is formatted as FAT32.
- Insert the card, flash the Arduino code to your ESP32-S3, and reset the board.
The interface is simple:
- Button 1 (UP): Scroll up in the menu.
- Button 2 (DOWN): Scroll down.
- Button 3 (PLAY/SELECT): Selects a video to play. Pressing it again during playback returns you to the menu.
Audio Tip: If the volume is too low, check the code for the gain setting (0-21) and adjust it. I found '20' to be the sweet spot.
📥 Code & ResourcesYou can find the full source code, the Python converter script, and the wiring diagram in the repository below.
Github Repo: https://github.com/derdacavga/video-Player
Youtube Channel : https://www.youtube.com/@DsnIndustries/videos
If you liked this project, don't forget to subscribe to the channel for more ESP32 experiments!


Comments