Drones are good at collecting data (photos, videos), but they are not good at distributing information.
Using the drone's camera, the pilot can observe the situation from a high vantage point and can often see danger approaching in a fire situation, or see an exit route for trapped people, however, until now, the drone observer has been helpless to assist with ground efforts because there is no way of communicating with people on the ground.
The Solution
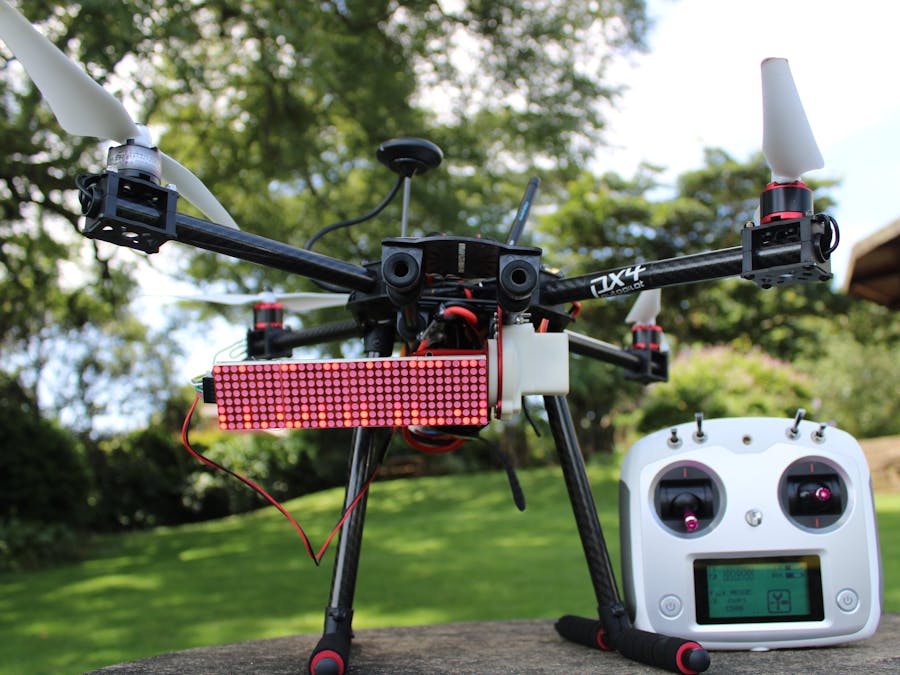
This project is a highly visible text display that is mounted on a drone. The display displays readable messages to people on the ground, on a mountain side, or on a building.
Using this flying "billboard" the drone operator can display a daylight visible message to people on the ground. Using a cell phone and the cloud, the message can be remotely changed, from anywhere in the world, as the situation requires.
For example the following messages can instantly be displayed on the drone: "STOP", or "WAIT", or "FOLLOW" or "RUN".
Flexibility
In some situations the drone will be above the people for whom the message is intended, in this case the angle of the display can be remotely adjusted so it is facing down. In cases where the drone is level with the reader, the display can be set to a horizontal angle by the operator. Alternatively, the display can sweep through a 130 degree angle, the sweep rate and range of angle to sweep can also be remotely set.
The User Interface
The text on the display is changeable remotely by logging onto a website using any connected device with a browser(smartphone, PC). All settings are changed by the operator using the Particle console website which is linked to the device.
website to change variables
The Secret
The communication to the LED display is done through the cloud, messages are transmitted using the GSM/GPRS cellular network. (A sim card is installed on the drone).
The operator uses their mobile device to input text and other settings on the Particle device consol https://console.particle.io/devices web page, the Particle console server transmits the message over the cloud to the GPRS enabled receiver on the drone.
Particle cloud user interface . The first field is the text to display on the drone.
Display Angle
The particle Cloud user interface can also control the angle of the display, if the person for whom it is intended is directly below the drone, the display can be angled down using a servo mounted on the drone (ServoPos = 90).
If the drone is hovering in level with the intended recipient, the display can be set to face forwards (ServoPos = 180), or any angle in between.
horizontal servo position
The display can also be set remotely to sweep between a certain servo range, this is so that the display reaches a wider audience.
Security
The device is linked on purchase to a specific Particle account on initial setup, this prevents unauthorized use. Devices can be transferred to other users. Hooks to other websites like IFTTT and Ubidots can allow for a larger user-base with a more refined user experience.
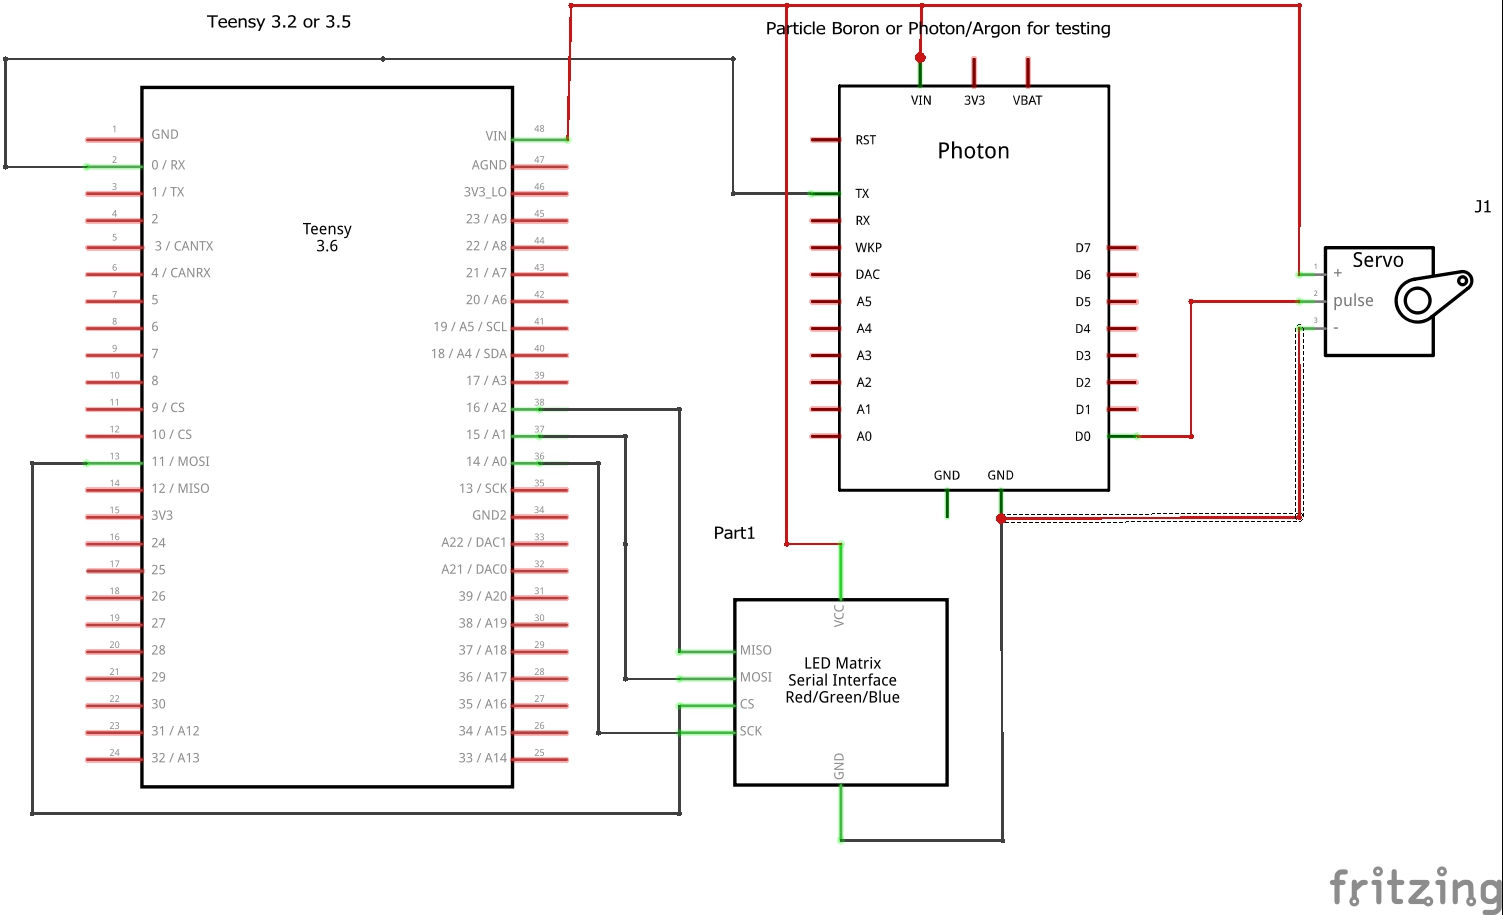
Give it 5V power supply (pick it up off the 5V bus on the drone). Wire up the pins as instructed in the code. The exact components used are not available in Fritzing so if in doubt, wire it like the code says. Your biggest problem will be wiring all of the power and ground wires together - i soldered them up and hot-melt glued them to insulate them. A dedicated circuit board would be nice!
Partical Boron code - for receiving the text to display over the GPRS cloud
C/C++
Flash this code to your Particle Boron and then connect to your console and send text to the Boron. The TX1 pin of the Boron must be connected to the RX1 pin of the teensy to display the text. Connect a servo to pin D0 of the Boron and send servo sweep commands from the Partilce consol.
Note: you can also use a particle Photon or Argon connected to wifi for local testing on your local wifi or hotspot.
//This code receives settings from the Particle cloud //It relays text received onto Serial 1 //it also controls the position and optionally the sweep of a servo.// this code oruns on a particle Boron, Electron or Photon device//connect a servo to pin D0 //connect whatever is listening for the text to pin TX1 at baud 115200// follow all the instructions on the Particle website to setup your particle device//Note: the below will only run if the particle device is connected to the internet, this is a feature of Particle devices where System mode set to the default automatic// Written by : Jasper Pons in 2020 for the NXP hovergames competition.#include"Particle.h" //----------------- servo sweep variables------------Servomyservo;// create servo object to control a servointbSweep=true;intpos;boolbgoingup;longilastsweep;intservomax=90;intservomin=30;voidsetup(){Serial.begin(115200);Serial1.begin(115200);myservo.attach(D0);// attaches the servo on the D6 pin to the servo object// particle functions - these allow you to adjust variables using the particle consoleParticle.function("sendText",sendText);Particle.function("ServoPos",ServoPos);Particle.function("SetSweepInterval",SetSweepInterval);Particle.function("setservomax",setservomax);Particle.function("setservomin",setservomin);//show some variables in the particle consoleParticle.variable("servomax",servomax);Particle.variable("servomin",servomin);// start off with a decent servo position, almost horizontalServoPos("122");Serial.println("Setup done");//useful for debugging}voidloop(){// just loop and wait for text to come in from the cloud//see if we need to perform a sweep of the servofn_Sweep();}//send any text received to the serial port//this is called by the particle cloud functionintsendText(StringsToSend){if(millis()>=20000){// dont send empty string on startupSerial.println("You sent:");Serial.println(sToSend);Serial1.println(sToSend);}return1;}intServoPos(StringsServoPos){intiServoPos=sServoPos.toInt();myservo.write(iServoPos);pos=iServoPos;bSweep=false;returniServoPos;}//---------------------- everything below here manages servo sweep and fixed position ---------------------intiSweepinterval=30;//set the delay between sweep increments - called from the cloudintSetSweepInterval(Stringsinterval){iSweepinterval=sinterval.toInt();bSweep=true;returniSweepinterval;}//do the actual sweep - check every loop but only do stuff if actually sweepingvoidfn_Sweep(){if(millis()-ilastsweep<iSweepinterval)return;ilastsweep=millis();if(!bSweep)return;//check limitsif(pos<servomin){pos=servomin;bgoingup=true;}if(pos>servomax){pos=servomax;bgoingup=false;}//sweep in degrees of 1 if(bgoingup){pos+=1;}else{pos-=1;}// in steps of 1 degreemyservo.write(pos);// tell servo to go to position in variable 'pos'}//set servo sweep range - called from the cloudintsetservomin(Stringsval){servomin=sval.toInt();bSweep=true;returnservomin;}//set servo sweep range - called from the cloudintsetservomax(Stringsval){servomax=sval.toInt();bSweep=true;returnservomax;}
Teensy 3.2 or 3.5 Code for controlling the LED matrix display
C/C++
Flash this code to your Teensy 3.2 or 3.5 and connect the LED display to Pins 14-16 and pin 11. Connect the RX1 pin to the Particle Boron the receive the remote string to display. You can also use Serial commands to test - whatever you type in the serial port will display on the LED SCreen. Note: you need this exact library: https://github.com/gauravmm/HT1632-for-Arduino .
//This code receives a string from serial 1 and displays it on an LED matrix // this code oruns on a Teensy 3.2 ot 3.5, it may also run on other devices however the LED Matrix library is specifically designed for teensy.//connect an HT1632 32x8 LED matrix display to the pins shown below.//connect whatever is transmitting the text to display to pin RX1 at baud 115200//if you want to test the display, just type into the serial consol , this code monitors the usb serial console as well as Serial 1//Note: the HT1632 displays can be tricky to get going and you MUST use the library from :https://github.com/gauravmm/HT1632-for-Arduino . // this project would not have been possible without the libraty written by //Gaurav Manek "gauravmm"// Written by : Jasper Pons in 2020 for the NXP hovergames competition.#include<Arduino.h>#include<HT1632.h>#include<font_8x4.h>//------------------- Connect these pins to the LED display: ------------------------------- #define SOFT_SCK_PIN 14 // WR clk #define SOFT_MOSI_PIN 15 //DATA input to device#define SOFT_MISO_PIN 16 //NO NEEDED-- data output from device, not needed for led display#define LEDDISP_CS 11 //cs for led display//------- variables needed for new led matrix -----------//charleddisplay[]="D- SCAN ";#define ledstartpos 32 StringsToDisplay="H.GAMES";voidsetup(){Serial.begin(115200);Serial1.begin(115200);//setup the display -- make sure the library is installed or this will fail!!!HT1632.begin(LEDDISP_CS,SOFT_SCK_PIN,SOFT_MOSI_PIN);HT1632.renderTarget(1);HT1632.clear();HT1632.drawText(leddisplay,OUT_SIZE-ledstartpos,0,FONT_8X4,FONT_8X4_END,FONT_8X4_HEIGHT);HT1632.render();Serial.println("hello");setLEDString("Hello");}unsignedintilastdisplay;voidloop(){//dont need to refresh the display too often.if(millis()-ilastdisplay>140){setLEDString(sToDisplay);ilastdisplay=millis();}//monitor serial port for debugging and testingif(Serial.available()){sToDisplay=Serial.readString();Serial.println("you sent:");Serial.println(sToDisplay);}//monitor particle boron for messages from the cloudif(Serial1.available()){if(millis()>=10000)sToDisplay=Serial1.readString();Serial.println("RX1 sent:");Serial.println(sToDisplay);}}// sets the string to display on the LED matrixvoidsetLEDString(StringsToDisplay){sToDisplay.toCharArray(leddisplay,12);// display on the led matrixHT1632.renderTarget(1);HT1632.clear();HT1632.drawText(leddisplay,OUT_SIZE-ledstartpos,0,FONT_8X4,FONT_8X4_END,FONT_8X4_HEIGHT);HT1632.render();}


Comments