Project PurposeThis is a data visualization project, which was made for a physical computing class. The project consists of physical computing students being matched with a sculpture student, and the task being to bring life to a sculpture that followed this year's theme of "struggle". The physical computing student was responsible for using electronics to visually represent data from their chosen database/API, this visual representation was via led lights and motor movement. While, the sculpture student was responsible for all the elements of the sculpture.
The idea for this sculpture was to represent the struggle of Chicago families in record numbers leaving their neighborhoods to escape gun violence and the elevated homicide rates. In this project, we recreated a miniature version of a Chicago neighborhood, so based on the amount of homicide victims in chosen neighborhoods/Ward, that would determine the amount of houses in the sculpture that would have their lights off (representing families no longer living in that house) and the car in the street would start moving towards the "Leaving Town" sign.
Using Chicago Data PortalTo get the data for this project, the Chicago Data Portal was used, specifically the API regarding Crime. To "pull" data from the Chicago Data Portal, an integration is created in the Particle IDE console in the custom webhook section. For this integration, an important aspect is filtering which types of crime and the dates of the cases. So, for the API URL, before attaching it to the integration, use SQL query parameters to count the amount of cases that fall between the dates specified and homicide cases with gunshot injuries. URL: https://data.cityofchicago.org/resource/gumc-mgzr.json?$query=select count(*) where date between '{{{minDate}}}' and '{{{maxDate}}}' and victimization_primary ='BATTERY' and gunshot_injury_i ='YES'
Then, in the integration, use the response templated feature to only get the count. When this webhook is called, it returns a json array of the count.
1 / 2 • Webhook Builder in Particle IDE
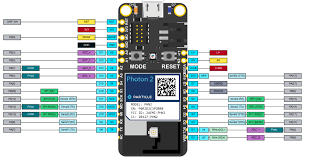
The lights in the buildings of the sculpture are Adafruit's NeoPixels and the instructions on how to use the lights can be found here. For this project, 24 NeoPixel lights were used in the buildings and daisy-chained together via solid core wire and soldering, and then 2 NeoPixel lights were set to a white color to illuminate the "Leaving Town" sign. To light up these lights, a for loop was used to set the pixel color. Remember to include the NeoPixel library in the Particle IDE. *Important Tip: For the data wires on the led lights, use the SPI pins on the photon 2.
Example of NeoPixel lights being placed in a building
To utilize the stepper motor, you must establish a 5v power source and ground for the stepper motor driver, then the 4 pins on the motor driver can be connected to any 4 digital pins, except the SPI pins. Then attach the stepper motor connector to the motor driver, and include the Stepper library on the Particle IDE. For the movement of the motor, use a for loop to cycle through the step rotations of the stepper motor and after a delay time, cycle through the reverse of those step rotations to get back to the initial resting position.
3D PrintingFor the set up of the car moving system along the road in the sculpture, a timing belt and pulley was used, and to mount this apparatus, 3D printing in PLA plastic was utilized. For the stepper mount, I used a file from "TheMagusMX" on thingiverse, which can be found here. For the other mount, I made it myself via TinkerCad.
1 / 2 • Stepper Motor Mount
So, before actually placing the electronics into the sculpture project, the electronics must be attached to the protoboard via soldering or female-to-male dupont wires that are soldered to the protoboard. Next, ensure that the lights are placed into the buildings and hidden by the raised platform. Then have a cut-out for the pulley system in the raised platform. Measure out the dimensions of the bottom of the box and place the stepper motor system on the bottom via gorilla glue double-sided tape. Make sure the buildings are secured onto the raised platform via a hot glue gun. Then on the pulley system, tape a stack of circular magnets on the movable track and a magnet on the paper car. Finally attach everything together.


Comments