

Hardware components | ||||||
 |
| × | 1 | |||
 |
| × | 1 | |||
 |
| × | 1 | |||
Software apps and online services | ||||||
 |
| |||||
This is a small tutorial to implement easily neopixel or WS2812b leds with the new Sony Spresense board.
The story behind it is really simple 😁 I started to develop my application for the Spresense contest but in the way I couldn't find a concrete way to integrate some NeoPixel leds and then I decided to search about new methods and here is the small tutorial for those who maybe need the same leds as me.
First, I would like to say that I don't have original Neopixel leds, but the name is the most famous name for WS2812b leds, so I will refer as Neopixel, but the leds are WS2812b.
The Magic...
Of course, there's a magic and here is where I have to introduce to @hideakitai and his library call SpresenseNeoPixel. I found it surfing on internet and the implementation was really easy. Here the steps:
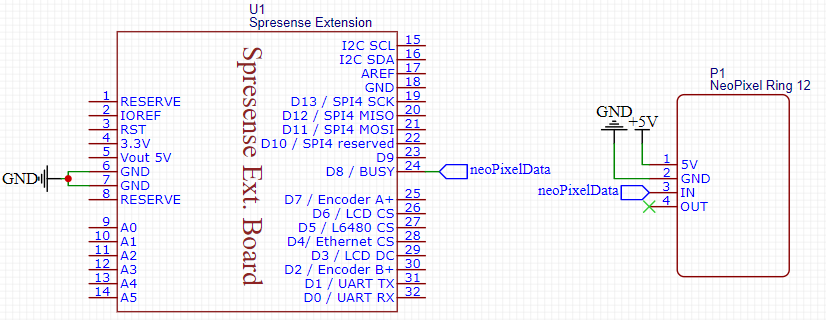
1) The Schematics
Usually we have to use an external resistor between the main board and the leds, but after many attempts I found that any resistor has to be used. The reason behind it I'm trying to find it, but I'm expecting it has to be related with how Sony manage each IO pin in the extension board.
Don't forget to connect the ground from the board and the DC power source ground. And in addition, it is important to set the board's jumper in 5V GPIO mode.
It is so important to remember that neopixels leds require an external power source. PLEASE DON'T CONNECT THEM FROM THE 5V SPRESENSE PIN!
For the real connections I used an USB connector to breadboard like in the following picture.
This is how I did the connection. As you can see, the leds are attached to the breadboard and DC source. The signal is directly to the spresense board and one cable to join ground's board and DC ground. With that connector is really easy to connect an USB cable and a AC adapter from an old phone to give a 5V stable for leds.
2) The Library.
The library is really simple to use and after read the documentation, I think that the most important instructions are:
SpresenseNeoPixel<PIN, NUM_PIXELS> neopixel; This instruction creates the object "neopixel", indicating the connecting pin number and the number of pixels in the array. In my case, I used the pin number 8 and I have 12 pixels.
neopixel.clear();This instruction allow us to shutdown all the leds in the array. That's all. Pay attention that the instruction is based on the object "neopixel", the same that we defined before.
neopixel.framerate(40); // default framerate is 40[fps]This instruction is usually used in the setup to indicate the frequency at which the board will update each date. I read in some tutorials that the main problem with neopixels is the time rate to synchronize the board and the leds, so this instruction let us to configure the framerate. By default is 40fps, but when I tested other frequencies it didn't work, then I decide to keep 40fps.
neopixel.set(Num_Of_Pixel, intensity_R , intensity_G, intensity_B);
neopixel.set(intensity_R , intensity_G, intensity_B);
neopixel.set(intensity_all_leds);
Finally the last instruction that can be 3 different instructions. Reading the documentation posted on Github, "neopixel.set" let us to have three different options.
- The first instruction set the pixel to turn on and the intensity between 0 and 255 of each led. That let to program each led in specific order and color. That instruction has 4 arguments as seen before.
- The second instruction set all the pixels with the same color, but you have to specify the intensity of each color between 0 and 255. That instruction has 3 arguments.
- The last option let to set the brightness of all the leds with the same number. But as you can expect, all the leds will be white. The function just needs one argument, an integer from 0 to 255.
Finally, with these instructions you can build an easy code to test your NeoPixel array. But I would like to say that there are other instructions in the library that I'm trying to work with. However, to finish this little example, here is my testing code. Based on the example library code.
And of course! a small video to show how it works.
I'm expecting that this library and tutorial works fine for other users and If I cannot finish my application for the final contest, at least I can contribute with little examples that I find usable for myself.
In addition, I want to say thanks to Hackster for the contest and send me that wonderful board. I'm working to use it in my master's thesis.


Comments