

Hardware components | ||||||
| × | 1 | ||||
 |
| × | 1 | |||
 |
| × | 1 | |||
| × | 1 | ||||
| × | 1 | ||||
| × | 1 | ||||
 |
| × | 1 | |||
| × | 1 | ||||
Software apps and online services | ||||||
| ||||||
Hand tools and fabrication machines | ||||||
 |
| |||||
We are using so many stuff and that is in list.
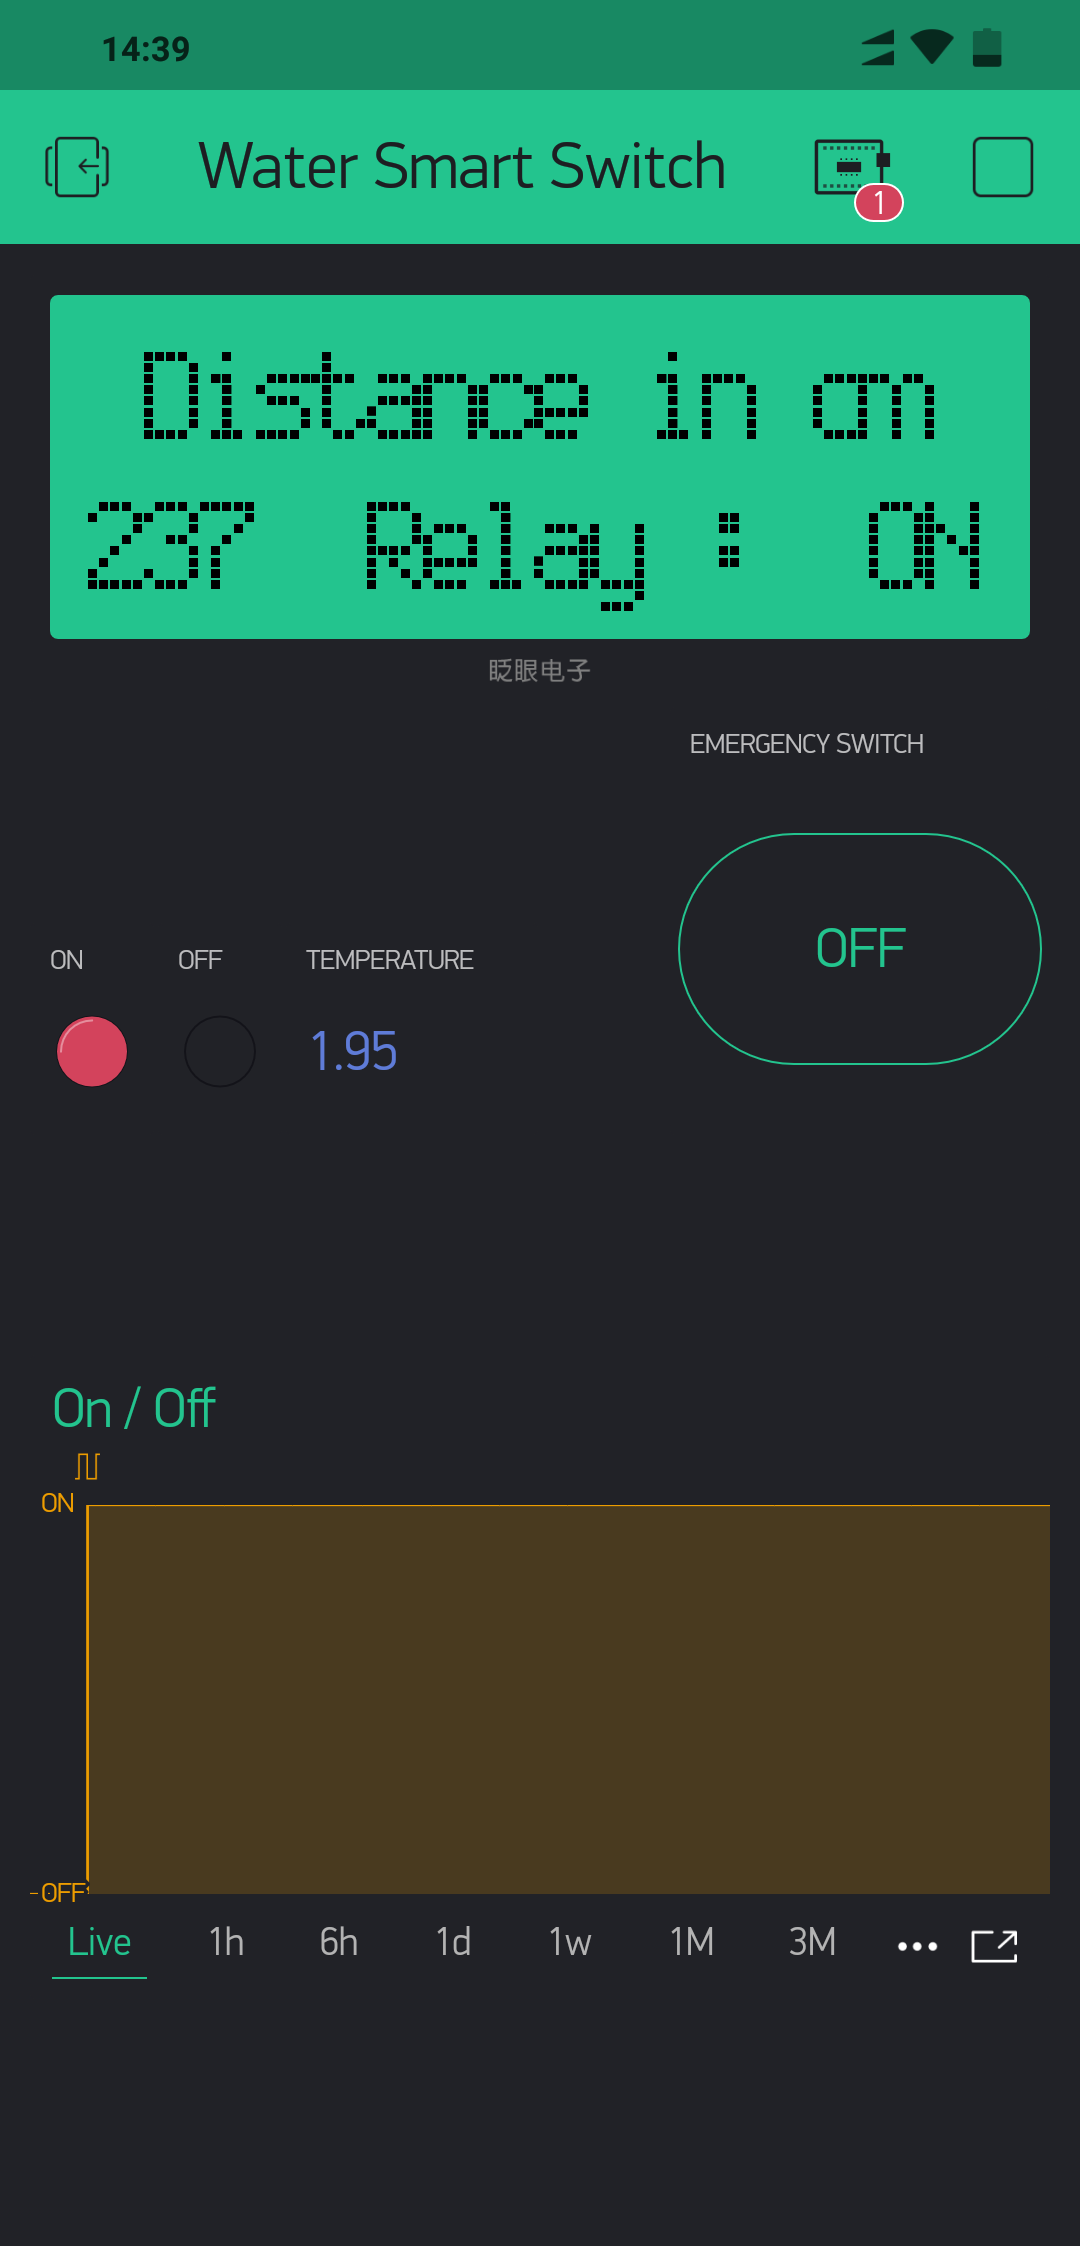
we are going to make smart water motor switch.
So basically we are going to make our life more simple and easier then before.
so how we do?
Using wemos d1 micro controller, relay, ultrasonic sensor,temperature.
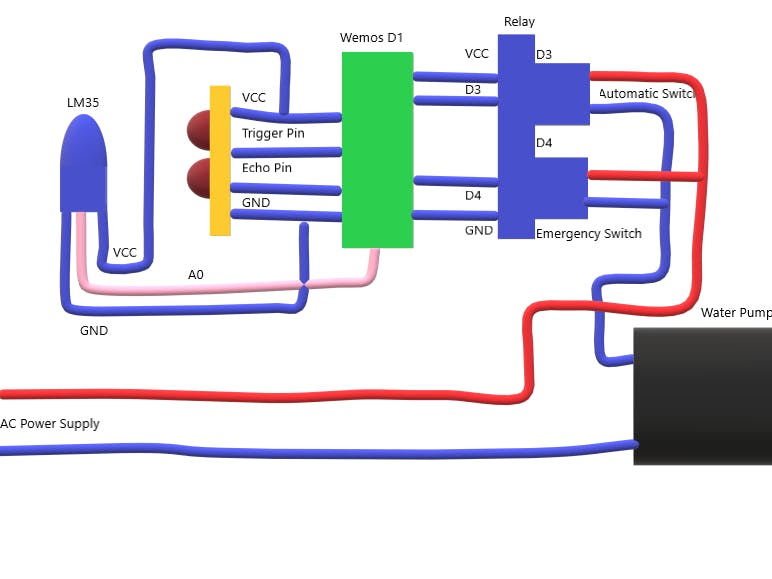
Take wemos d1 and dump this code on this. after this you have to interface ultrasonic sensor and temperature sensor(A0 pin) as shown in diagram.
Wemos D1 :
- 11 digital input/output pins, all pins have interrupt/pwm/I2C/one-wire supported(except for D0)
- 1 analog input(3.2V max input)
- Micro USB connection
- Power jack, 9-24V power input.
- Compatible with Arduino
- Compatible with nodemcu
Microcontroller --> ESP-8266EX
Operating Voltage --> 3.3V
Digital I/O Pins --> 11
Analog Input Pins --> 1(Max input: 3.2V)
Clock Speed --> 80MHz/160MHz
Flash --> 4M bytes
Length --> 68.6mm
Width --> 53.4mm
Weight --> 25g
PinPin | Function | ESP-8266
TX | TXD | TXD
RX | RXD | RXD
A0 | Analog input, max 3.3V input | A0
D0 | IO | GPIO16
D1 | IO, SCL | GPIO5
D2 | IO, SDA | GPIO4
D3 | IO, 10k Pull-up | GPIO0
D4 | IO, 10k Pull-up, BUILTIN_LED | GPIO2
D5 | IO, SCK | GPIO14
D6 | IO, MISO | GPIO12
D7 | IO, MOSI | GPIO13
D8 | IO, 10k Pull-down, SS | GPIO15
G | Ground | GND
5V | 5V | -
3V3 | 3.3V | 3.3V
RST | Reset | RST
UltraSonic Sensor :
If you are sourcing a ultrasonic ranging module , the HC-SR04 is good choose . Its stable performance and high ranging accuracy make it a popular module in electronic market .Compared to the Shap IR ranging module , HC-SR04 is more inexpensive than it . But it has the same ranging accuracy and longer ranging distance.
Specifications- Power supply: 5V DC
- Quiescent current: <2mA
- Effectual angle: <15°
- Ranging distance: 2cm – 500 cm
- Resolution: 1 cm
- Ultrasonic Frequency: 40k Hz
A short ultrasonic pulse is transmitted at the time 0, reflected by an object. The senor receives this signal and converts it to an electric signal. The next pulse can be transmitted when the echo is faded away. This time period is called cycle period. The recommend cycle period should be no less than 50ms. If a 10μs width trigger pulse is sent to the signal pin, the Ultrasonic module will output eight 40kHz ultrasonic signal and detect the echo back. The measured distance is proportional to the echo pulse width and can be calculated by the formula above. If no obstacle is detected, the output pin will give a 38ms high level signal.
LM35 Sensor :
- Operating Voltage: 4-20V
- 3 pins: VCC, GND, SIGNAL
- SIGNAL pin changes voltage according to the temprature
LM35 is a 3 pin temperature sensor which requires a VCC and GND and in return the remaining third pin gives us an analog output. For its pin configurations refer to the Circuit Diagram below. This output is then provided to the ADCs present in AtMega 16 IC which according to a formula calculate the temperature in °C format.
The LM35 series are precision integrated-circuit temperature sensors, whose output voltage is linearly proportional to the Celsius (Centigrade) temperature. The LM35 thus has an advantage over linear temperature sensors calibrated in ° Kelvin.
Features- Calibrated directly in ° Celsius (Centigrade)
- Linear + 10.0 mV/°C scale factor
- 5°C accuracy guarantee able (at +25°C)
- Rated for full −55° to +150°C range
- Operates from 4 to 30 volts (in this project its working on 5 V)
- Low self-heating, 0.08°C in still air
Relay :
This is a 5V 4-channel relay interface board, and each channel needs a 15-20mA driver current. It can be used to control various appliances and equipment with large current. It is equiped with high-current relays that work under AC250V 10A or DC30V 10A. It has a standard interface that can be controlled directly by microcontroller.
Pin DescriptionInput:VCC: Positive supply voltage
GND: Ground
IN1--IN4: Relay control port
Connect a load, DC 30V/10A,AC 250V/10A
Features:- Size: 75mm (Length) * 55mm (Width) * 19.3mm (Height)
- Weight: 61g
- PCB Color: Blue
- There are four fixed screw holes at each corner of the board, easy for install and fix. The diameter of the hole is 3.1mm
- High quality Songle relay is used with single pole double throw, a common terminal, a normally open terminal, and a normally closed terminal
- Optical coupling isolation, good anti-interference.
- Closed at low level with indicator on, released at high level with indicator off
- VCC is system power source, and JD_VCC is relay power source. Ship 5V relay by default. Plug jumper cap to use
- The maximum output of the relay: DC 30V/10A, AC 250V/10A
This is a LOW Level 5V 2-channel relay interface board, and each channel needs a 15-20mA driver current. It can be used to control various appliances and equipment with large current. It is equiped with high-current relays that work under AC250V 10A or DC30V 10A. It has a standard interface that can be controlled directly by microcontroller.
Features- Relay Maximum output: DC 30V/10A, AC 250V/10A
- 2 Channel Relay Module with Optocoupler LOW Level Triger expansion board, which is compatible with arduino
- Standard interface that can be controlled directly by microcontroller ( 8051, AVR, *PIC, DSP, ARM, ARM, MSP430, TTL logic)
- Relay of high quality loose music relays SPDT. A common terminal, a normally open, one normally closed terminal
- optocoupler isolation, good anti-jamming
VCC : Connected to positive supply voltage (supply power according to relay voltage)
GND : Connected to negative supply voltage
IN1: Signal triggering terminal 1 of relay module
IN2: Signal triggering terminal 2 of relay module
Each submodular of the relay has one NC(nomalclose), one NO(nomalopen) and one COM(Common). So there are 2 NC, 2 NO and 2 COM of the channel relay in total. NC stands for the normal close port contact and the state without power; No stands for the normal open port contact and the state with power. COM means the common port. You can choose NC port or NO port according to whether power or not.


Comments