

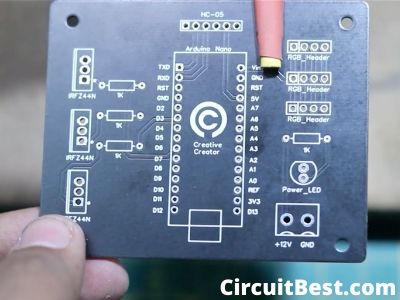
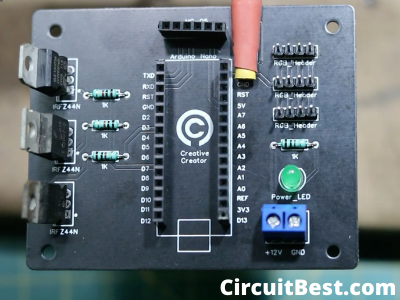
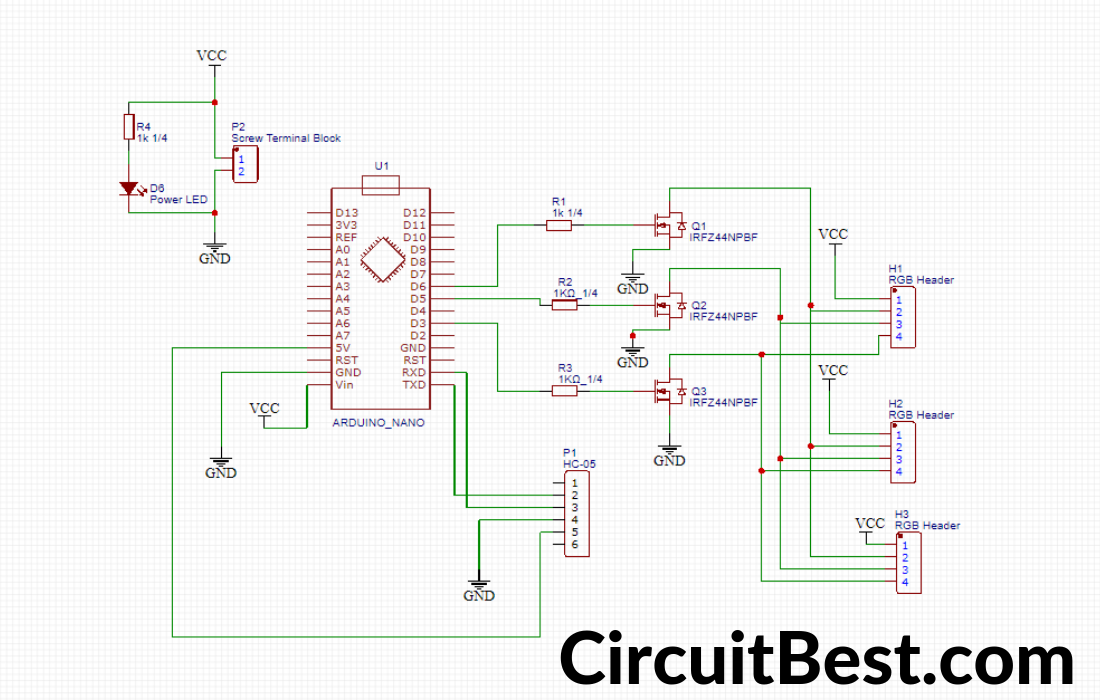
LEDs are Great for Lighting. Controlling the splendor of the LED strip is a significant troublesome assignment with Bare hands. In this undertaking, we are going to make an Android App Controlled RGB LED Strip. This Circuit is for Demonstration Purposes. I have utilized JLC PCB Service for this Project. The Heart of this venture is Arduino Nano. also, for Driving the LEDs I utilized 3, IRFZ44N Mosfets.
For the components section, I have gone with UTSOURCE. They are one of the largest component suppliers in China. They offer different types of components such as Resistors, Capacitors, ICs, and many other things. You will get exclusive discounts for Today in this article we are going to discuss shown to makes a simple Long Distance Transmission System circuit. So, let me give you a brief description of the circuit. So, why you are waiting for? Place your first order from UTSOURCE.
0 Profit selling KN95 masks and Infrared Thermometer from UTSOURCE.net: https://www.utsource.net/home/healthcare
Watch the YouTube Video about Android Controlled RGB LED Strip Using Arduino:Here is the video from Creative Creator Watch this Step by Step Without any skip and you will get everything.
RGB LED Strip:This LED Strip, for the most part, made up of SMD LEDs. On the off chance that you give a particular voltage, at that point the LED illuminates. We can't ready to control the LED strips with the Data signal. Along these lines, it implies that all LED strip Colors will stay Constant. To run the LED strips you will require Constant 12V Power source. For the Pinouts, It has 4 pin yield. 1, +ve, and 3 GNDs. The 3 GND focuses are for 3 individual Colors. They are for Red, Green, and Blue. In 90% of cases, the Internal Connections are the Same. 3 LEDs associated with the arrangement and 1 Resistance in Parallel. The Resistance is for Limiting the Current. This equivalent inside Circuit is Present in each circuit. Presently there are Many Branches Like this and these Brunches associated in Parallel. (Extremity plays the imperative job.)
How the RGB LED Strip Controller Circuit Works?You will require an Arduino for Providing the PWM heartbeats to the LED. These PWM Pulses are not sufficient for running the LED Strips. At next, we will require some Power Transistors for running the LED strips.
For the Power Transistor Selection, I have gone with IRFZ44N N-Channel Mosfet. Utilize The Mosfet can Drive 3 or 4 LED Strips effortlessly.
In the LED strip There are 3 Individual LEDs there are Red, Green, and Blue. I will utilize 3 Mosfets for this Project. Each LED is Connected with Each Mosfet.
We should Take Mosfet a, b, c. an is for Red. b is for Green and c is for Blue. Presently Suppose we need to illuminate the Red LED from the LED Strip. In this way, what we have to do is to Give the PWM Pulses to the Gate pin Of Mosfet a. Comparative cases will have Appeared for the Other Colors.
In Coding Language we state '0' for LOW and '255' for HIGH. Let me give you a few instances of how it is composed. assume you need to illuminate the Green LED., for this situation, the RED LED will be off as likewise, Blue LED will be off. The linguistic structure will be (RED_VALUE, GREEN_VALUE, BLUE_VALUE). For this, it will be (0, 255, 0).
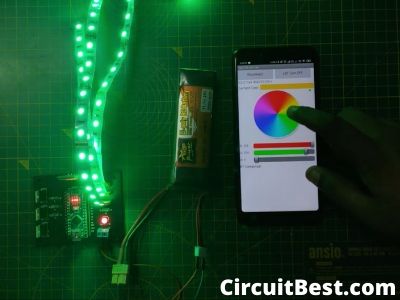
For Controlling the LED Strip we are utilizing an Android App. This App is associated with Bluetooth. furthermore, Sends Data to Arduino NANO. The Arduino NANO peruses the information and Sends the RGB information to the LEDs by PWM Pulses. Along these lines, the LED strip gives Different hues.
Notes:The application is produced using App Inventor. Subsequently, it isn't advanced for Android gadgets. A few times the application Crashes excessively.
Utilize 12V Powersupply for the Circuit.
The Arduino Nano's Voltage controller offers 5v to run the Arduino. for this, you can utilize 9 to 12v any.
You can likewise Read Our Another Article about LED Chaser Circuit With Arduino.
Step 1
Step 2
Step 3

Step 4

Step 5

Step 6


Comments