


Hardware components | ||||||
 |
| × | 1 | |||
 |
| × | 1 | |||
 |
| × | 1 | |||
 |
| × | 1 | |||
 |
| × | 1 | |||
Software apps and online services | ||||||
 |
| |||||
| ||||||
If you followed my other projects you would know that I have designed my IoT cloud based sensor instructions to rely on RESTful API's to push data about the cloud. I decided to write this tutorial utilizing the newer IoT protocol standard of cloud data messaging known as MQTT. As we see from the Google Trends graph below; MQTT is gaining rapid popularity in the world of IoT messaging.
OverviewThe MQTT protocol uses a publish/subscribe architecture in contrast to HTTP+ REST, with its request/response paradigm. Publish/Subscribe is event-driven and enables messages to be pushed to clients. The central communication point is the MQTT broker, it is in charge of dispatching all messages between the senders and the rightful receivers. One implicit advantage of using the broker is the “Callback” functionality. This callback function allows us a two way communication as part of the protocol whereas enacting callback in REST requires more work.
To use MQTT in the Arduino environment we utilize the Publish/Subscribe library created by IBM engineer Nick O'Leary(knolleary). This library is freely downloadable on Github.
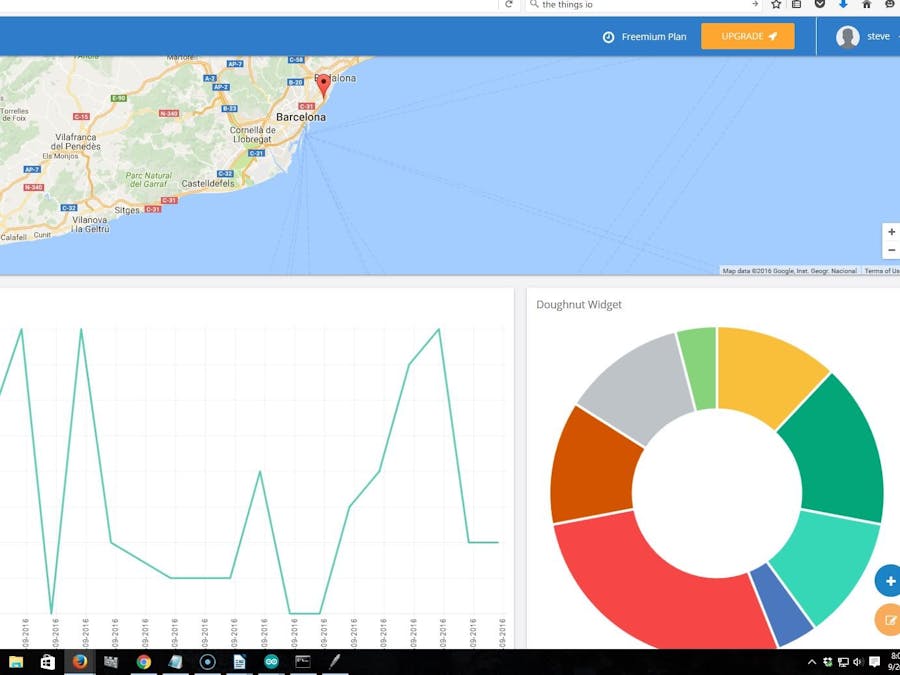
Looking for a free cloud based website that provides multiple visualizations isn't hard to find. Previously I've used ThingSpeak.com and even Google Sheets on my projects to move data about the cloud. However, for this project I had to search for a free cloud data visualization website that was both easy to use and utilizes the newer MQTT protocol rather then the more common RESTful API method. The website I found which meets these requirements is called theThings.io based out of Barcelona Spain. Not only was the sight free, easy and uses this emerging technology, they provided some excellent Arduino code which I only had to modify for the DHT and simplify by removing some unneeded overloaded functions. Their code is also heavily based on the MQTT_ESP8266 Arduino code which is included as one example when you download the PubSub Library.
ProceduresBelow are the procedures for establishing and configuring your account at thethings.io.
1. Sign up for a free account:
2. Fill out the informative questionnaire, Then select a name, the ESP8266 device, and make sure you choose JSON format for this example.
3. Grab your own TOKEN/API key from the following setup.
4. Now that we have our API token we just need to plug that into our Arduino sketch and start receiving data.
Just some simulated data but use your own TOKEN/API key.
ConclusionsI would like to make a final comment about the included Arduino Code. As of this writing date the addValue() function is not working as intended so I needed to use the send() function after each data string. The addValue() function is correctly designed to concatenate the string for subsequent passed values. I tested that the "cont" variable works as intended, and it does. However we won't get a callback from subsequent values so its possible the JSON string is not written correctly or not interpreted correctly on the server side. We avoid this problem by using the send() function after each addValue() is passed so the global variable "cont" always stays at 0. I assume this will be fixed soon but this included code is perfectly functional as of today and provides a great and simple example of how to use MQTT in your own projects.Finally thanks to thethings.io president Marc Pous and developer Carles Garriga Estrade for the great support and clever code.


Comments