


Hardware components | ||||||
 |
| × | 1 | |||
 |
| × | 1 | |||
 |
| × | 2 | |||
 |
| × | 1 | |||
Software apps and online services | ||||||
 |
| |||||
If you are a proud owner of Bolt IOT hardware, then you have access to basic BOLT CLOUD service. Also if you own a Raspberry Pi, and wonder if you can utilize the BOLT cloud service on your Raspberry Pi device, then you are at right place.
Although in beta version, but you can try very basic projects like LED on-off using Raspberry Pi and Bolt cloud service.
If you got Bolt Cloud Pro subscription, then you also can try projects using servo motor.
As per Bolt-IOT Documentation,
The Raspberry Pi is the latest addition to the devices which can connect to the Bolt Cloud. Due to the hardware limitations, not all features available to Bolt Wi-Fi modules are available on the Raspberry Pi.
This is two step process
1. Setting up Raspberry Pi for SSH access
2. Control LED connected to RaspberryPi using Bolt-IOT cloud.
Lets Start:Step -1. Setting up Raspberry Pi for SSH access :
- login to Bolt IOT cloud site and copy the API key
- Connect to RaspberryPi using SSH.
- On Raspberry Pi, open terminal and enter following command for required setup :
wget https://cloud.boltiot.com/PiBoltInstaller/<api_key> -O install.sh -o /dev/null 2>/dev/null;sudo bash install.shreplace <api-key> with your copied API key.
- After you run above script, then the output of the command will be as per the image below.
- Once the installation is complete, then you can see Raspberry Pi module in your Bolt-IOT cloud page as a new device.
- Copy the device name (BOLTXXXXXX) of newly added RaspberryPi module. This you will need to control the hardware connected to RaspberryPi. (along with API key).
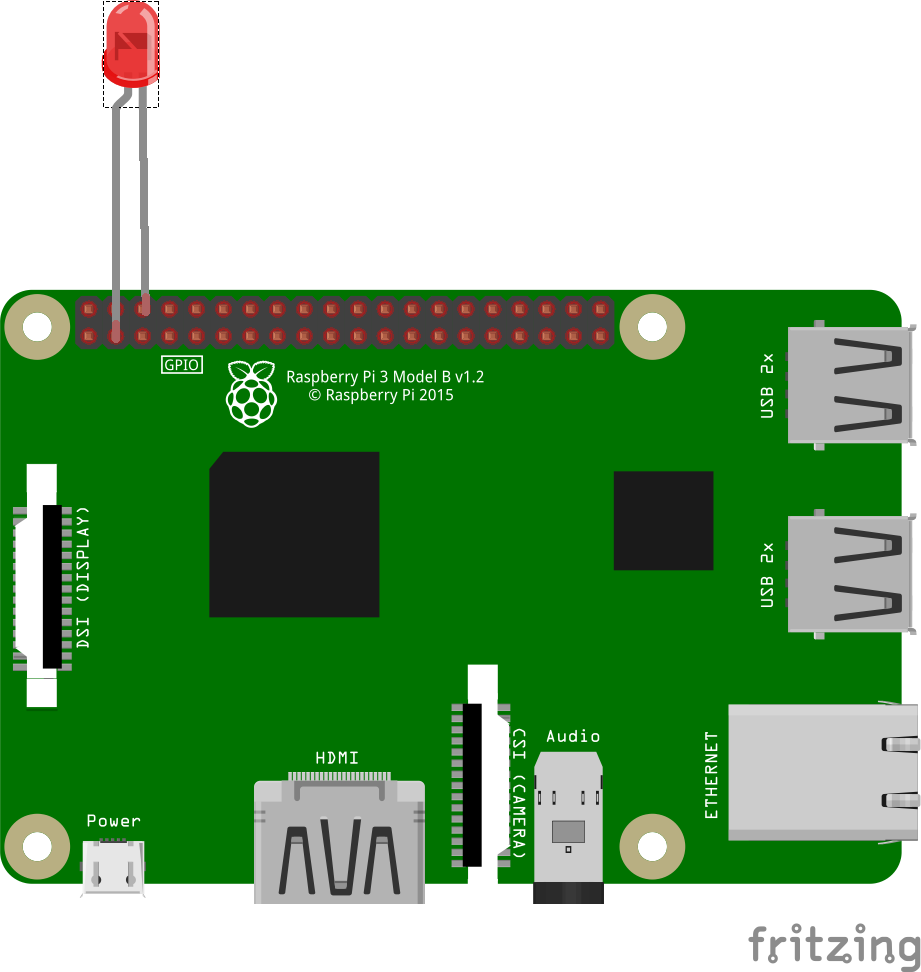
- The Raspberry GPIO pin configuration is as follows:
- Now connect positive terminal of LED to pin no-3 of Raspberry Pi and negative terminal to pin no-6.
- Now open Chrome browser
- Type below URL to make LED ON :
https://cloud.boltiot.com/remote/<api-key>/digitalWrite?pin=0&state=HIGH&deviceName=<device-name>[ Replace <api-key> with your API key, replace <device-name> with your device name.]This command will give 3.3 volts on pin 0. Browser output: {"success": "1", "value": "1"}
- Type below URL to make LED OFF :
https://cloud.boltiot.com/remote/<api-key>/digitalWrite?pin=0&state=LOW&deviceName=<device-name>[ Replace <api-key> with your API key, replace <device-name> with your device name.]This command will give 0 volts on pin 0. Browser output: {"success": "1", "value": "1"}
Congratulations, now you can control LED attached to RaspberryPi using Bolt IOT cloud.
There are various other options that you can try. Refer official documentation for more details.
Please Note, this is a beta version feature and may or may not work for certain scenarios.
Bolt-IOT Official References:https://docs.boltiot.com/docs/setting-up-raspberry-pi-for-ssh-access
https://docs.boltiot.com/docs/setting-up-a-raspberry-pi-as-a-bolt
https://docs.boltiot.com/docs/write-digital-output-1
https://forum.boltiot.com/t/connecting-raspberry-pi-to-the-bolt-cloud/17455
Optional:
Following is the additional functionality, if you like to add ON-OFF button UI as 'Products' to your cloud.boltiot.com account.
- Login to https://cloud.boltiot.com/home
- Make sure, your RaspberryPi device is connected to BoltIOT cloud service.
- Go to 'Products' and click on 'Add products'
- Give product a name, select settings as per below image and click ok button:
(Output devices, GPIO)
- Select 'Code' tab from top. Give file a name. Select file type as 'HTML'
- copy following code in Code area. Replace <device_name> and <API_key> in the code. Save the code.
<!-- connect positive of LED to pin no 3 and negative to pin no 6 of Raspberry pi -->

<!DOCTYPE html>
<html>
<head>
<style>
.flex-container {
  display: flex;
  flex-wrap: wrap;
}

.flex-container > a{
  width: 100%;
  margin: 5px;
  text-align: center;
  line-height: 75px;
  font-size: 20px;
}

a:link {
  text-decoration: none;
}
</style>
</head>

<body>
<h2>LED ON OFF using Raspberry Pi and BoltIOT Cloud</h2>
<div class="flex-container">

<a style="background-color:lightgreen;" href='https://cloud.boltiot.com/remote/<API_key>/digitalWrite?pin=0&state=HIGH&deviceName=<device_name>';" target="iframe_a";>
ON </a>

<a style="background-color:skyblue;" href='https://cloud.boltiot.com/remote/<API_key>/digitalWrite?pin=0&state=LOW&deviceName=<device_name>';" target="iframe_a";>
OFF </a>

<iframe height="40px" width="100%" src="_blank" name="iframe_a"></iframe>
</body>
</html>- Now link the newly created 'Product' with your 'Raspberry Pi' device.
- once linked, then it will be visible as follows:
- open BoltIOT application on mobile and control the LED attached to RaspberryPi using BoltIOT cloud.


Comments