

Hardware components | ||||||
 |
| × | 1 | |||
| × | 1 | ||||
 |
| × | 1 | |||
Software apps and online services | ||||||
 |
| |||||
Here we are going to connect NodeMCU ESP8266 and RFID-RC522 with MySQL database. So for that, first we should connect our NodeMCU ESP8266 board with RFID module. By using the RFID Module we are going to scan our RFID card and tag which are allowed or not. And by using our ESP8266 we are going to send that data to our MySQL database which is connect through a php page.
In this case, we are using php script as well. From NodeMCU code, we are making a get request to our php page. Make sure with that php page, you have to put inside /var/www/html.
Installation of LAMP Server and phpMyAdmin:First of all let us clear one thing: we are using LAMP Server for this project. In case you don't know what is LAMP, it is an abbreviation of Linux, Apache, MySQL and PHP. So if you have Windows or maybe MAC, then you have to install WAMP or MAMP respectively.
So what we are explaining is only for the LAMP server, and here are the steps for installing LAMP server:
- Install Apache:
sudo apt-get install apache2
- Install MySQL:
sudo apt-get install mysql-server
- Install PHP:
sudo apt-get install php5 libapache2-mod-php5
- Restart Server:
sudo /etc/init.d/apache2 restart
- Check Apache:
http://localhost/
If you install these steps successfully then you will get the Apache page like the image above. Here we are using phpMyAdmin, the web interface of MySQL, so you have to install that also and the command for that is:
sudo apt-get install phpmyadmin
Step 1:
Firstly open the Arduino IDE.
Step 2:
Go to File then click on Preferences tab as in Figure 1. Now you have to copy in the additional board manager URL here, then click OK.
Step 3:
Now go to Tools then select Board Manager. Open the window like figure 2. Just scroll down on that window and search for esp8266 by ESP8266 Community and then click on the install button.
Step 4: Restart your Arduino IDE.
Step 5: Now go to Tools then Select as shown in figure 3.
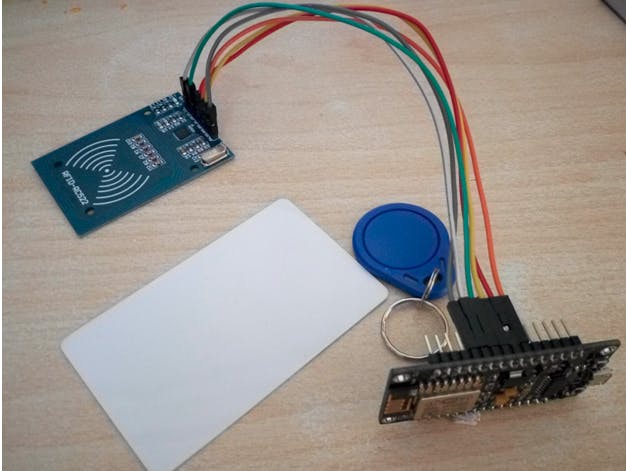
For this project you need:
- NodeMCU V3
- RFID-RC522 Reader with Tag
- Jumper Wire
1) NodeMCU V3:
NodeMCU is an open source IOT platform. It includes firmware which runs on the ESP8266 Wi-Fi SoC from hardware which is based on the ESP-12 module. The term "NodeMCU" by default refers to the firmware rather than the dev kits.
2) RFID-RC522 Reader with Tag:
There are cheap RFID modules that can read and write MIFARE tags, are sold at several web stores like eBay and included with many "starter kits" nowadays. Simply search for: RFID-RC522 (MF-RC522). The microcontroller and card reader use SPI for communication (chip supports I2C and UART protocols but not implemented on library). The card reader and the tags communicate using a 13.56MHz electromagnetic field.
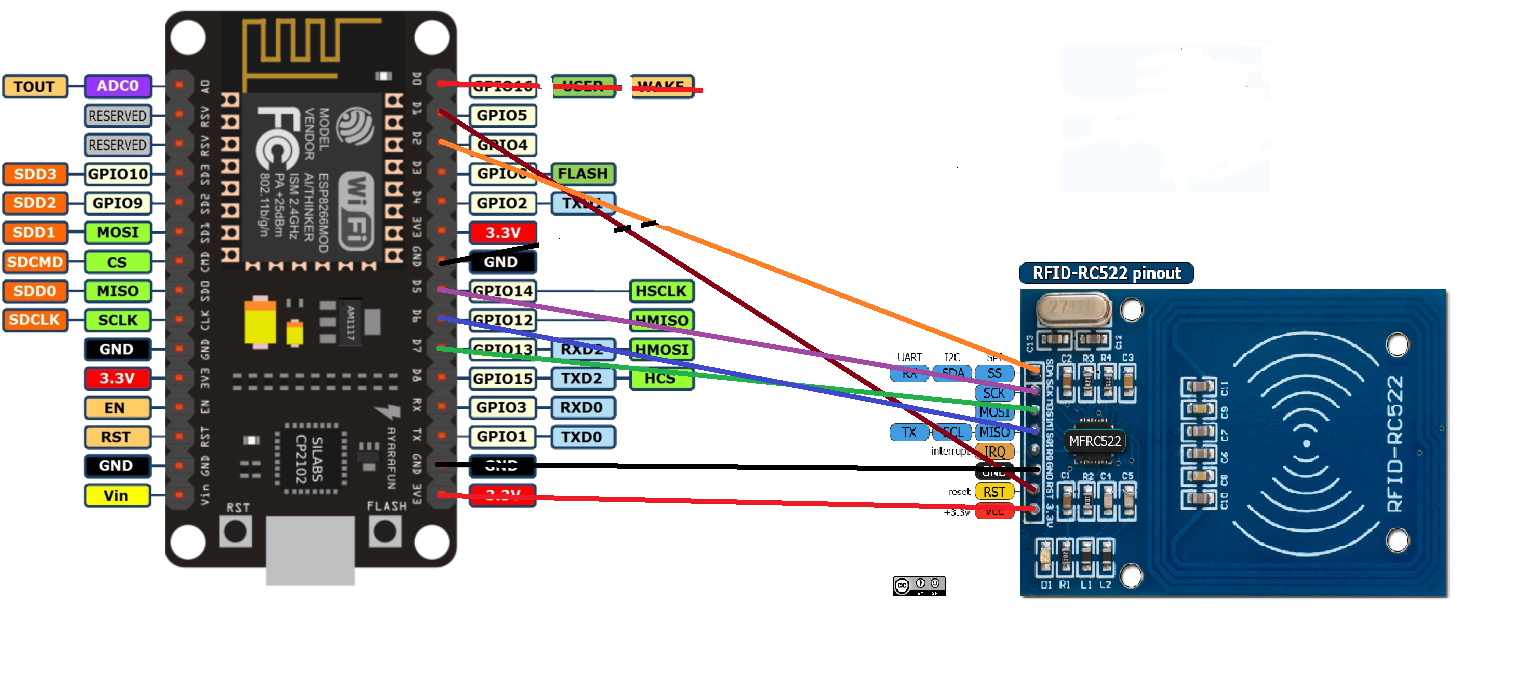
Circuit Diagram of this project is given above.
Here are the connections of our circuit:
RFID-RC522 -- NODEMCU
- SDA(SS) -- GPIO2
- MOSI -- GPIO13
- MISO -- GPIO12
- SCK -- GPIO14
- GND -- GND
- 3.3V -- 3.3V
- RST -- not connected
- IRQ -- not connected
Here we are using RFID-RC522, so you have to import MFRC522. Here is a GitHub link: https://github.com/miguelbalboa/rfid
And if you want to learn about how to make php program and where to put that file, you can check out the video here. If you have any doubts regarding this project, feel free to comment us below or you can email us at info@deligence.com.
And if you want to learn more about this type of project, feel free to visit our YouTube channel here.
Comments