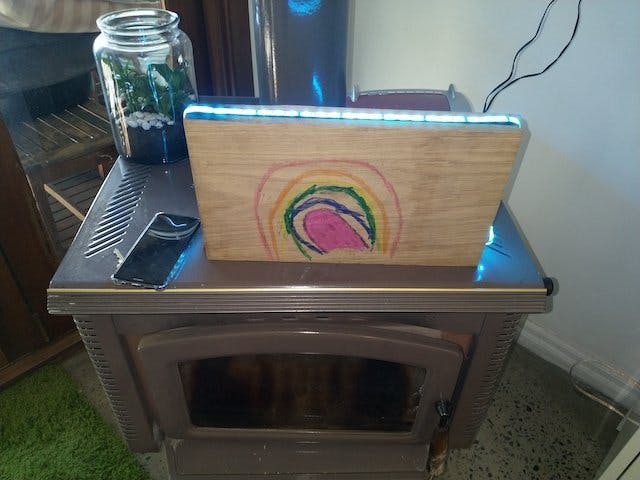
I have this friend. Let's call her “the woman who gives a lot and has all thing things." Or Lois. We could do that too. anyways, she does a bang up big New Year's Party every year and I wanted to make her something for it. Made her some chutney. Made her some cherry ripe balls. Nice... but she is an amazing cook. I know - why not grab a kid who likes being curious and make something nerdy. I had bought a cute little kit that allowed android controlled LED strips, and a spare few hours. This is what we came up with:
Preparation:Wood: Prepare the surface by planing, sanding and ensure the wood stays freestanding. Drawing / decoration: I find getting someone else to do the drawing or designing of the “thing” (in this case a 5 year old kid’s imagination was great), working out the thing you will use then getting them engaged and involved with the project will make something beautiful. Gather your materials and work out where and how you will place the LED lights. I simply side mounted the LED’s so that they were easy to wrap around the edges and I could quickly tape the prototype together. Measure your LED strip ready for the cutting. Download the Magic Pro app from the google play store or the apple app store. The name of the app is Magic Pro version 1.2.7 on Android Oreo It’s free! Don’t configure just yet ! Hold your horses, we will do that in the assembly bit. I use a seperate phone to my everyday one for this project as I wanted to use a secure wifi network which contained jut me and the phone. This means I could take the device anywhere and plonk it for a dance party and encourage others to use it and watch it anywhere. But there are ways to integrate this device into your existing home network and do all sorts of things with it like wake you up at a certain hour, activate through timers If this then that recipes and google home you can use it via via voice control or all manner of things.Make sure the device works! Plug the whole reel into the magic pro (see note in step two if you don’t have the right strip connector), ensure you have the connectors beteween the LED strip and the unit, and switch the power on. It should immediately light up. Because LED strips get hot very easily don’t leave it on for too long if you’re not going to use the whole strip or unwind it fully to do this. If you would like the test the colours, there is a simple remote that comes with the device. The remote just needs a CR2032 battery which is sometimes included with the unit otherwise your local supermarket or jay has them in stock. You can change the colour and a few bits of basics with this remote so try it out! Gather your tools
Assembly:Step one:- either sand or mount the item so that it can be freestanding and hold hidden at the back approx 30 ms of weight at least for the LED controller to be fixed to the back.
- Give the thing to a kid, outline the parameters in which they can decorate IE how much room they have and what the device will do.. then let their imagination run free with how they want to do it! I just used what was around me. Textas, and a pen!
Step two:- Cut the LED strip. Be careful wit this one! The LED units themselves should hahave a little scissors line where it’s safe to cut the tape. Measure the amount you wish to cut and then snip it to suit.
- If you don’t have the right connector you will need to fix it to the strip yourself. Here’s one place to grab them: https://www.amazon.com/Esco-Lite-Solderless-Connector-Adapter-Non-waterproof/dp/B00GPCYU7Q/ref=sr_1_4?ie=UTF8&qid=1422744256&sr=8-4&keywords=smd+5050+led+strip+connectors&tag=linus21-20.. no soldering required. Just clip them in.
- ok so your strip is connected. It’s time to mount.
Step three:- Grab the outdoor, double sided tape, and carefully lay it across the surface you wish to place the LED’s. Most LED strips come with adhesive tape which is hopeless. It’s good to go to your local hardware place and grab some strong stuff.
- On the cut you’ve made, wrap electrical tape or heat some shrink tube to seal the end.
- stick down and secure the strip.
- Secure the magic pro to the back of the item.
Step four:- Connect the Magic pro to a power source and the strip connector and you are good to go!
- Leave it plugged in and now lets configure it.
Step five:- Open your magic phone app, change your wireless network on your phone to be wifi ID named LED something your wifi list and note that at this time we’re now connecting the phone just to the LED strip. It won’t have a general internet connection. Instructions on passwords are in the app if you wish to change things or to connect your device to an existing wifi network. As mentioned, I took this to a party so simply left the device unconnected to an existing network and just used a second cheapie phone I had lying about to play with. Open the ap and click add a device. IT will search for the device, find it and click add. At this stage you can get crazy and add a whole bunch of stuff in there with adding the device to a group, adding a “scene” or recipe if you will to define the use case. WE will keep it simple and just add the device. - make sure you click the on button on trephine to switch it all on. - Now, in this screen you can change colours etc but down the bottom you’ll see a button called “microphone”. Click on it. It will automatically start using the phone’s microphone to detect noice and respond to it. - throw some music on and have a dance with the thing! Phone general instructions:
- Phone: Android Oreo only instructions. Please note that with android, eventually when the phone goes into “lock” mode your magic home app may stop working. In oreo versions of the android phone (android 8) you fix this by going into settings - battery and and in the background activity manager screen enable magic home.In the security screen also allow the magic home to enable access via the apps with usage access screen.


_3u05Tpwasz.png?auto=compress%2Cformat&w=40&h=40&fit=fillmax&bg=fff&dpr=2)

Comments