


Hardware components | ||||||
 |
| × | 1 | |||
| × | 1 | ||||
 |
| × | 1 | |||
Software apps and online services | ||||||
 |
| |||||
I have a collection of microcontrollers and sensors. I am working my way through the collection of equipment I have and looking at fun projects I can put together, and also expand my knowledge base.
I decided to create a rock, paper, scissors game as this included some technical challenges that I needed to overcome.
The ProjectHere is a short video of the project:
Here are the main components for this project:
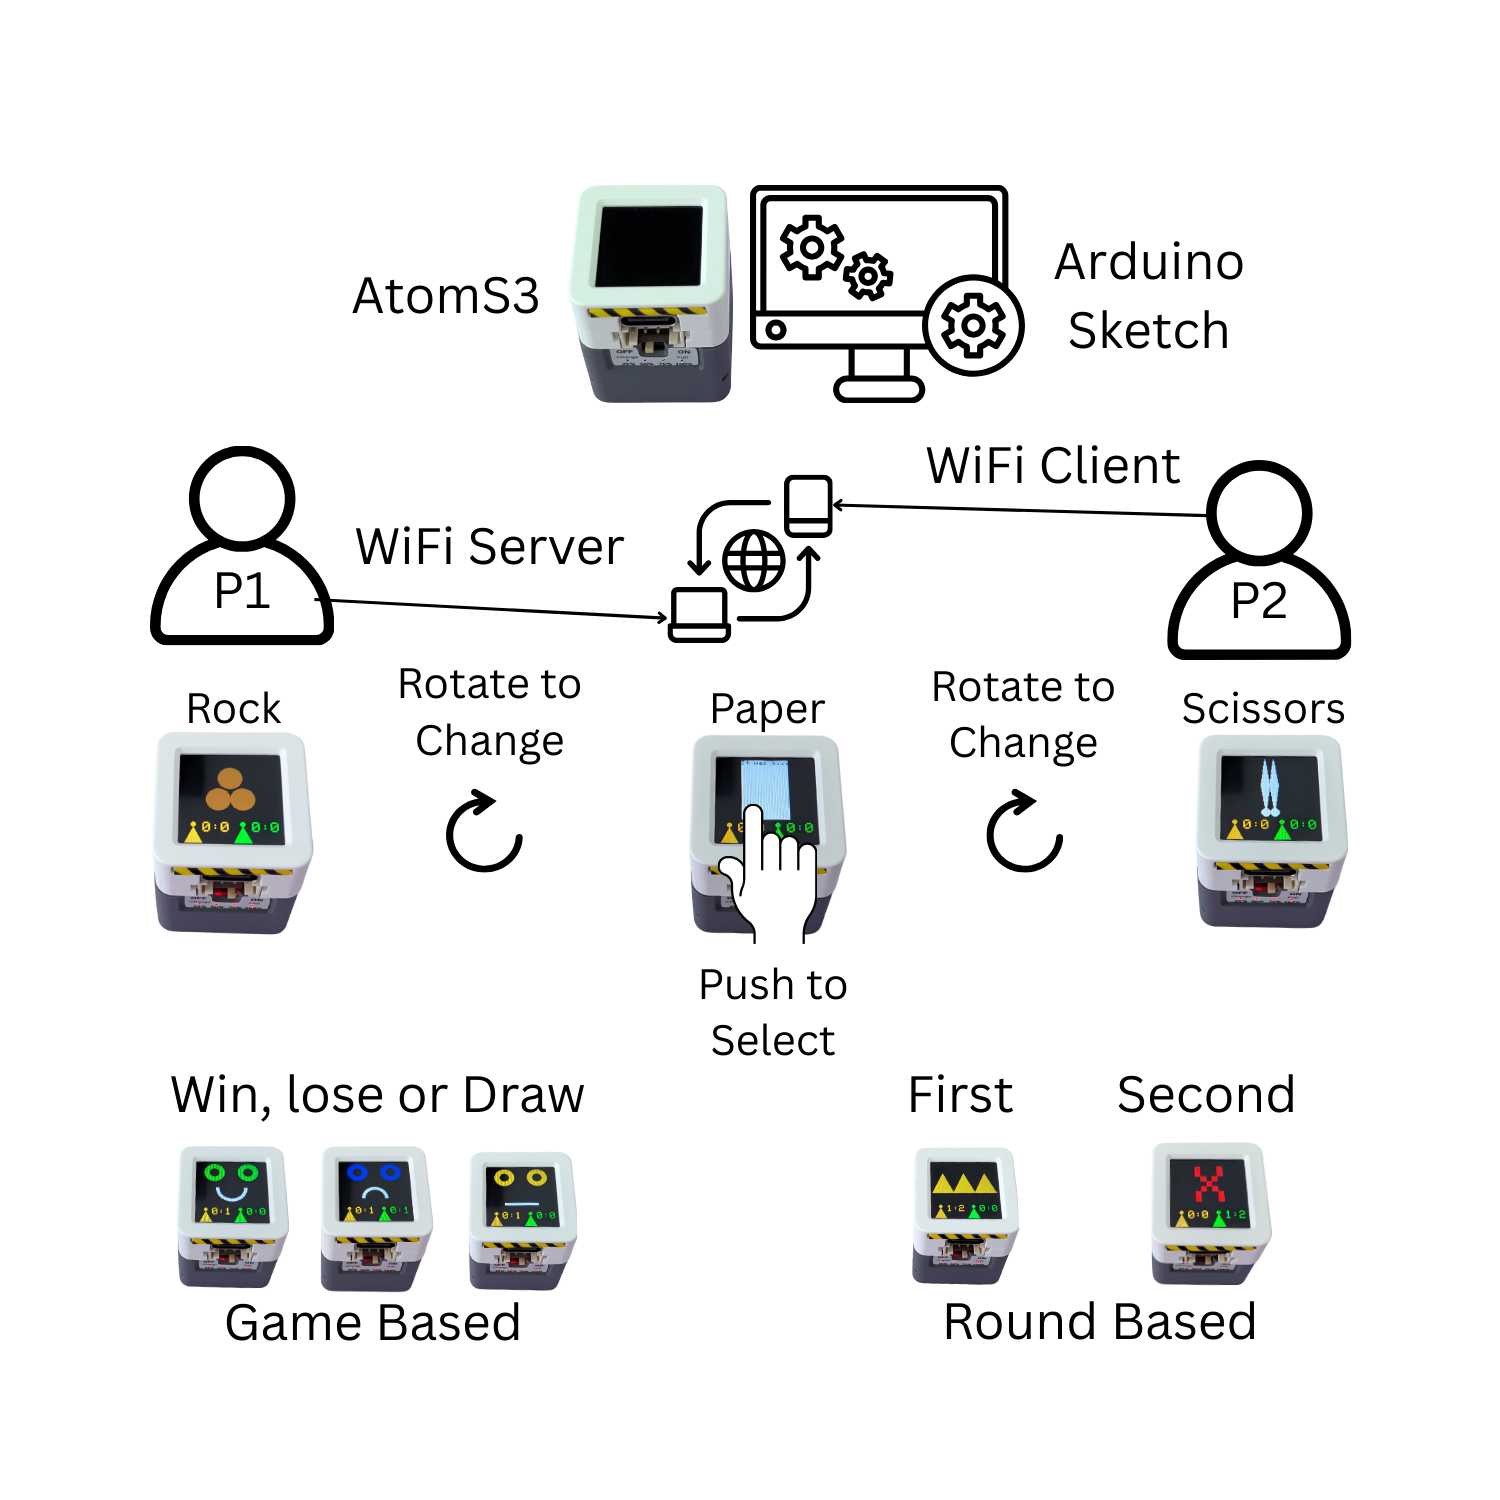
The project uses 2 M5Stack AtomS3 microcontrollers with batteries attached to the base. M5Stack have a wide selection of microcontrollers, and sensors, and the AtomS3 is one of the smaller microcontrollers available.
The AtomS3 has a small form factor - 0.94 x 0.94 x 0.51 inches (24mm x 24mm x 13mm). The integrated screen has 128 x 128 pixels and is not a touch screen. However, the screen doubles as a button. The AtomS3 has a number of other integrated devices like WiFi, Bluetooth, an accelerometer and a gyroscope.
The AtomS3 can be powered by a USB-C cable, but I decided to use some of the battery base units I have. The battery base has an on/off switch and a battery level indicator.
Part of the challenge with this project was the amount of screen real estate and the lack of the touch screen. For other projects, I have placed button icons on a touch screen to drive the user interface. I chose the rock, paper, scissors game as this would be easier to represent on the screen real estate provided, along with player scores.
I decided to use WiFi for the devices to communicate, and I could use the AtomS3 screen button to select an image. After running some tests, the Z axis reading from the gyroscope was used to determine if the device had been tilted past a certain point, which would cycle through the rock, paper, scissors images.
The project uses an Arduino Sketch to initialize the microcontroller display, WiFi and gyroscope. The Sketch creates all the images, as sprites, controls game play and updates scores.
Sprites are used for the majority of graphics in this project as they prevent a lot of flicker when the screen is updated.
When the AtomS3 is powered on, the Sketch runs a demo:
This is supposed to give the user the idea that they tilt the AtomS3 to move between images and then push the screen to select the image they want. I am not convinced this is effective. There is a #define in the Sketch (RUN_DEMO) that can be set to a value of 0 to disable the demo.
After the demo runs, each AtomS3 will configure the WiFi interface to discover other available devices. The following diagram shows an overview of this process:
Both devices create WiFi access points with a common prefix, like RPS, and a unique identifier. The unique identifier is taken from the MAC address of the device.
Each device will then scan available networks and filter out access points that start with the RPS prefix. As soon as each device finds 2 access points, the lexically lower access point name (RPS-ABC is lexically lower than RPS-DEF) is selected as the main server access point. The other device will delete its access point and connect to the server access point.
Once this process has completed, the devices can communicate with each other. The only data passed between the devices is the object selected by each player.
I ran into a couple of issues in this area:
- The initial WiFi configuration has to be set to AP and Station mode to allow an access point to be created and other networks to be scanned. Once the main server has been selected, the device that acts as the client has to switch back to Station mode so it can connect to the server AP.
- The WiFi scanning code uses an STL set to track the scanned SSIDs. The STL set is ordered and will not allow duplicates. This means the first SSID in the set can be used by both devices. However, the scan was not always picking up the access point the local device created, so this is now added manually to the set.
Once the network configuration is complete, the game can begin:
Player 1 (orange icon) is always the device the user is holding. Player 2 (green icon) is always the remote device. The number of rounds and games won is displayed.
The game has rock, paper and scissors:
The paper object includes the start of a quote, from a well known canine author.
Players can win, lose or draw a game:
The "meh" icon indicates a draw. The number of games per round, and the number of total rounds can be configured in the Sketch.
The game play mirrors the real life game - rock beats scissors, paper beats rock, scissors beats paper.
The player that wins all the rounds will see (a crown):
Second place will see:
The majority of the graphics are contained within sprites. Using sprites significantly reduces the amount of flicker when updating the AtomS3 screen. When I added the first and second place sprites, the Sketch starting to behave erratically. Sometimes it would display certain sprites and other times it would not.
It occurred to me that the sprites for the main playing area were quite large - 128 x 98 pixels with 24-bits per pixel, which is ~36KiB per sprite. The majority of the sprites have 2 colors, which allowed me to use a color depth of 1-bit on those sprites. This reduced a number of sprites to 12KiB.
Sprites are usually created with a width and height e.g 128 x 98. The color depth needs to be set before the sprite is created:
M5Canvas mySprite (&M5.Display);
mySprite.setColorDepth(1);
mySprite.createSprite(128, 98);
The M5Stack libraries use M5Canvas to define a sprite. Other libraries use TFT_eSprite.
Setting the color depth to 1 does not mean monochrome. It just means 2 colors. The M5Stack library allows you to set a color for a specific palette index. The following code sets white (palette index 1) to red at color depth 1:
mySprite.setPaletteColor(1, RED);Anything that would be output as white, will now be red.


Comments