


Hardware components | ||||||
| × | 1 | ||||
| × | 1 | ||||
| × | 1 | ||||
| × | 1 | ||||
Software apps and online services | ||||||
 |
| |||||
This project explores the feasibility and implementation of serving content, such as Wikipedia articles, directly from an ESP32 microcontroller. The ESP32's capabilities make it a compelling platform for embedded web applications and offline content delivery.
BackgroundIn late 2025, I found myself in a situation where I needed to serve offline content (offline maps, medical and technical information). I ended up using some Radxa Cubie A7Z (1GB RAM with GPIO) boards (https://radxa.com/products/cubie/a7z/) running Armbian(https://forum.armbian.com/topic/56130-radxa-cubie-a7aa7z-allwinner-a733/) and Internet in a Box(https://internet-in-a-box.org/).
If you are interested in self-hosting offline content, there is also Kiwix(https://kiwix.org/en/) and RACHEL(https://worldpossible.org/). Internet in a Box uses some resources from both Kiwix and RACHEL.
Here are some additional links, that I found useful, for self-hosting a Wikipeda mirror and setting up a Kiwix server on a Raspberry PI:
https://docs.sweeting.me/s/self-host-a-wikipedia-mirror
https://www.xda-developers.com/raspberry-pi-kiwix-guide/
The Radxa Cubie A7Z with Internet in a Box solution worked very well for my use case, but I wanted to see if I could serve content from a power efficient device without a sophisticated OS.
What did I use?I have a wide collection of microcontrollers. I usually use M5Stackcontrollers as they offer seamless integration with sensors, have great coding examples and a helpful community of other makers and developers. For this project, however, I decided to use a LILYGO T-Dongle-S3(https://lilygo.cc/products/t-dongle-s3?srsltid=AfmBOor0538aF0NND5JlcwYaf1nITRw9S8lsJHexYojBZY3xOpvSrcvK). I liked the form factor, the LCD for user feedback and the SD Card reader. The Arduino Sketch can be adjusted for any ESP32 based microcontroller with an SD Card and, at least, 512KB RAM.
Here’s a picture of the T-Dongle next to a regular USB drive to give you some idea of the scale of the device:
The front of the T-Dongle has a 0.96 screen. Here’s the back of the T-Dongle, which has a BOOT button if you need to use it:
If you look very closely, you will see a green insert in the USB-A connector:
The green insert is there to protect the SD Card reader until it is used. This is where the SD Card can be inserted:
Here’s a picture of the T-Dongle with the project started:
The screen on the T-Dongle gives some great user feedback in terms of the access point and host access as well as the amount of content served over time:
The project can be built to disable screen output to save power, so this project also uses an LED on the back of the T-Dongle to indicate an error (red) or normal operation (green):
Here’s the power consumption of the T-Dongle running the project:
The project uses just under 1W. The Radxa Cubie A7Z I used in another project consumes ~2.2W when idle and ~8W under load.
Here’s the output of an astronomy ZIMfile hosted locally using the kiwix-serve utility and accessed from Firefox on using localhost:8888:
Clicking on the “book” gives the following output:
The same ZIM content, after processing to fit onto the T-Dongle, looks like this:
The T-Dongle version goes directly to the content, but takes ~44seconds to load. The content hosted by the kiwix-serve utility loads in 2-3 seconds. However, this is the difference between running on a Linux laptop with an Intel CoreTM i3-1215U (6 cores @ 3.3GHz), 8GB RAM and NVME storage vs running on a T-Dongle with Xtensa LX7 (2 cores @ 240MHz), 512KB RAM and SD Card storage.
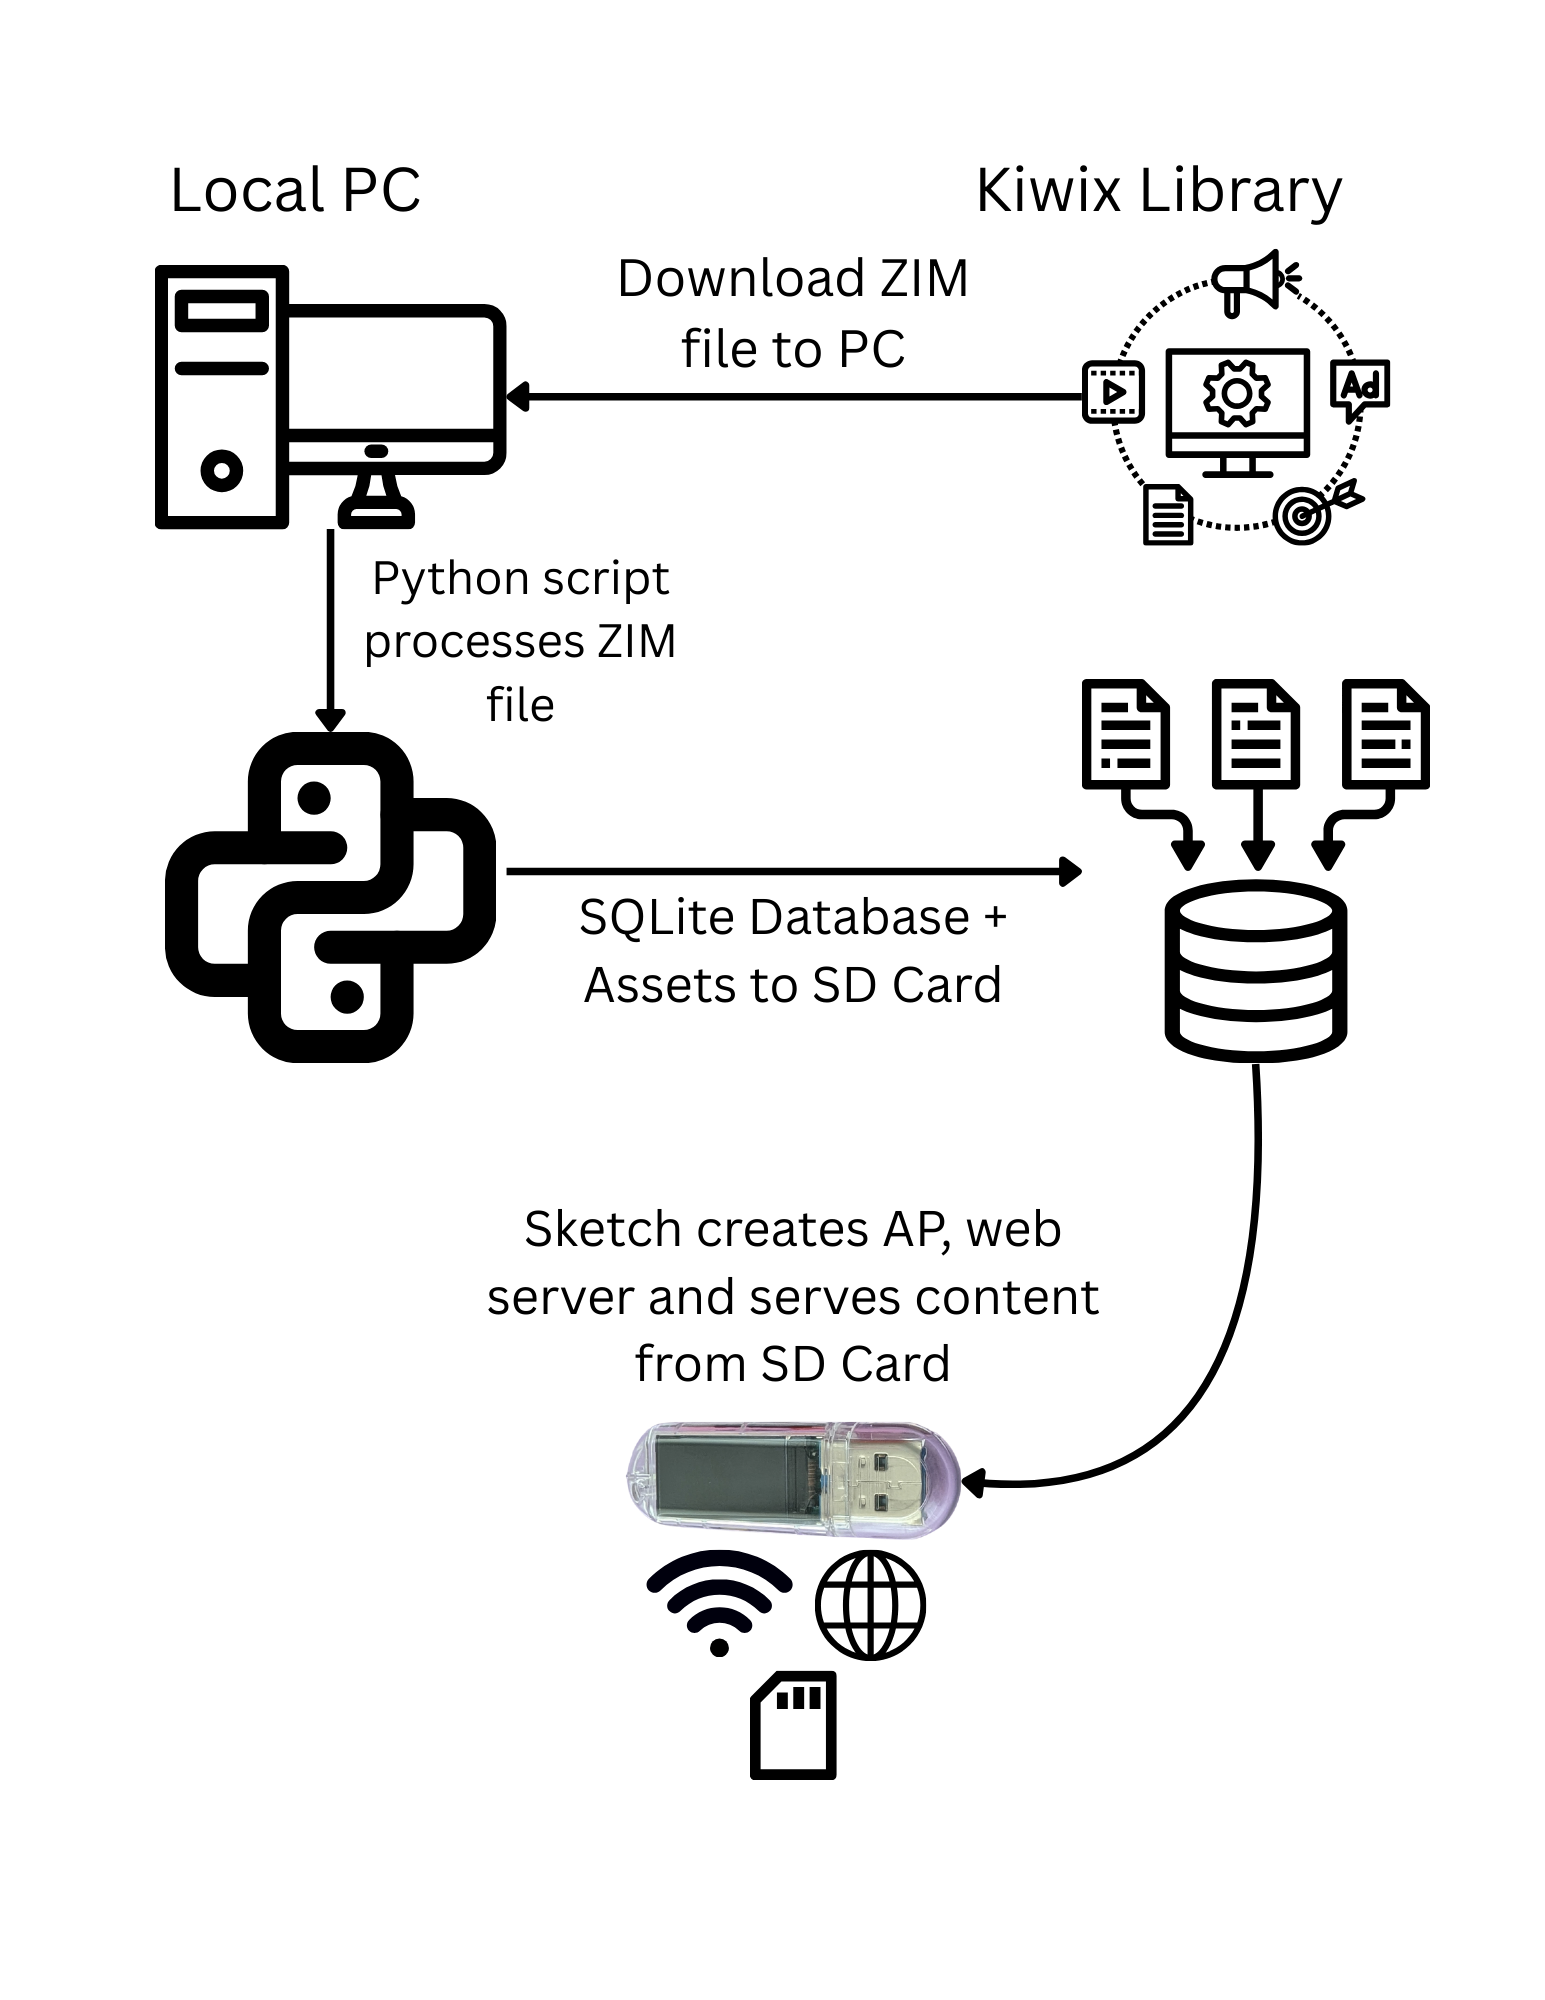
Technical OverviewThe following diagram gives an overview of the entire process of taking Kiwix libraries (https://library.kiwix.org/) and serving them from the T-Dongle:
Here’s walk through of the diagram:
- Step 1. Visit the Kiwix Library (https://library.kiwix.org/) and select the content that you would like to serve from the T-Dongle. This will download a ZIM file your local PC. The content must be well under 128 GB e.g. 80-90 GB.
- Step 2. Process the downloaded ZIM through the zim2asset.py script.
- Step 3. The zim2asset.py script locates all the content in the ZIM file and repackages it for use on the T-Dongle. This is achieved by creating a CSV file with the original URL of the content e.g. /some/url/file.html, the type of content e.g. HTML or JavaScript, whether the content is compressed, what asset file the content belongs to, and the start position and size of the content. The CSV file is used to create a SQLite database that cross-references an incoming URL request with the repackaged content.
- Step 4. The finish.py script is used to copy all content to an SD Card and then an Arduino Sketch is loaded onto the T-Dongle which will create a WiFi access point to serve content from the SD Card.
There are a number of discussion topics, on-line, about the SD Card capacity the T-Dongle, and probably other ESP32 devices, can support. I started the project by limiting the SD Card to 64 GB, but started using 128 GB SD Cards later in the project. The 128 GB SD Cards seem to be working well, but this might be one area where YMMV. Whatever SD Card you use, you must format it for FAT32 with the largest allocation block size possible as this helps performance considerably.
Content has to be split up into ~4 GB files (ASSET-00.BIN through ASSET-13.BIN) as the FAT32 allows a maximum file size of 4 GB and the Arduino File.seek() API only supports unsigned 32 bit input, which essentially limits the seek to 4 GB.
The zim2asset.py script compresses as much content as it can (HTML, text, CSS and JavaScript). However, this project only uses GZIP for compression and not the ZSTD compression used by ZIM. This means the compression is not as good and processed ZIM files will produce larger content. This is why it is important to pick a ZIM file that is well under 128 GB as there will be some expansion over the ZIM file size. For example, the Top 1 Million Wikipedia ZIM file (wikipedia_en_top1m_maxi_2026-01.zim) is 46 GB. Once processed, which takes ~63 minutes on an Intel Core i3-1215U, the content is ~60 GB. SD Cards, once formatted, will have ~50 GB (64 GB SD Card) or ~119 GB (128 GB SD Card) available space.
Content like GIF, JPG, PNG and PDF etc. are not compressed by the script as these file formats already contain some form of compression and GZIP will just store the file.
You will notice that all the files on the SD Card follow the FAT32 8.3 naming convention as this uses the least amount of space on the SD Card. There are not a lot of files on the SD Card, but lower case filenames will consume more disk space that upper case 8.3 format names.
The following diagram shows an overview of the user interaction with the T-Dongle:
Here’s a walk through of the diagram:
- Step 1. The user connects to the portablewiki access point and start their browser. The user accesses http://portablewiki.local to start browsing content.
- Step 2. The T-Dongle, running a Sketch to serve content, receives the request.
- Step 3. The Sketch uses SQLite to query a database, on the SD Card, for the incoming URL.
- Step 4. If the URL is found in the database, metadata about the URL is loaded. This tells the sketch which asset file (ASSET-00.BIN through ASSET-13.BIN) contains the content, the type of content e.g. HTML or CSS etc., if the content is compressed, and the start location and size of the content.
- Step 5. The content is loaded from the correct asset file and proper HTTP headers are set e.g. content type and compression encoding. Content over ~2 KB will be sent in chunks.
- Step 6. The content is sent back to the user.
The following diagram describes the relationship between content request, the SQLite database, the asset files and the returning content:
Here’s a walk through of the diagram:
- Step 1. The end user requests the URL /results.html.
- Step 2. The SQLite database is used to locate metadata for the requested URL. The URL has a content type of text/html, is located in asset file 10 (ASSET-10.BIN), starts at offset 1000 bytes for a length of 300 bytes in the asset file.
- Step 3. The content at byte offset 1000, length 300 bytes, is extracted from ASSET-10.BIN and returned to the user as text/html content.
The project achieved its goals, and shows that some Kiwix content can be served via a different environment and ecosystem. Hosting directly with Kiwix or using Internet in a Box is a much better option as these environments allow access to a lot more content, are performant and concurrent. Additional information about this project e.g. build and configuration information, can be found on GitHub.


Comments