

Hardware components | ||||||
| × | 1 | ||||
| × | 1 | ||||
 |
| × | 36 | |||
 |
| × | 36 | |||
 |
| × | 36 | |||
| × | 36 | ||||
| × | 17 | ||||
| × | 8 | ||||
| × | 1 | ||||
 |
| × | 1 | |||
| × | 1 | ||||
Software apps and online services | ||||||
 |
| |||||
| ||||||
| ||||||
If you would like to build this but don't like the idea of starting completely from scratch, please check out Chris Davis' Altair-Duino kit which comes with all components, a PCB, a case and a pre-programmed Arduino Due!
Here are some pictures from others who have built this project and made it their own:
- Alan Lowther found a nice metal case for his version and connected a Raspberry Pi for input/output and speech synthesis.
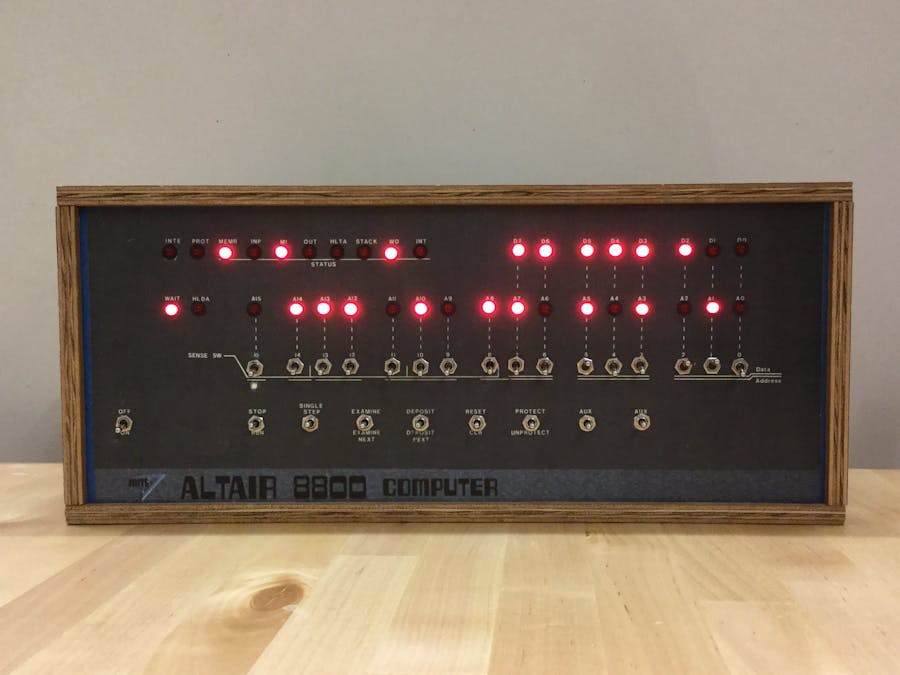
- Martin Zumr made a really nice looking box all out of wood.
- Justin Davis made an Altair shield for the Arduino Due.
If anybody else wants to share their creation let me know and I'll post it here. I'd love to see the variety of versions that people come up with!
For a long time I have thought it would be cool to have an Altair 8800 computer to play around with. But working vintage Altairs are rare and therefore expensive, easily costing $1500-$2500 if available at all. There are some other options, such as altairclone.com but that still costs $600 which for me is too much to spend on a computer that - while very cool - will be of limited use. Thankfully Mike Douglas, the creator of the Altair Clone, has made available to the community all the old documents and software he hunted down and used when creating the clone. Thanks to Mike's work there is a wealth of information on the inner workings of the Altair and its most popular peripherals conveniently available.
At some point I was looking at the Arduino Mega 2560 specs and started wondering whether it would have enough I/O pins to just hook up the LEDs and switches from the Altair front panel and write my own emulator software. Turns out the Arduino Mega has exactly the right number of I/O pins. So I just had to make my own Altair clone.
Using the Arduino Mega to drive the simulator worked fine and was simple to set up but the emulation runs at only about 25% of the Altair's speed and it can only provide 6KB of emulated RAM (although back in the day that would have been a lot). Permanent storage capacity (for saving programs/data created in the simulator) is also limited since the Mega's EEPROM only holds 4KB.
The Arduino Due has plenty of memory to support a full 64KB of emulated RAM and runs much faster than the Mega. Additionally, the Due can save data to the flash memory at run time. That makes it possible to use any portion of the 512K flash not used by the simulator itself for permanent storage.
Using the Due I now have an Altair 8800 simulator that runs at about the original speed, provides 64K of emulated RAM, includes lots of Altair software and still can provide 32K of semi-permanent storage to load and save programs and data in the emulator.
My goal for this project was to get as close to the "real" Altair 8800 feeling as possible when working with the simulator. That includes having the front panel lights reflect the real behavior as much as possible. One criterion for that was that it should be possible to play the front-panel "Kill-the-Bit" game - and it is:
It turns out that the simulation is true enough to the original that even the Altair 8800 music demo works. Note that this relies on an AM radio picking up the electromagnetic interference generated by the Altair's circuitry!
Back in the day, Processor Technology released a small extension board for the Altair (just a few capacitors and resistors) with accompanying software that turned the Altair into a respectable music system (for the time). The same additions can be made to the Simulator (see the documentation) which allows it to play the tunes created for the music system back then. Here's an example:
Another historically important extension to the Altair was the Cromemco Dazzler graphics board. Using either a software or hardware extension, the Simulator can also emulate that board:
Yet another software/hardware extension allows the Simulator to emulate the Processor Technology VDM-1 graphics card:
Of course in the end I don't own an original Altair, so all information on how it works had to come from documents and videos (see acknowledgements below). There may be some minor differences but over all I think it reproduces the original behavior quite well. One known (and intentional) difference is the HLDA status light: On the original it signals that CPU has acknowledged being halted by an external device. This functionality is never used in the simulator so here it signals that a file (serial/tape capture/replay) is currently open.
Highlights- Accurately reproduces the behavior of the Altair's front panel elements.
- Runs at about the same speed as the original Altair 8800 (when using Arduino Due) or 25% original speed when using Arduino Mega.
- Emulated RAM size is 64KB (Due) or 6K (Mega)
- A number of Altair programs are included and can easily be loaded into the emulator, including Pong, Altair 4K BASIC (the first Microsoft product), Altair extended BASIC, MITS Programming System II (Due only), Altair Time Sharing BASIC (allows multiple users to use BASIC at the same time).
- BASIC and Assembler example programs are included in the emulator software and can easily be loaded into BASIC/Assembler.
- Emulates one 88-SIO, 88-2SIO and 88-ACR (audio cassette recorder interface) board. Each simulated serial device can be mapped to an Arduino's serial interface. By default, the two most common (88-SIO and 88-2SIO port 1) are mapped to the Arduino's main serial port at 115200 baud 8n1, which can be accessed via the USB cable. I recommend connecting a serial-to-Bluetooth dongle to the RX/TX serial pins. That way any bluetooth-enabled device can serve as a terminal for the Altair.
- On the Arduino Due, both the main serial interface (USB) and the Serial1 interface (pins 18/19) can be used simultaneously.
- Data sent to each serial device (including the ACR tape) can be captured and replayed in up to 256 files which are kept in the Arduino's local storage (EEPROM or FLASH).
- The cassette interface supports using the CSAVE/CLOAD commands in extended BASIC (support is automatic with no user interaction required). Great for developing your own BASIC programs!
- Emulates a Cromemco Dazzler graphics board (needs some additional hardware/software, see here)
- Emulates a Processor Technology VDM1 video terminal board (needs some additional hardware/software, see here)
- Emulates up to 16 88-DCDD disk drives (4 in default configuration). Disk drive emulation is optional but requires hooking a SD card up to the Arduino's SPI header. Only supported when using Arduino Due.
- Emulates an 88-HDSK hard drive controller with up to 4 hard drive units attached (1 in default configuration) and 4 platters per unit.
- Emulates a 88-RTC-VI board with real-time clock and vector interrupt handling. This makes it possible to run Altair Time Sharing Basic.
- 256-byte pages of memory can be saved to permanent storage and loaded back to memory. This provides a simple way of saving programs entered via the front panel switches.
- Many settings can be easily changed via the integrated configuration editor.
When using the Due, be aware that everything captured or saved within the simulator gets erased if you upload a new version of the sketch to the Due. This is because saved data is stored in flash memory which gets erased when uploading a new sketch (the Due does not have any EEPROM for permanent storage). If an SD card is hooked up to the Due, saved data is stored on the SD card. In that case data will not get lost when uploading a new sketch.
DocumentationSince the simulator works exactly the same as the Altair 8800, the original Altair's documentation (easily found on Google), will provide all the information needed to operate the front panel switches.
However, the simulator does include a number of extra functions and built-in software for the Altair which are accessible via the AUX1/AUX2 switches on the front panel (those were included but not used on the original Altair). That functionality is explained in a separate document which I wrote up while developing the software for the Simulator. The document is many pages long and the information contained in it would overwhelm this page, so please refer to the Documentation.pdf file in the source repository.
Build instructionsOne goal was to use as little support circuitry as possible. Both the Arduino Mega and Due have enough I/O pins to directly wire up all the front panel elements. The only additional circuitry required are the transistors and resistors to drive the 36 LEDs (if the LEDs were connected directly to the Aruino's output pins and too many turned on at the same time the total current would exceed the Arduino's limits).
Creating full schematics for this project would be tedious, repetitive (36 identical LED driver circuits, wiring for 32 switches) and not very helpful. So the schematics document instead contains detailed tables about which elements get connected to which Arduino pins and the schematics for the individual sub-circuits (like LED drivers). I also added a Fritzing file to show the layout of the LED driver components on the stripboard.
To create the front panel I started with a high-quality scan of the Altair's front panel (found here at www.vintage-computer.com) and had it printed at a copy shop onto card stock. For the backing (to actually hold switches and LEDs in place) I used a sheet of 22 gauge metal, using a regular power drill to create the holes for LEDs and switches. The LED driver circuits are soldered on pieces of stripboard which are soldered directly to the LEDs which in turn are held in place by the metal sheet.
The front panel is held in place and upright by a simple wooden box. The box is not as deep as the original Altair (because it only has to hold the front panel and Arduino).
To wire up the front panel On/Off switch, I just added a power socket (same as on the Arduino itself) to the box, wired it to the front-panel switch and from there to a power plug that plugs into the Arduino.
When using the Arduino Due, emulation of up to 16 88-DCDD disk drives can be enabled by connecting an SD card to the Due's SPI port. The last page in the Schematics document shows required wiring in detail.
Before uploading the sketch to the Arduino Due, be sure to switch the Arduino compiler's optimization setting to "performance". By default it is set to "size" (not sure why since the Due has 512k flash memory). To do so, load file
c:\Users\[user]\AppData\Local\Arduino15\packages\arduino\hardware\sam\1.6.9\platform.txt
into a text editor and change any occurrence of "-Os" to "-O3". You can skip this step but then the simulator will run significantly slower.
The simulator software can also run on a bare-bones Arduino (Mega or Due) without any front panel controls connected. This does allow to run quite a few of the included programs (those that mostly use the serial terminal and not the front panel elements). To do so, edit the config.h source file and set #define STANDALONE 1 (instead of 0). Refer to the "Debugging capabilities" section in the documentation to see how to operate the virtual front panel elements in that setup. Keep in mind though that this is not the intended use of the simulator. I suggest using PC-based all-software emulators if you don't want to build the front panel hardware. The config.h source file contains a number of switches that include/exclude simulator functionality. The default settings work well but if you want to tweak the simulator, this is the place to start.
Since I do not own an Altair myself, I had to rely on getting information off the internet. The Altair 8800 instructional videos produced by Mike Douglas (deramp5113) of altairclone.com were of great help and are very interesting to watch. In addition to producing the videos, Mike has collected a wealth of Altair related hardware and software manuals and made them available on his site.
(Note that Mike's videos are very helpful to get some ideas about what to do with the simulator once you build it)
Martin Eberhard's ADEXER tool was invaluable for low-level debugging the hard drive support. He also wrote two boot loaders used by the simulator: the combo disk boot loader (CDBL) for booting disks and mini-disks as well as the hard disk boot loader (HDBL) which is shorter and more stable than the original.
While I did write all the code including the CPU emulation myself, I did take some inspiration from the i8080 core model project when it came to getting the half-carry computation and the DAA instruction implemented efficiently.
The simulator includes some original software for the Altair 8800. Another big thanks to Mike Douglas who spent countless hours hunting down, collecting and getting this software to work and then made it all available on his altairclone.com web site:
- Altair 4K BASIC (MITS 1975)
- Altair Extended ROM Basic (MITS 1975)
- Altair Time Sharing Basic (MITS 1977)
- Kill-the-Bit game (Dean McDaniel, 1975)
- Pong game using front panel (Mike Douglas)
- 'Daisy, Daisy...' music (Steve Dompier, 1975)
- Music System (Processor Technology 1977)
- MITS Programming System II (MITS 1976)
- Altair Turnkey Monitor (MITS 1977)
- i8080 CPU Diagnostic (Microcosm Associates, 1980)
- i8080 CPU Exerciser (Frank D. Cringle 1994, Ian Bartholomew 2009)
The disk and hard disk images (included in the "disks" subdirectory of the source archive) were also taken altairclone.com as well as deramp.com (Mike Douglas' personal web site). These include CP/M, various versions of disk BASIC, Altair DOS (including Fortran) and more. Again, Mike has done an amazing job finding all that software and then creating functioning disk images that can be used by the Altair community. I only used a selection of the software so you may want to head over to altairclone.com or deramp.com and check out some more.
Discussion ForumChris Davis of Altairduino.com has set up a Google Group for discussion of Altair-Duino related questions:
https://groups.google.com/forum/#!forum/altair-duino
Feel free to visit and contribute to the discussion!


_3u05Tpwasz.png?auto=compress%2Cformat&w=40&h=40&fit=fillmax&bg=fff&dpr=2)
Comments