

Software apps and online services | ||||||
 |
| |||||
 |
| |||||
For the past few months I have been doing some Amazon Alexa development on the side. When I made my first skill and sent in for certification I kept getting declined. One thing that is great about the declining process is they are very thorough on what you are missing. Part of it was from lack of reading requirements (yes, that is my fault) but there were elements that would get declined because I was using AWS Lambda's example code that was also missing requirements. After trial and error I finally had my first certified Amazon Alexa Skill. I now use that code and process as a template to make all my Alexa skills. I've had a few friends and colleagues who have run into similar problems attempting to certify their own Alexa Skills, so I have decided to compile a tutorial that goes over the process I use to turn my template code into a new Amazon Alexa Skill that I can send for certification. I hope this tutorial helps you create and publish your Amazon Alexa Skill. I do have to warn you, this tutorial is quite long because it covers EVERYTHING from beginning to end, you are already familiar with Alexa development, or just looking to learn how to publish I highly suggest skipping certain sections of this tutorial.
The tutorial will be broken up into 4 parts: Setting up Lambda and Amazon Alexa Skill, Understanding the Lambda code, Integrating Amazon Alexa Skill and Lambda Code, and Publishing the Amazon Alexa Skill.
Setting Up Lambda and Amazon Alexa SkillLet's first start by creating a Lambda.
- Go to https://aws.amazon.com/ and sign up for Alexa Web Services.
- Once you have signed up, go to the top left corner and select Services. In this dropdown you should see all the services that AWS offers. Select Lambda in the Compute section.
- Once in the lambda console, select Create a New Lambda Function. It will ask you to select a blueprint to pick from now. For now select Blank Function:
- For Configure Trigger select the dotted box and pick Alexa Skills Kit from the dropdown.
- ***NOTE: If there is not "Alexa Skills Kit" in step "Configure Trigger", select region "US East (N. Virginia)" (upper right) – this is the only region with Alexa/Lambda free tier service.***
- For Configure Function pick a name for your function (based on what your lambda function will do) and give it a description. That is up to you. However, what is important for this tutorial is to select Python 2.7 from the Runtime dropdown.
- Scroll down to the Lambda function handler and role section, select Role dropdown and choose to create a new role. Once again, call it whatever you want. Then select the Existing Role dropdown and choose the new role you just created. Now you can go to the bottom of the page and click Next.
- Now your are in the Review section. Once you are satisfied with your setup, click Create Function.
- You should now see the Lambda console where you can start coding.
- All setting you chose during setup can still be changed! We will come back to this console in the next section.
Now we will look at setting up the Amazon Alexa Skill.
- Go to https://developer.amazon.com/alexa and select Sign In
- If you have not done so, create an Amazon Developer account.
- Once you have logged into the Amazon Developer account, Select the Alexa tab and then select the Get Started button under Alexa Skills Kit
- Once in the Alexa tab, select Add a New Skill.
- Fill in the Name and Invocation Name, then click Next button
- You should now be in the Interaction Model section.
- We will look more into this in the next section.
Ok, now that all the setup is done we can get to the fun stuff! Now it is time to download the Alexa Skill Template provided in this project. The lambda code is the document labelled exam_grade_estimator.py. We are going to break down this code a bit, to understand what is happening.
The code starts off as a lot of if-else statements. On lines 23-28, there is an if-else statement to choose between which request was activated by the user. Their can be a Launch Request when the app is opened, Intent Request when a command was received, and a SessionEnded Request when the user closes the app.
- LaunchRequest activates the function get_welcome_response() that gives the user a speech output explaining what the app does.
- SessionEndedRequest activates the function handle_session_end_request() that gives the user a speech output telling the user that the app is closing.
- IntentRequest activates the function on_intent() that opens up another decision tree of possibilities. In this code there are four intents. The last two (AMAZON.HelpIntent and AMAZON.CancelIntent) are needed in every Amazon Alexa Skills. On lines 59-68 you can see the if-else statements for determining which intent will be executed.
- The two first intents (GradePercentageIntent and GradePassIntent) are the intents that I created for this app specifically.
- Within the function get_percentage_grade() (line 114) you will see the code to actually calculate a grade percentage based on a few determining factors. On lines 120 and 121 there is a large condition statement. This is the input validation of the skill. Without this, someone could give an incomplete command and your code will crash from lack of information.
- ***NOTE: You will notice on line 120 and 121 these variables called intent['slots']. This will become more apparent when we integrate the Alexa Skill with Lambda, but essentially, these are the variables that are passed from Alexa to Lambda" ***
- On lines 135 and 144 you will see a variable called speech_output. This is what you want Alexa to respond to the user with.
- On lines 139 and 145 (to just name a few) you will see a variable called reprompt_text. This is supposed to be activated if the skill does not properly pick up an answer said by the user.
- You will also notice that every function returns build_response(). This is the function that gathers the speech_output, reprompt_text, etc and sends it back to Alexa to be read out loud to the user.
That will conclude this section. We will be revisiting lambda in the next section to discuss what needs to be replaced within the code for your own custom skill.
Integrating Amazon Alexa Skill and Lambda CodeEverything is setup and you have a understanding of how the code works, now ask your computer a question out loud! .....just kidding, we still got more to cover before we can do that :D. From the last section we learnt that Intents are selected from the command given by user, and that each intent has variables passed from Alexa to Lambda.
- Go back to the Amazon Developer console where we added the Amazon Alexa Skill in the setup phase. Once there, go to the Interaction Model section.
- There you should see a blank Intent Schema and blank Sample Utterances. From the code provided in this project, there is a file on my Github called Intent Schema.txt. Copy the contents of the file and paste it into the Intent Schema segment of Alexa.
- The intent schema is in JSON format, and consists of intents. These intents activate different actions in the Lambda function. Each intent contains something called a "slot" that holds all the variables that will be passed to Lambda. This is why we needed that input validation, to make sure each variable in the slot had a value. Each variable within the slot needs a name and a type. For example, if you would like to use a number, the type is AMAZON.NUMBER. There is a whole list of different types offered by Alexa, but you can also make custom types.
- Change the intents, names and types according to what you want your application to do.
- Now let's open the Sample Utterances.txt from my Github and copy and paste it's content into the Sample Utterance segment of the Interaction Model section.
- This segment is most important. Here is where you define what user has to say in order to activate your intents and fill in the needed variables. Based on the intents, variable names and types create the sentence you would like the user to say in order to activate your skill.
- *** NOTE: for AMAZON.NUMBER variables use {name_of_number_variable}. For example TestNumberIntent I have {orange_count} oranges in my fridge. For AMAZON.LITERAL variables use { test_value | name_of_literal_variable}. For example: TestLiteralIntent I need {milk | buy_list} from the store. These specifications are defined here***
- With these now defined we press the Save button. The page will process your sections to make sure they are valid, once complete you will receive a green checkmark for this section, click Next.
It is time to jump back to the Lambda code, keep the Alexa skill tab open though! We'll be back!
- Open up the AWS Lambda Console. Copy and paste the lambda code from my Github into the lambda code editor.
- It is always important to test the code. Most of the code will be tested with Alexa, but syntax errors are much better picked up within Lambda. To test the Lambda code we must first configure a test. Click on the Actions dropdown and select Configure Test Event.
- Within the Configure Test Event select Alexa End Session as the input test.
- Now run Save and Test or Test (depending on what interface says). You should receive a log response reading "Execution result: succeeded" with a green checkmark. If you receive an error, click on the log and it will bring you to the log manager where it will describe your error in more detail.
- Alright, now that we are finally all set, it is time for some coding. I will now describe what you need to change in the template to get your code published.
- On line 59 you need to change the intent to the intent name you used in the Intent Schema. Make sure you add all your intents from the Intent Schema to the if-else statements (just like it is in the template).
- On line 88 and 95 you need to change the speech_output and reprompt_text variables to whatever you want the application to say when the user asks for help or when the skill is launched.
- On line 104 change the speech_output to whatever you want the application to say when the user cancels or closes the app.
- On lines 118 and 119 (in get_percent_grade()) change the variable names in the input validation statement to the variables you created associated to a given intent. For example, if the intent calling get_percent_grade had variables "test1" and "test2", then your input validation statement will look like this:
if 'test1' in intent['slots'] and 'test2' in intent['slots']:
       if 'value' in intent['slots']['test1'] and 'value' in intent['slots']['test2']:
- The code you want to run when your intent is triggered will replace the code between 121 and 130. Then your desired speech response will replace the speech_output variable on line 133. Likewise, replace the reprompt_text on line 137.
- This procedure is to get one of your intents working. If you have multiple intents, make multiple copies of the function (make sure to give them unique names) and link them to their intents on lines 59 to 66 (that you edited before to add your intents).
- Click Test and Save to make sure you have no syntax errors. Make sure you get the green check mark!
Alright we are switching back to Alexa Skills Kit where we had just finished are Interaction Model and now we are working on Configuration.
- In the Configuration tab, select Amazon Lambda ARN for the Service Type Endpoint. Then pick the geographical region closest to you.
- Once the geographical location has been selected an empty box will appear. This is where you need to put the ARN from your Lambda skill. Go back to the Lambda console and copy the ARN alphanumerical value in the top right corner. Looks something like this:
arn:aws:lambda:us-east-1:628045875214:function:lambda_name
- Paste this value into the blank box in the configuration tab of Alexa Skills Kit web page. Then Click Next.
- Now we are in the testing tab. This is where we will find out if our lambda function is operating the way we intended it to. To do this we are going to type utterances into the Service Simulator.
- To test we must use the sample utterances that we specified in the Interaction Model. For example, before I gave the example of a sample utterance "TestLiteralIntent I need {milk | buy_list} from the store". The test utterance for this would be "I need milk from the store" or "I need shows from the store". A test utterance for the grade estimator skill from the template would be "I am going into the exam with a eighty percent what do I need on the forty percent exam to get eighty five percent in the course"
- *** NOTE: When testing AMAZON.NUMBER you cannot types numbers into the test utterance, you must write out the full number. You must write "ten" not "10" ***
- After writing your test utterance you click the ask button underneath. You should see JSON data fill the Lambda Response and Lambda Request segments below. The Lambda Request is what was sent to your Lambda code. In the slots you can see your variables and the values that you provided in the utterance. The Lambda Response is what was sent back to Alexa. In the "text" of the "outputSpeech" of the "response" you will notice the speech_output variable you designated in Lambda that correlates to the corresponding intent that was sent in the Lambda Request.
- *** NOTE: If you are getting an error that reads "The remote endpoint could not be called, or the response it returned was invalid." it means there is an error in your lambda code. Check to make sure you are getting the values from the slots correctly and reexamine your syntax. It could be as simple as typing the name of a variable wrong. ***
- ***ADVANCED: building of the note above, continuously guessing and checking syntax errors is very tedious. But lucky for you, you are reading this tutorial and are about to get a life-changing tip. Now that you have used the Service Simulator and have received a Lambda Request text you are able to develop a better test in the Lambda console. Copy the Lambda Request JSON text and then go to the Lambda console. Click ACTIONS->Configure Test Event. Click the Sample Event Template dropdown and select Alexa Intent - Recipe. Delete the sample code given in the code segment below and paste your Lambda Request JSON text there. Now Click Save and Test. From now on, when you Click Save and Test it will actually simulate an Alexa request to Lambda. In addition, it will give better error logs when something goes wrong!"***
- In this stage of the process you must continue testing your skill until it operates as you expected. This requires you to go back to the Lambda code, edit your functions, test and save it, and then come back to the Service Simulator and enter your utterance. This can be a long procedure, or maybe you are a wizard and got it on the first try. Either way, make sure you keep testing until you are satisfied with the responses.
- Once your code does exactly what you want, click Next at the bottom of the page. You are now in the Publishing Information tab and are now a step closer to becoming an Amazon Alexa Developer.
We have finally hit the easiest yet, most important step. You must not trip at the finish line as this section will make or break your skills chance of being published.
- FIll in every text box with appropriate answers. For Testing Instructions, clearly state that no extra hardware is needed (unless your skill actually does :P).
- The Short and Full Description text box will be displayed to users, so be careful of spelling and make sure you really bring out why they should use your skill.
- Here comes the most important of them all, the Example Phrases. Meeting the standards of the Example Phrases is actually tricker than it sounds, but Amazon really wants to make sure that the examples given help users fully understand your skill's capability. Below are the Example Phrases I used the exam grade estimator.
Alexa ask grade estimator I am going into the exam with a eighty percent what do I need on the thirty percent exam to get eighty five percent in the course
Alexa ask grade estimator I am going into the exam with a eighty percent what do I need on the thirty percent exam to pass the course
Alexa ask grade estimator I am going into the exam with a seventy five percent what do I need on the thirty percent exam to get eighty percent in the course
- Ok! hardest part is over. The Keywords section is optional, but the images are definitely not.
- You must have an image for both the small and large images. Alexa is very picky about it sizing, so make sure you use some imaging software to crop your desired image to the proper dimensions. Likewise, make sure you do NOT use copyrighted images, I recommend getting an image from one of those free images websites such as https://pixabay.com/.
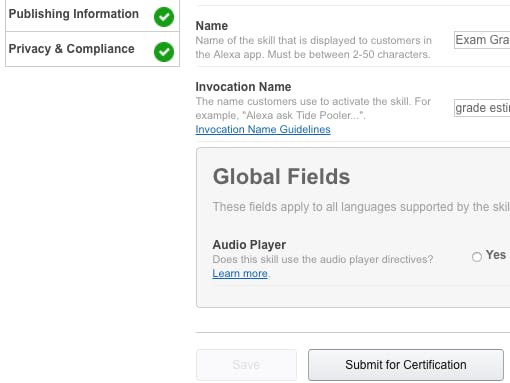
- Now Click Save and Next to progress to Privacy and Compliance. Fill out the Privacy questionnaire and check the box for Compliance. With all this done you should now have all green checkmarks next to the tabs on the left, and you should be able to click on Submit for Certification in the bottom right corner.
- You are done for now, in the next week or so you should receive an email on the certification of your skill. If it does not get certified it will give a detailed explanation of what you need to change. If it does get certified, well then congratulations! You are a certified Amazon Alexa Developer!
That is it for this tutorial, I have incorporated everything I have learnt from working with Amazon Alexa and Lambda functions. The programming itself in this project is not super complicated, the bulk of the difficulty comes from having the right setup in the Intents of the Lambda function and the Interaction Model of the Alexa Skill. This is why I have provided a bulletproof template for both and gave a detailed explanation of every step of the procedure. I hope starting off with my sample template has reduced the amount of headaches and wasted time that comes along with learning a new developer platform. I know it would have helped me! Thank you for reading, if you have any questions feel free to comment below.


Comments