

Hardware components | ||||||
 |
| × | 1 | |||
Software apps and online services | ||||||
 |
| |||||
Hello again! In this tutorial I will show you how to easily set up your LightBlue Bean and Node-Red server as a method to send notifications via email when a door has been unlocked during a specific time interval. The main concepts of this tutorial will include:
- Downloading new Node-Red nodes
- Reading built-in sensors of the LightBlue Bean and sending setting scratch characteristics.
- Creating global variables in Node-Red
- Using the LightBlue Bean nodes in Node-Red
- Sending emails with Node-Red
- Learning concepts of the Internet of Things and how to stay connected
Let's get started!
How It Will WorkThe LightBlue Bean will be attached to the standard switching lock on your desired door. Once firmly attached to the door, the built-in accelerometer of the Bean will be used to determine the current x, y, and z acceleration when the door is in the locked position. The acceleration that is being exerted on the Bean is of course due to gravity. These values should be marked down and remembered for later. Then switch the Bean to the unlocked position, and mark down these values for later. Basically in the locked position the Bean will experience an arbitrary gravitational force of "g". When the Bean is in the unlocked position, it will experience a force of "-g".
Some may be thinking this is a kind of hacky solution, but this is a solution that involves not having to buy some fancy new IOT lock just to know if someone opened a door. Likewise, it doesn't involve some circuit that will have to be duct taped to the door frame. Once the Bean has been placed in the unlocked position it will send a scratch characteristic to the Node-Red server telling it the door state has been changed. When Node-Red gets the notification that the door state has been changed (through the LightBlue Bean node), it will send an email to the user. Keep in mind that this may not always be useful as there are certain times of the day where you will know when the door has been unlocked because you are there. This is why an inject node with a time interval is used. That is pretty much it! On to the fun part!
Downloading New Node-Red nodesLast year I created a very simple tutorial on how to install new Node-Red nodes, specifically the LightBlue Bean nodes. This can be found here. This tutorial also includes a script that once run will install Node-Red and the LightBlue Bean nodes through the terminal. If you are new to Node-Red, I highly suggest looking at my tutorial, 3 Steps to Installing Node-Red and Bean Nodes on Mac OS.
Reading the LightBlue Bean Built-In Accelerometer And Setting Scratch CharacteristicsAs you know, or are about to find out, the Bean has a built-in accelerometer sensor. There is a class called AccelerationReading that can be used to keep the values of the Bean's acceleration. To get the Bean's acceleration values there is a function in the Bean class called getAcceleration(). Therefore to use get the Bean's acceleration data and store it use the following line:
AccelerationReading acceleration = Bean.getAcceleration();
The AccelerationReading class has a property for x-axis, y-axis, and z-axis. To read a specific axis, use: acceleration.xAxis. This is a good time in the tutorial to determine the values of the Bean acceleration in the locked and unlocked position.
- Firmly attach the Bean to the door lock in the locked position.
- Download the Arduino code from this blog (found here) and load it onto the Bean.
- On lines 28-30 of the code is used to print the x, y, and z accelerations of the Bean to the Serial Monitor.
- Once the code has been loaded, and is running, open the Serial Monitor in the Arduino IDE.
- Record the approximate values of the x,y and z accelerations being printed.
- Repeat this process with the Bean in the unlocked position.
One of the 3 accelerations should become the opposite of what it was before. For me it was the x-axis acceleration. In the locked position the x-axis value was negative, however, in the unlocked position the x-axis value was positive. This is why in my code I have a check for if the x-axis value is positive.
The next thing to do is send the current state of the door to the Node-Red server. The function to do this is a method in the Bean class called setScratchNumber. This method takes in a number (the Scratch Number) and a value (the data to send). It is used as follows:
Bean.setScratchNumber(2, door_locked);
To get a reminder of how to send scratch characteristics and how they work, check out my previous blog: Getting Started with Bluetooth Low Energy using Xamarin, and check out the Arduino Code section. The LightBlue Bean documentation on Scratch Characteristics can be found there as well as how to use it.
Now it is time to move on to the Node-Red part of this tutorial.
Creating global variables in Node-RedIn order to not send a million emails when the door becomes unlocked (and stay unlocked), there must be some kind of flag or counter that will be switched on once the door is initially switched to being unlocked. This value should also be reset once the door is switched back to locked position. Due to Node-Red's flow structure it is hard to have any sort of memory within the actual flow without some very shady logic. Luckily, they have already thought about this for us. To add the global variable follow these steps:
- Open the terminal on your computer.
- Go to your node-red folder. this should be easily accessible by using the command
cd ~./node-red.
- Once in the node-red folder open the settings.js file in your favourite text-editor (we all know I mean Sublime...or Atom is ok to, but that is it. OKAY fine I'll also accept Notepad++. But if you are still using notepad or nano, I'll seriously lose it. And now you're gonna say "Oh but Nick I'm using this on a Raspberry Pi", well then use sshfs for crying out loud!!...moving on).
- Anywhere within the module.export parameter add the following line and then save the file:
functionGlobalContext: {door_lock_count: 0},
- This will add a global variable called "door_lock_count" to Node-Red.
- Make sure Node-Red is restarted to see the addition of the global variable.
- To access the global variable (either setting or getting) looks like this:
context.global.door_lock_count.
As stated before this is important to keep the track of, if an email was already sent or not. If this is not added then Node-Red will continuously send emails as long as the door is unlocked. In the Node-Red code added to this blog (can be found here to be imported into Node-Red) there is a function called "isUnlocked" that takes care of the logic for the email to be sent or not. The value from the Bean's scratch characteristic is a parameter to this function. If the value is 0 the door is locked, if the value is 1 the door is unlocked. The output of the function is 1 if the email should be sent and 0 otherwise. So the logic is as follows:
- If the door is locked and the door_lock_count variable is 0 then no email should be sent. Output = 0
- If the door is unlocked and door_lock_count = 0, then the door has just been unlocked and therefore an email should be sent. The door_lock_count is now set to 1. Output = 1
- If the door is unlocked and door_lock_count = 1 then the email has already been sent, no email should be sent again. Output = 0
- If the door is locked and door_lock_count = 1 then the door has been locked again. No email is sent and door_lock_count is set back to 0. Output = 0.
This logic is found in the isUnlocked node of the flow provided in this blog.
Using the LightBlue Bean nodes in Node-RedIn this tutorial the read scratch node is used:
Open and import into Node-Red the JSON code provided from this tutorial (found here). Notice the node named "Bean Read Scratch". Double-Click on the node to open and see its parameters. In order to work it needs a Bean to be connected to, and scratch characteristics selected to be outputted.
- To add a Bean to the node choose "add a new bean" in the drop down of the Bean parameter.
- Then click the little pencil (the kind of pencil you use to have as a kid because you were too lazy to just get a new pencil. Then all of a sudden the pencil is so small your sanding down your finger tips on the desk when writing).
- There should be a new menu that has the parameters for Name, UUID, Connection and Timeout.
- Name the bean whatever seems fit, choose to have connection on event and keep the timeout to be 60 seconds. The UUID is a standard for the LightBlue Bean and is given in their documentation as a495ff20-c5b1-4b44-b512-1370f02d74de.
- Copy and paste this value into the UUID parameter. The final result should look something like follow image:
- If all set, click the update button and navigate back to the previous menu to choose the scratch number. Remember from before that the unlocked/locked value from the Bean was set on scratch characteristic number 2. Therefore, the Scratch 2 box should be selected and the value type should be set to Number.
The last piece of the puzzle is to send the email! Double-Click on the node called "Warn User". The following will pop-up:
I used a gmail account for my application. I filled the "To" parameter with the account I was going to send it to, the "Server" parameter was "stmp.gmail.com" for gmail, and the "Port" parameter was "465". The UserID and Password parameter were just my gmail account credentials. Once everything is filled press "Done" because now you are also done this tutorial! Virtual high-five!
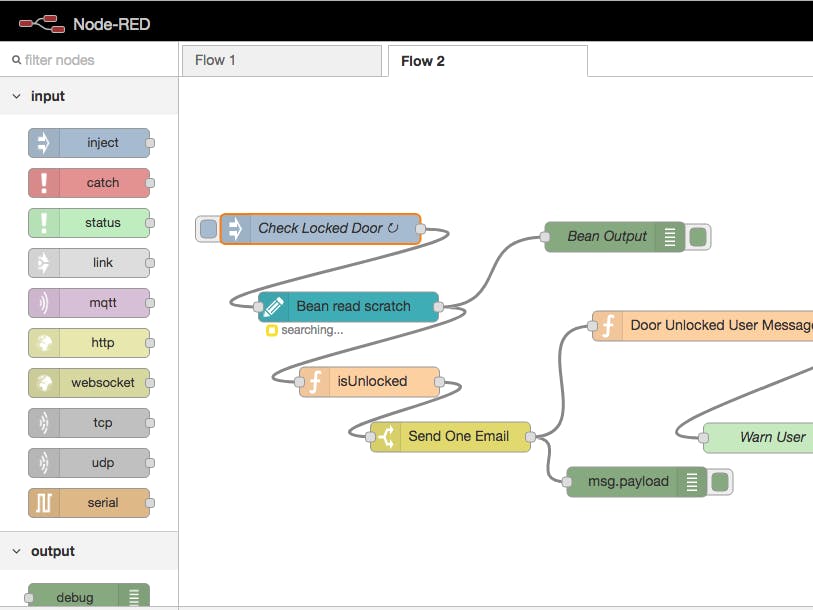
Running The ProjectDouble Click on the Inject Node called "Check Locked Door" and change the time interval to what you need.
With everything now completed press "Deploy". The LightBlue Bean node will start searching for the Bean specified so make sure the Bean has the battery in it. The code included in this project has a check for if the Bean is connected and turns the on-board LED green when it is (The node itself will also say "connected"). This can be seen in the image below:
In the above image, the Bean is in the locked position and therefore no email has been sent yet. Once I tilted my hand to the right (into unlocked position), I received an email instantly that notified me the door was unlocked, and I only got ONE email. When I first made this flow I sent myself 30 emails because I did not have the global variable. The email is shown below.
The tutorial went over the topics of downloading new Node-Red nodes, using global variables in Node-Red, sending emails in Node-Red, and receiving data from the Bean in Node-Red. In addition, the tutorial covered how to read the built-in acceleration of the Bean and how to set the Bean scratch characteristics. If done correctly the Bean and Node-Red will work synergistically to send notifications via email when the designated door is unlocked during the specified time interval. I hope all of you enjoyed my tutorial, thank you for making it this far! I encourage you to leave any questions or comments below. I would more than happy to answer them. Thank you!


Comments