

Hardware components | ||||||
_ztBMuBhMHo.jpg?auto=compress%2Cformat&w=48&h=48&fit=fill&bg=ffffff) |
| × | 1 | |||
| × | 1 | ||||
Software apps and online services | ||||||
| ||||||
 |
| |||||
 |
| |||||
| ||||||
 |
| |||||
In this hack we're going to use a Thinxtra Xkit device to send temperature data over the Sigfox network into Amazon Web Services to provide a Quicksight dashboard.
PrerequisitesFor this hack, I assume that you have:
- An AWS Account and a basic understanding of IAM Roles & Profiles. NOTE: you are solely responsible for all AWS charges that result from following this walk-through.
- Familiarity with compiling and installing Arduino Firmware.
- A Thinxtra Xkit with a Sigfox contract. (Any programmable Sigfox device will do but some specifics will vary).
The Thinxtra XKit consists of an Arduino Uno clone, a Sigfox radio shield with sensors for temperature, pressure, ambient light and 3-dimensional accelerometer.
NOTE: In the box is a card which contains the jumper configuration changes needed to set the XKit & Arduino to different power configurations. Pay attention to which configuration you are using, At least for the initial setup, configured the board for Arduino USB power.
When I received my Xkit, the firmware was out of date and not transmitting all the sensor data, so as a first step is to download the current firmware from https://github.com/Thinxtra/Xkit-Sample compile and install it. You need to copy the libraries from the Github repository to your Arduino library folder prior to compiling.
Now is a good time to press the black button on the Xkit to force it to send a payload.
Once done, you need to register your Xkit with the Sigfox network.
Sigfox ConfigurationLog into https://backend.sigfox.com.
- Firstly go to the 'Device' tab, you should see your Xkit in the list below (if this is your only Sigfox device, then there will be only one item).
- Click on the value in the 'ID' column to bring up the Xkit's particulars, then click on the 'Messages' item on the left. If all has gone well, you should see a line or two showing that data was received by the Sigfox network. If not you might need to take your Xkit mobile to find somewhere with coverage, press the button every now and then to get the XKit to send a signal.
- Once you've confirmed that the XKit can send data to the Sigfox network, go back to the Sigfox backend website and go to the 'Device Types' tab.
Devices are grouped by 'types' which have the same backend configuration. Click on the value in the 'Name' (not the Group) column which opens the configuration for that device type. Then select "Callbacks" from the left menu.
CallbacksWhen the Sigfox network receives a signal from your device, it uses the callbacks configured on this screen to send the data to your backend. In this case, were are going to use the AWS IOT Backend, which Sigfox have provided a wizard to get going. Click on the 'new' button at the top of the screen and then click on the AWS IoT line.
There are two methods Sigfox uses for pushing message data into AWS IoT, Cross Account (which we will use here) & Basic. The basic method uses AWS API keys, where as the Cross Account uses cross account roles. Both methods come with a Cloud Formation script to get things up and running.
Ensure that "Cross Account" is selected, copy the "External ID" value to the clipboard (we'll need that in a second) and click "Launch Stack". This opens the AWS CloudFormation console in another window (getting you to log in if required).
As the CloudFormation script location is prepopulated, you can just click 'Next' on the first screen.
On the second screen, you need to populate the following values, if you're following along I suggest using the same values as I did;
- StackName: Any valid name that you want, it makes it easier to find created items later.
- AWSAccountId: Your AWS Account Number (on the bar at the top of the window).
- ExternalId: Paste the value you copied earlier
- Region: Your preferred Region, I recommend 'us-east-1' unless you are confident that all the services used are available in your region of preference
- Topic: Any valid MQTT topic string, I used 'sigfox'
Then click 'Next', and 'Next' again.
RoleOn the next page, you'll get a warning that CloudFormation will create a Role, this is needed so that SigFox can publish events directly into your AWS account. Tick the tick box and click 'Create'.
CloudFormation will now go and set up your AWS IoT environment, create the roles needed etc. After a couple of minutes, the Status will change to 'CREATE_COMPLETE' (you may need to click the refresh icon a couple of times to get the screen to update. Once it is complete expand the 'Outputs' section (see below).
Now you need to copy the ARNRole, Region & Topics back to the Sigfox backend window.
Encoded formatIn order to post decoded data back to AWS, we need to tell Sigfox about the encoding format, paste this into the "Custom Payload Config". In short it lets Sigfox know that the data received has temp, pressure, photo, & Accelerometer values which are 16bit little-endian (because we are working with Arduino) integers.
temp::uint:16:little-endian pressure::uint:16:little-endian photo::uint:16:little-endian AccX::uint:16:little-endian AccY::uint:16:little-endian AccZ::uint:16:little-endian
Then in the 'JSON Body' field paste this:
{"device": "{device}","time": {time},"station": "{station}","snr": {snr},"rssi": {rssi},"data": "{data}","temp": {customData#temp},"pressure": {customData#pressure},"photo": {customData#photo},"AccX": {customData#AccX},"AccY": {customData#AccY},"AccZ": {customData#AccZ}}
This is the format of the JSON payload that AWS will receive. Make sure that has no line breaks as the AWS Athena parser doesn't like them. You can see from the JSON above that we are giving AWS some information about the device, time and signal strength as well as our sensor data.
Finally, click 'OK' and our Sigfox setup is complete.
AWS SetupMoving on to AWS, we need to setup a couple of S3 buckets, some IAM Policies and Roles, create an IoT rule, create an Athena Query with AWS Glue and finally create our QuickSight dashboard.
So back to the AWS console for now.
S3 Bucket CreationFirstly go to S3 and create two buckets, since S3 bucket names are globally unique, you'll need to come up with your own names.
- DataBucket: For Sigfox data
- AthenaBucket: For Athena output data (this is optional, as Athena will create its own bucket if you don't supply one).
The buckets need no special configuration, however, you want to ensure that they are in the same region as that you used in the Sigfox configuration (I used us-east-1 (N. Virginia)). Otherwise, keep clicking next and the 'create bucket'. Repeat for the second bucket if you're creating it manually.
IAM ConfigurationSwitch to the IAM console and then the Roles view. Two Roles are needed, one which allows AWS IoT to write data to S3 and another which allows Glue, Athena & QuickSight to read the data.
Role 1: AWS IoT -> S3 Writter
Click "Create Role",
Under the "AWS service" role type select 'IoT', then click "Next: Permissions"
Two Policies are automatically assigned:
- "AWSIoTLogging" which allows the IoT service to write logs to cloudwatch
- "AWSIoTRuleActions" which allows the IoT service to perform various output actions, such as writing to S3.
Review these to ensure that you're comfortable with them, then click "Next: Review" then "Create Role".
Role 2: AWS Glue, s3 Reader
Click "Create Role",
Under the "AWS service" role type select 'Glue', then click "Next: Permissions"
Add the following Policies:
- AWSGlueServiceRole
- AmazonS3ReadOnlyAccess, Read access to all your s3 buckets, you would want to be more restrictive than this in a production environment.
Review these to ensure that you're comfortable with them, then click "Next: Review" then "Create Role".
IoT RulesNow we have Sigfox sending events to AWS IoT and a Role for writing to S3, so we need to create an IoT Rule to get the events stored.
Switch to the AWS IoT Console and open the 'Rules' view.
Click "Create". Provide whatever Name and Description you want (as long as the console accepts it), I used SigfoxToS3. Set the topic to '#' without the quotes, this will catch all messages coming into the IoT service. Click 'Add action', then select "Store messages in an Amazon S3 bucket" and click "Configure".
On the next screen:
- Select the first 'DataBucket' that you created.
- Set the key to '${topic()}/${timestamp()}' again without the quotes. This causes each message to be written into a folder with the same name as the topic used to send data to IoT, we set this to 'sigfox' at the start, and a filename of the timestamp the message was received. Note: this might not be a good idea if you're expecting lots of messages.
- Set the IAM Role name to the first Role you created (it will probably be the only one in the list.
Click "Add action".
Now go and generate some events, pressing the black button on the Xkit will send a payload straight away, as long as you're in network range these messages should start appearing in your S3 bucket. You need to have a couple of messages there before proceeding.
Glue & Athena
Next, we need to tell AWS Athena about the dataset and to build the schema. The easy way to do this is to use AWS Glue. Open the AWS Glue service console and go to the "Crawlers" section.
Click "Add Crawler", give it a name and select the second Role that you created (again, it is probably the only Role present), then click 'Next'. On the "Add a data store" page, ensure that the DataStore is set to S3, and that "Specified path in my account" is selected. Click on the little folder icon next to "Include Path" and select the 'dataBucket' bucket you created (remember that your name will be different). Click 'Next', then 'Next' again. Set the Frequency to 'Run on demand' and click 'Next'.
Click 'Add a database' and enter "SigfoxDatabase" in the database name, and click 'Create'. Then click 'Next', check everything over and select 'Finish'.
Now that the crawler has been created it needs to be told to run. Tick the tick-box next to your newly created crawler and click 'Run Crawler'. All going well you'll get a message saying the crawler is running and the "Tables added" value will change from 0 to 1.
You can have a look at the table by going to the tables section (left menu) and clicking on the entry that has the database "SigfoxDatabase". This will show you the schema that Glue created.
QuickSightOK, almost at the end, we've now got data in a format that QuickSight can use.
Open the QuickSight console. and select 'New analysis'. You'll then be presented with a list of available datasources, click on 'New data set'.
Click on 'Athena', then enter 'athenaSigfoxData" as the source name, then click 'Create data source'. In the following window, select your 'SigfoxDatabase' and then the 'sigfox_data'. Click on 'Select' and then 'Import to SPICE for quicker analytics' and finally click 'Edit'.
You should now see something like this:
To make the data a little more meaningful we need to add a couple of fields.
DateTime: click 'New field', set the field name to "DateTime" then click on 'epochDate' in the function list, followed by 'time' in the field list. The formula should look like:
epochDate({time})
Click "Create". This translates the 'time' field which is in unixtime format into a human readable date/time.
Temperature: click 'New field', set the field name to "Temperature" then enter the following into the formula box
intToDecimal({temp})/100
Click "Create". This converts the integer 'temp' value into a float and divides it by 100 (the Xkit firmware transmits the temperature multiplied by 100 to remove the floating component).
Now click 'Save & visualise' at the top of the screen.
For the visualisation, we are going to create a line graph showing the temperature change over time. Start by clicking on the line graph icon
Then click on the 'DateTime' field on the left, followed by the 'Temperature' field.
At this point, you probably have a single dot on the screen as the values have all been summarised. At the bottom of the graph click on the 'DateTime' label and change the Aggregate from 'Year' to 'Hour'. Then click on the 'Temperature' label on the left of the graph and change the Aggregate from 'Sum' to 'Average'.
Hopefully, you have something that looks like this (of course your line will vary, based on your data).
You can play around with the bar at the bottom of the graph to move the timescale around (once you have enough data).
After that you can add other graphs for pressure, ambient light, etc, however I'll leave that as an exercise for the reader.
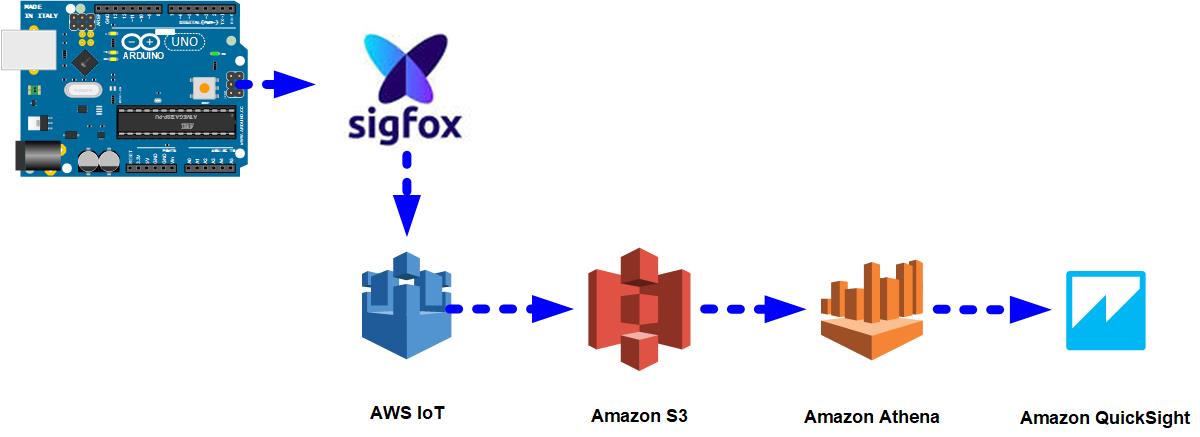
ConclusionSo just to recap, we use the Thinxtra Xkit to transmit temperature information over the Sigfox network, which was then sent to AWS IoT. The IoT Service saves the messages to an S3 bucket, which are then picked up by Athena. Finally, Quicksight uses the Athena table to provide the visualisation on the Dashboard.
There are alternate ways of doing this even in AWS, for example, we could have fed the data into a Kinesis stream instead of the IoT service, and in high volume scenarios this might make more sense.
Until next time,
Happy Hacking


Comments