


Hardware components | ||||||
 |
| × | 1 | |||
 |
| × | 3 | |||
| × | 1 | ||||
Software apps and online services | ||||||
| ||||||
Hand tools and fabrication machines | ||||||
 |
| |||||
Our spare refrigerator in the basement is handy, but has a problem due to age. It tends to start to lose the ability to cool over time. A quick fix is to defrost it, but quite often we weren't noticing it until it had gone well above a safe temperature. One time it failed while we were on vacation and we lost everything.
I've been planning to build an IoT device that could monitor the temperature, log the temperature periodically, and if it got above a pre-set temperature it would trigger an audible alarm and send my wife and I an email and text message.
The Sparkfun Thing Dev board combined with the Cayenne MyDevices IoT platform was an ideal combination. The Thing was easy to setup to monitor the three OneWire thermometers, and the Cayenne site provided a location to log the data while sending us an alert when the temperature started getting into the unsafe range.
"Wife Acceptance Factor"As a further constraint on the project, I promised my wife that I would keep the purchase cost as low as possible. Aside from being fiscally sound, it also gave me a reason to clean up some of my spare scraps that have accumulated over the years. It also helped me demonstrate to our daughters that solutions don't always have to have a beautifully molded case and cost a fortune. Hence the reason the "case" is a reused medicine bottle, and the cabling is from an old telephone cord.
ResourcesAs with most open source products, this is built on the efforts of many others. The code in my site was gathered from a number of other locations across the Internet. Here are a few of the major sites that I used for reference:
- PJRC.Com - Their Teensy OneWire library
- SheepDogGuides.com - General discussion of Temperature Sensing with the DS18B20.
- Elec-Cafe.com - Another resource discussing the DS18B20 and the ESP8266.
And of course SparkFun.com and MyDevices.com on-line references were a great general resource for all sorts of basic problems encountered.
If you notice another site that I have omitted, please comment and I'll add them to my writeup.
Build ProcessStep 1 - CodeThe code in use is stored on my public GitHub site here:
https://github.com/dglinder/SparkThing-Monitor/blob/master/SparkThing-Monitor.ino
The top of my code includes the required libraries and defines some constants used throughout the code. The string of thermometers are connected to the pin denoted in "DATAPIN", the number of thermometers (MAXPROBES) and how long to delay between publishing updates (PUB_DELAY). In a separate file I've included the WiFi credentials in the "creds.h" file - it was kept separate so the information wouldn't always be stored in the repository. The repository shows an example of the format of this file.
As with any common Arduino based file, the `setup()` function is defined first. It performs basic setup of the Serial and Cayenne services, then I have it enumerate all of the thermometers into the `MACaddr[]` array, and reset the `tempsC[]` and `tempsF[]` arrays to a default starting value (DEFTEMP). When the enumeration completes, if no thermometers are found, an error is printed and the system loops forever so it doesn't send invalid data up to the log.
The main body of the code is in the `loop()` function. If enough time has passed, the data is published, and also printed to the attached Serial port. A delay of 1 second (1000ms) is used to ensure that all components of the Cayenne and Arduino stack can keep up with any potential network delays or congestion.
So we can ensure some consistency of the data being sent from multiple thermometers, the `addr[]` array is loaded with the next available thermometer MAC address so the next data collection is done to the correct thermometer. The data is stored into the `data[]` array and processed combining the data into the `raw` variable. The celsius temperature is actually the `raw` value divided by 16, and the fahrenheit temperature is computed from celsius.
Finally, the most current celsius and fahrenheit temperatures are stored in the `tempsC[]` and `tempsF[]` arrays.
Step 2 - Bench buildTo test the thermometers and general functionality, I connected it to my workstations USB port for power and soldered a few wires to reach to a small breadboard to begin the initial build.
This worked right away, so I needed to rewire so I could place one sensor just outside the refrigerator, and the other two in the freezer and refrigerator areas.
Step 3 - Cayenne IoT interfaceWith data flowing into the Cayenne IoT system, I was able to setup some charts for historic views as well as the alerts that are driving the initial build plan. You will need to update the code and enter you Cayenne IoT credentials - see their online getting started guide and follow the steps.
After the device has checked in and posted some data, the Cayenne interface will display the device and some of the channels that are filled with data. Click on the project name then click on the
For this project I added a chart and a simple gauge for each of the thermometers.
Adding two alerts with thresholds will look something like this.
Keeping with my "reduce cost" request, I reused some old telephone wire - perfect for the low voltage and thin to run between the frame and magnetic seal of the doors.
Not the prettiest wiring job, but it gets the job done. I then used electrical tape to prevent short circuits. A second wrap of tape around everything sealed the thermometer against casual humidity entrance without making it bulky or obtrusive when Tein use.
To protect the board and electronics, I found a medium sized medicine bottle that was just the right size to hold the board and secure the connections.
I didn't want to solder the wires directly to the Thing, so I reused a network Cat5 cable and wall outlet.
The cable was only about 6" long but that was sufficient to solder on the telephone wires going to the temperature sensors. The socket was secured in the cap of the bottle by cutting a rectangle hole in the lid and snapping the receptacle in. As you can see from the photo above the board fits well within the bottle and is very environment proof.
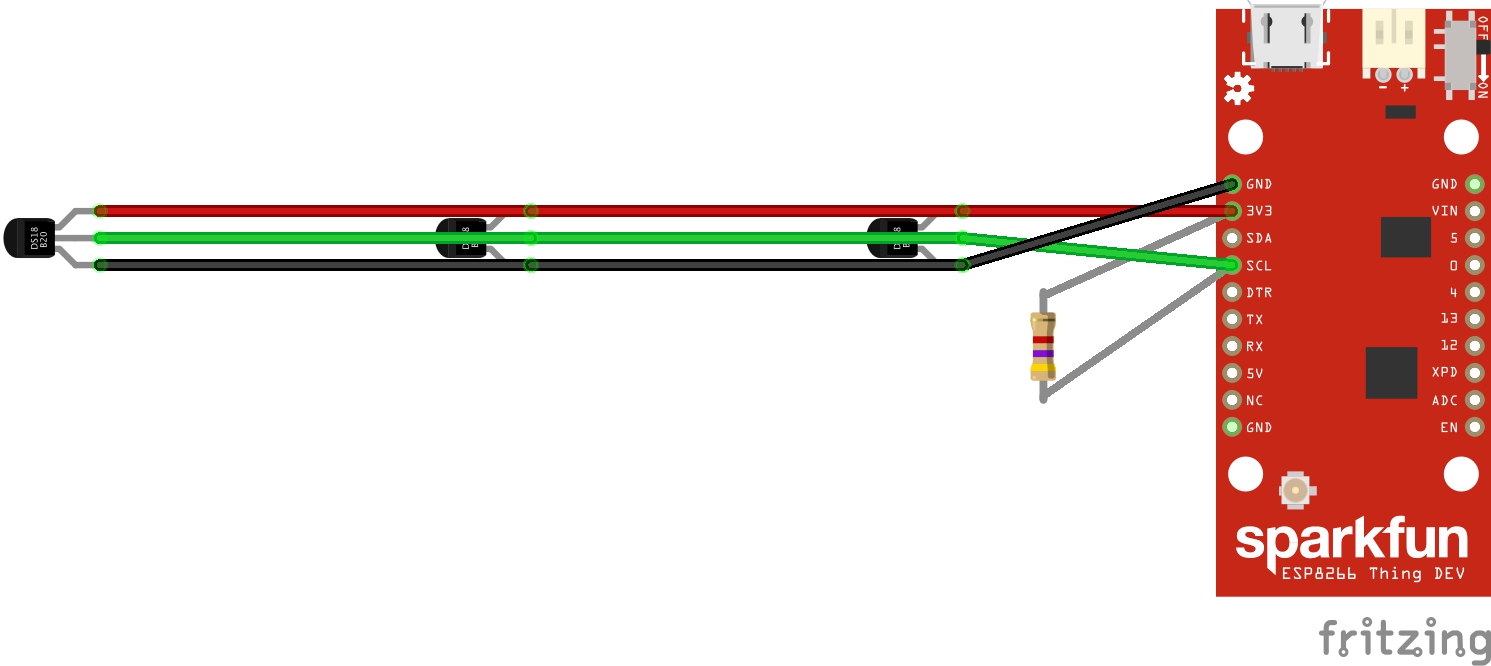
One suggestion on a number of sites recommended a 4.7k Ohm pull-up resistor between the data pin and the +3V supply going to the thermometers. I added it as a last minute addition to ensure I was following best practices, but it didn't see a difference in the reliability of the results either way. I've included this in the wiring diagram for completeness.
I have noticed that the temperature the thermometers register seem to be consistently lower than traditional physical thermometers I've used as a sanity check. My thermometers may have been damaged (see below), but they appear to be consistent so a future update to the code may include an adjustment factor in the temperatures when they are published.
One word of warning as you work with these thermometers. During construction, I accidentally hooked them up reversing the +3.3V and Ground. I don't know if it damaged the pieces, but the thermometers themselves got VERY hot - enough to cause a blister on my finger when I grabbed one while debugging. Three were in the mis-wired state for about 30 seconds over the course of debugging, but they seem to be ok - the temperatures they report are consistent. The SparkFun Thing Dev board did not suffer any issues either that I could determine so my compliments to the engineering staff who designed both.
Seeing how easy the Cayenne interface was to use and how rugged the Thing Dev board turned out to be, I'm already thinking of ways to expand the monitoring. For starters, I will will add the ability to adjust the adjustment factor (mentioned above) from the Cayenne GUI - making them hard coded requires reprogramming that is inconvenient now that it is mounted and inuse. Given the wire length specifications, I should be able to reach another freezer across the room and add it to the monitor GUI. Our basement also has water problems occasionally, so having another method to alert us when we are all at work or school would be a benefit that should be easy to add.


_3u05Tpwasz.png?auto=compress%2Cformat&w=40&h=40&fit=fillmax&bg=fff&dpr=2)
Comments