

Hardware components | ||||||
 |
| × | 1 | |||
| × | 1 | ||||
| × | 1 | ||||
| × | 1 | ||||
| × | 1 | ||||
 |
| × | 1 | |||
Software apps and online services | ||||||
| ||||||
 |
| |||||
Hand tools and fabrication machines | ||||||
| ||||||
| ||||||
As high school student athletes, we as siblings decided to create a smart lawn care system that is able to detect the fields' temperature and conditions, including the ability to spray water depending on the fields' necessities. Ever since the age of 4 and 5 years old, we have been playing baseball and softball and have noticed the amount of injuries caused by poor field maintenance. From experiencing sprained ankles to dislocated shoulders, we have decided to take initiative in stopping these life-changing injuries. Many athletes get the opportunity of playing sports at a higher level taken away due to injuries starting from inadequate fields.
With our smart field care system, we plan to eliminate poor field conditions by monitoring the field from just an app on a phone. Through a click of a button, water is able to be dispersed from our water system.
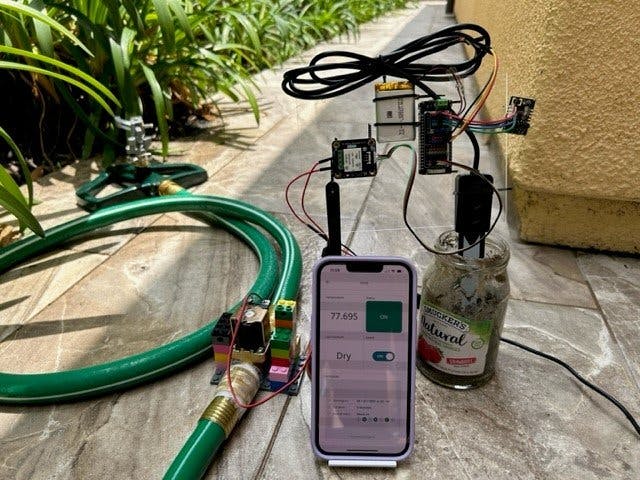
Here is a demonstration:
FUNCTIONALITYAs observed in the video, the water coming out of the valve is controlled through a singular ON/OFF button. This system allows the field maintainer to control the field's conditions without needing to be physically there, as the field can be observed through the app. In the app, the field's dirt moisture and temperature are displayed along with the scheduler that allows you to schedule when you want the water sprinkler to function. You are able to manually control the water switch too. In the scheduler, you are able to pick the date, duration, and repetition of the sprinkler system. When the sprinkler system notices that the dirt on the field needs more moisture and water, the sprinkler will turn on and provide the sufficient amount of water needed. The field maintainer will be signaled of the sprinkler's status through the app.
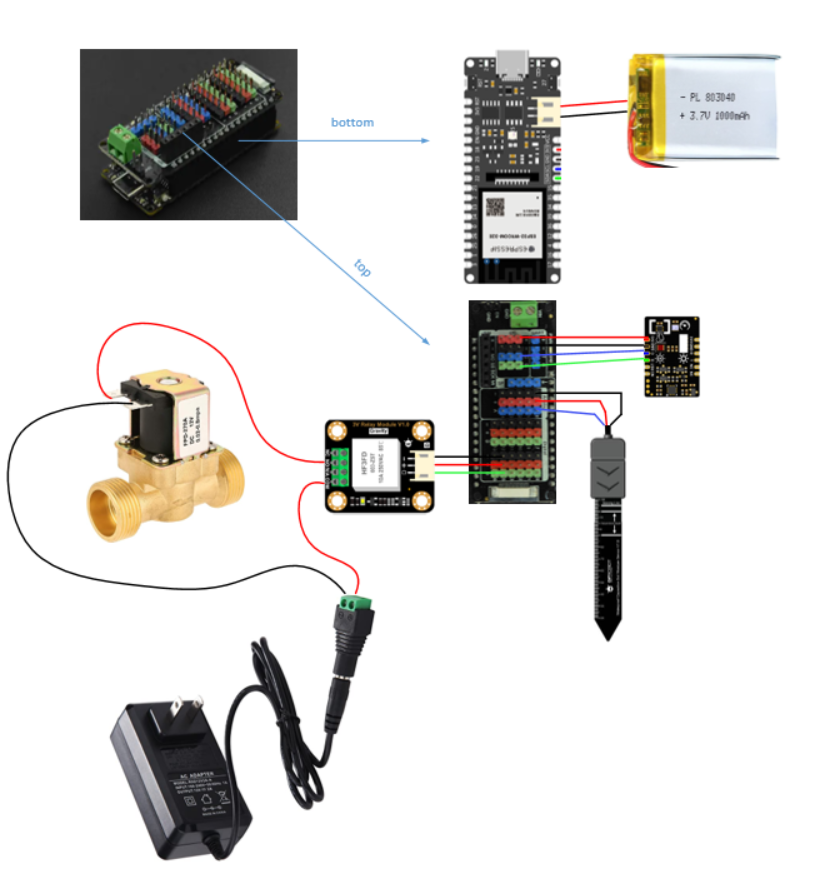
HARDWAREWe are so grateful that we received a Hackster & DFRobot EEDU Enviromental Sensor Kit to start our project. This is a perfect kit for our project. We are able to build our hardware with the kit except and a few add on items like battery, water shut off valve, and AC adapter to power water shut off valve. The water valve can be replace by the users based on their system.
FireBeetle 2 ESP32-E IoT Microcontroller:
ESP32 supports Arduino environment with pin matches. It is very easy for us to program and debug with our Arduino background. Also with integrated WIFI, it solved the connectivity problem.
Multifunctional environmental sensor:
Current temperature is measurement from this sensor. It communicate to ESP32 by I2C interface. The driver can be downloaded through GIT and uploaded to IOT cloud web editor as a custom library.
Analog Waterproof Capacitive Soil Moisture Sensor:
This sensor to get the moisture of soil and simply connect to an analog pin.
The relay is used to turn on/off 12V water shut off valve. This relay is recommended by DFRobot to work with 3.3V digital pin.
We use this water valve to demo how the field care system control the sprinkler. It requires 12V DC with 300mA.
12V DC power adapter:This 12V DC adapter provides the power to turn on/off water shut off valve.
The lithium polymer battery provided long and constant power to the board. One thing needed to check is the polarity of wires. We can't find a battery with the same polarity of wire as used in ESP32 board, so we have to cut the wire and reconnect to make the battery to work.
Also a battery charger convertor is needed to charge the battery.
A 5"x 7" Acrylic Sheet Plastic is used to hold all the components together. It is not only make the arrangement of parts look good also prevent the water to splash into the components.
SOFTWAREArduino IOT cloud is used to program and upload the code to ESP32. You can refer to this link to learn how to use software. Here is our setup.
Setup
- moisture - "Dry, Moist, and Wet" values. Sprinkler turns on when it is "dry". It doesn't turn on when "wet" is detected
- schedule - Administer can program the intend schedule
- start - Administer and override the sprinkler schedule if some unforeseen situation happens
- status - Shows current sprinkler on off condition
- temperature - Current field temperature. Sprinkler doesn't turn on if too hot or too cold. The recommended temperature is within 40 to 95 degree.
Sketch
Program is edit here and can open the full editor as Arduino IDE
GUI is setup here and shows the layout before upload
With the implementation of the Smart Field Care System for Schools, we can provide a safer environment for athletes to play on. This system ensures that the dirt and grass on athletic fields are at the best condition they can be at so that athletes are not injuring themselves due to poor field maintenance.
At this time, we can only create a demo version of the system due to limited resources. Since only one EEDU Kit received, and the IOT Cloud has a limit of 5 variables used (with the free version), we do not have enough resources to implement this system at an actual athletic field. However, we were able to create a sample system that can be easily duplicated to be implemented into actual use at a field.
Overall, the Hackster EEDU Kit, is a perfect tool for us to create a new generation of field care systems.


Comments