


Hardware components | ||||||
 |
| × | 1 | |||
 |
| × | 1 | |||
| × | 1 | ||||
| × | 1 | ||||
 |
| × | 1 | |||
Software apps and online services | ||||||
 |
| |||||
| ||||||
Using these instructions and the Wio LTE from Seeed Studio, you'll quickly connect to the internet using Twilio's Programmable Wireless.
We'll use the Arduino IDE in this quickstart. Although we recommend the Arduino IDE, code and instructions should work (at least partially) in other C/C++ workflows.
In this quickstart, you'll learn how to:
- Sign up for a Twilio account
- Purchase a Twilio Programmable Wireless Starter Pack which comes with 3 SIM cards
- Insert a SIM card into the Wio LTE
- Connect the included LTE antenna and Lithium Ion Battery to the Wio LTE
- Power and flash the Wio LTE
- Send and receive Machine to Machine Commands using Programmable Wireless
- Wio LTE
- 3.7v Lithium Ion Battery with JST SH 1.0mm 2-pin connector
- Micro-USB cable
- LTE cellular antenna
Not the quickstart you were looking to complete? See our other Programmable Wireless quickstarts or see all Wireless resources.
Sign Up for a Twilio Account and Purchase a SIM CardAlready have a Twilio account and SIM card? Skip ahead to the register and activate step.
Before you can connect with Twilio Programmable Wireless you'll need a Twilio account. Once you've signed up, continue with this quickstart.
First, visit the Programmable Wireless Console. On the Orders page, purchase a set of 3 starter SIMs by selecting the SIM Starter Pack... or make a larger custom order by entering a quantity under the Multi-Size SIM Card product.
Note: Orders of 10 SIMs or more will be delivered with the SIM cards already tied to your account.
Register, Assign a Rate Plan, and Activate Your SIMOnce you receive your SIM shipment, visit the Register a SIM page in the Programmable Wireless Console.
Follow that up by picking a Unique Name for the SIM.
Choose a Rate PlanNext, select a Rate Plan from the options provided by Twilio.
By default, there are Rate Plans added which approximate the usage Twilio sees in the field. Rate Plans let you control every aspect of what your device can do its maximum monthly data usage. We've added some reasonable defaults, but feel free to explore options later.
Activate a SIM cardWhen you're happy with the Rate Plan, 'Activate' the SIM card.
Note: You'll need to activate your SIM for real-world workflows although you can use small amounts of data without activating.
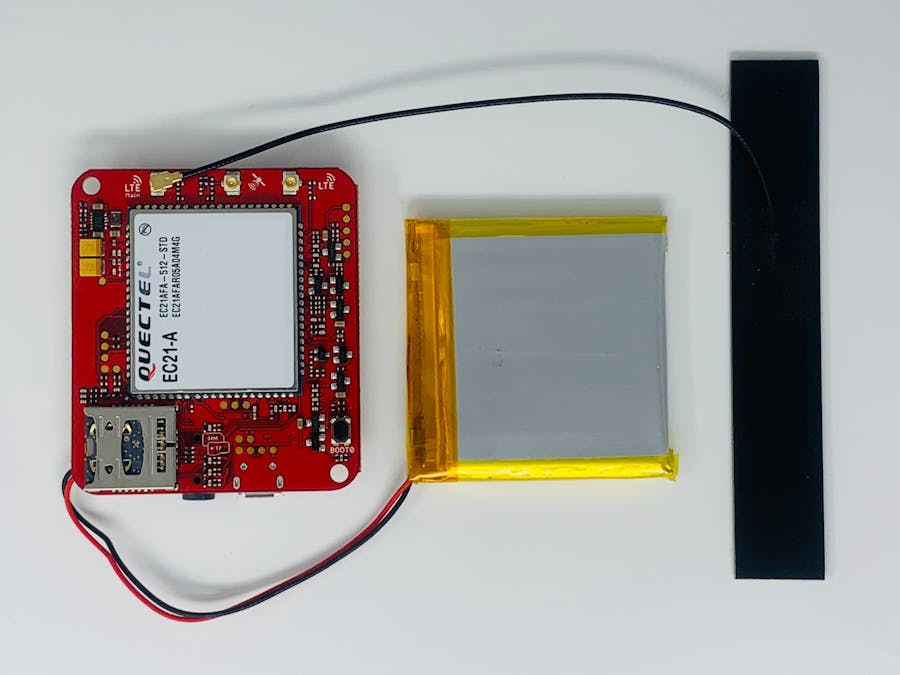
Attach the Cellular Antenna to the Wio LTEWith the Wio LTE still disconnected from power, remove the LTE antenna from the packaging. Connect the LTE antenna to the connector labeled 'LTE' on the Wio. Your setup should look like this:
Punch out your Twilio SIM card and insert it into the slot closest to the PCB on the Wio.
The slot is on the modem side and has an orientation diagram. You want to put it in the 'bottom' slot; the upper slot is for an optional MicroSD card.
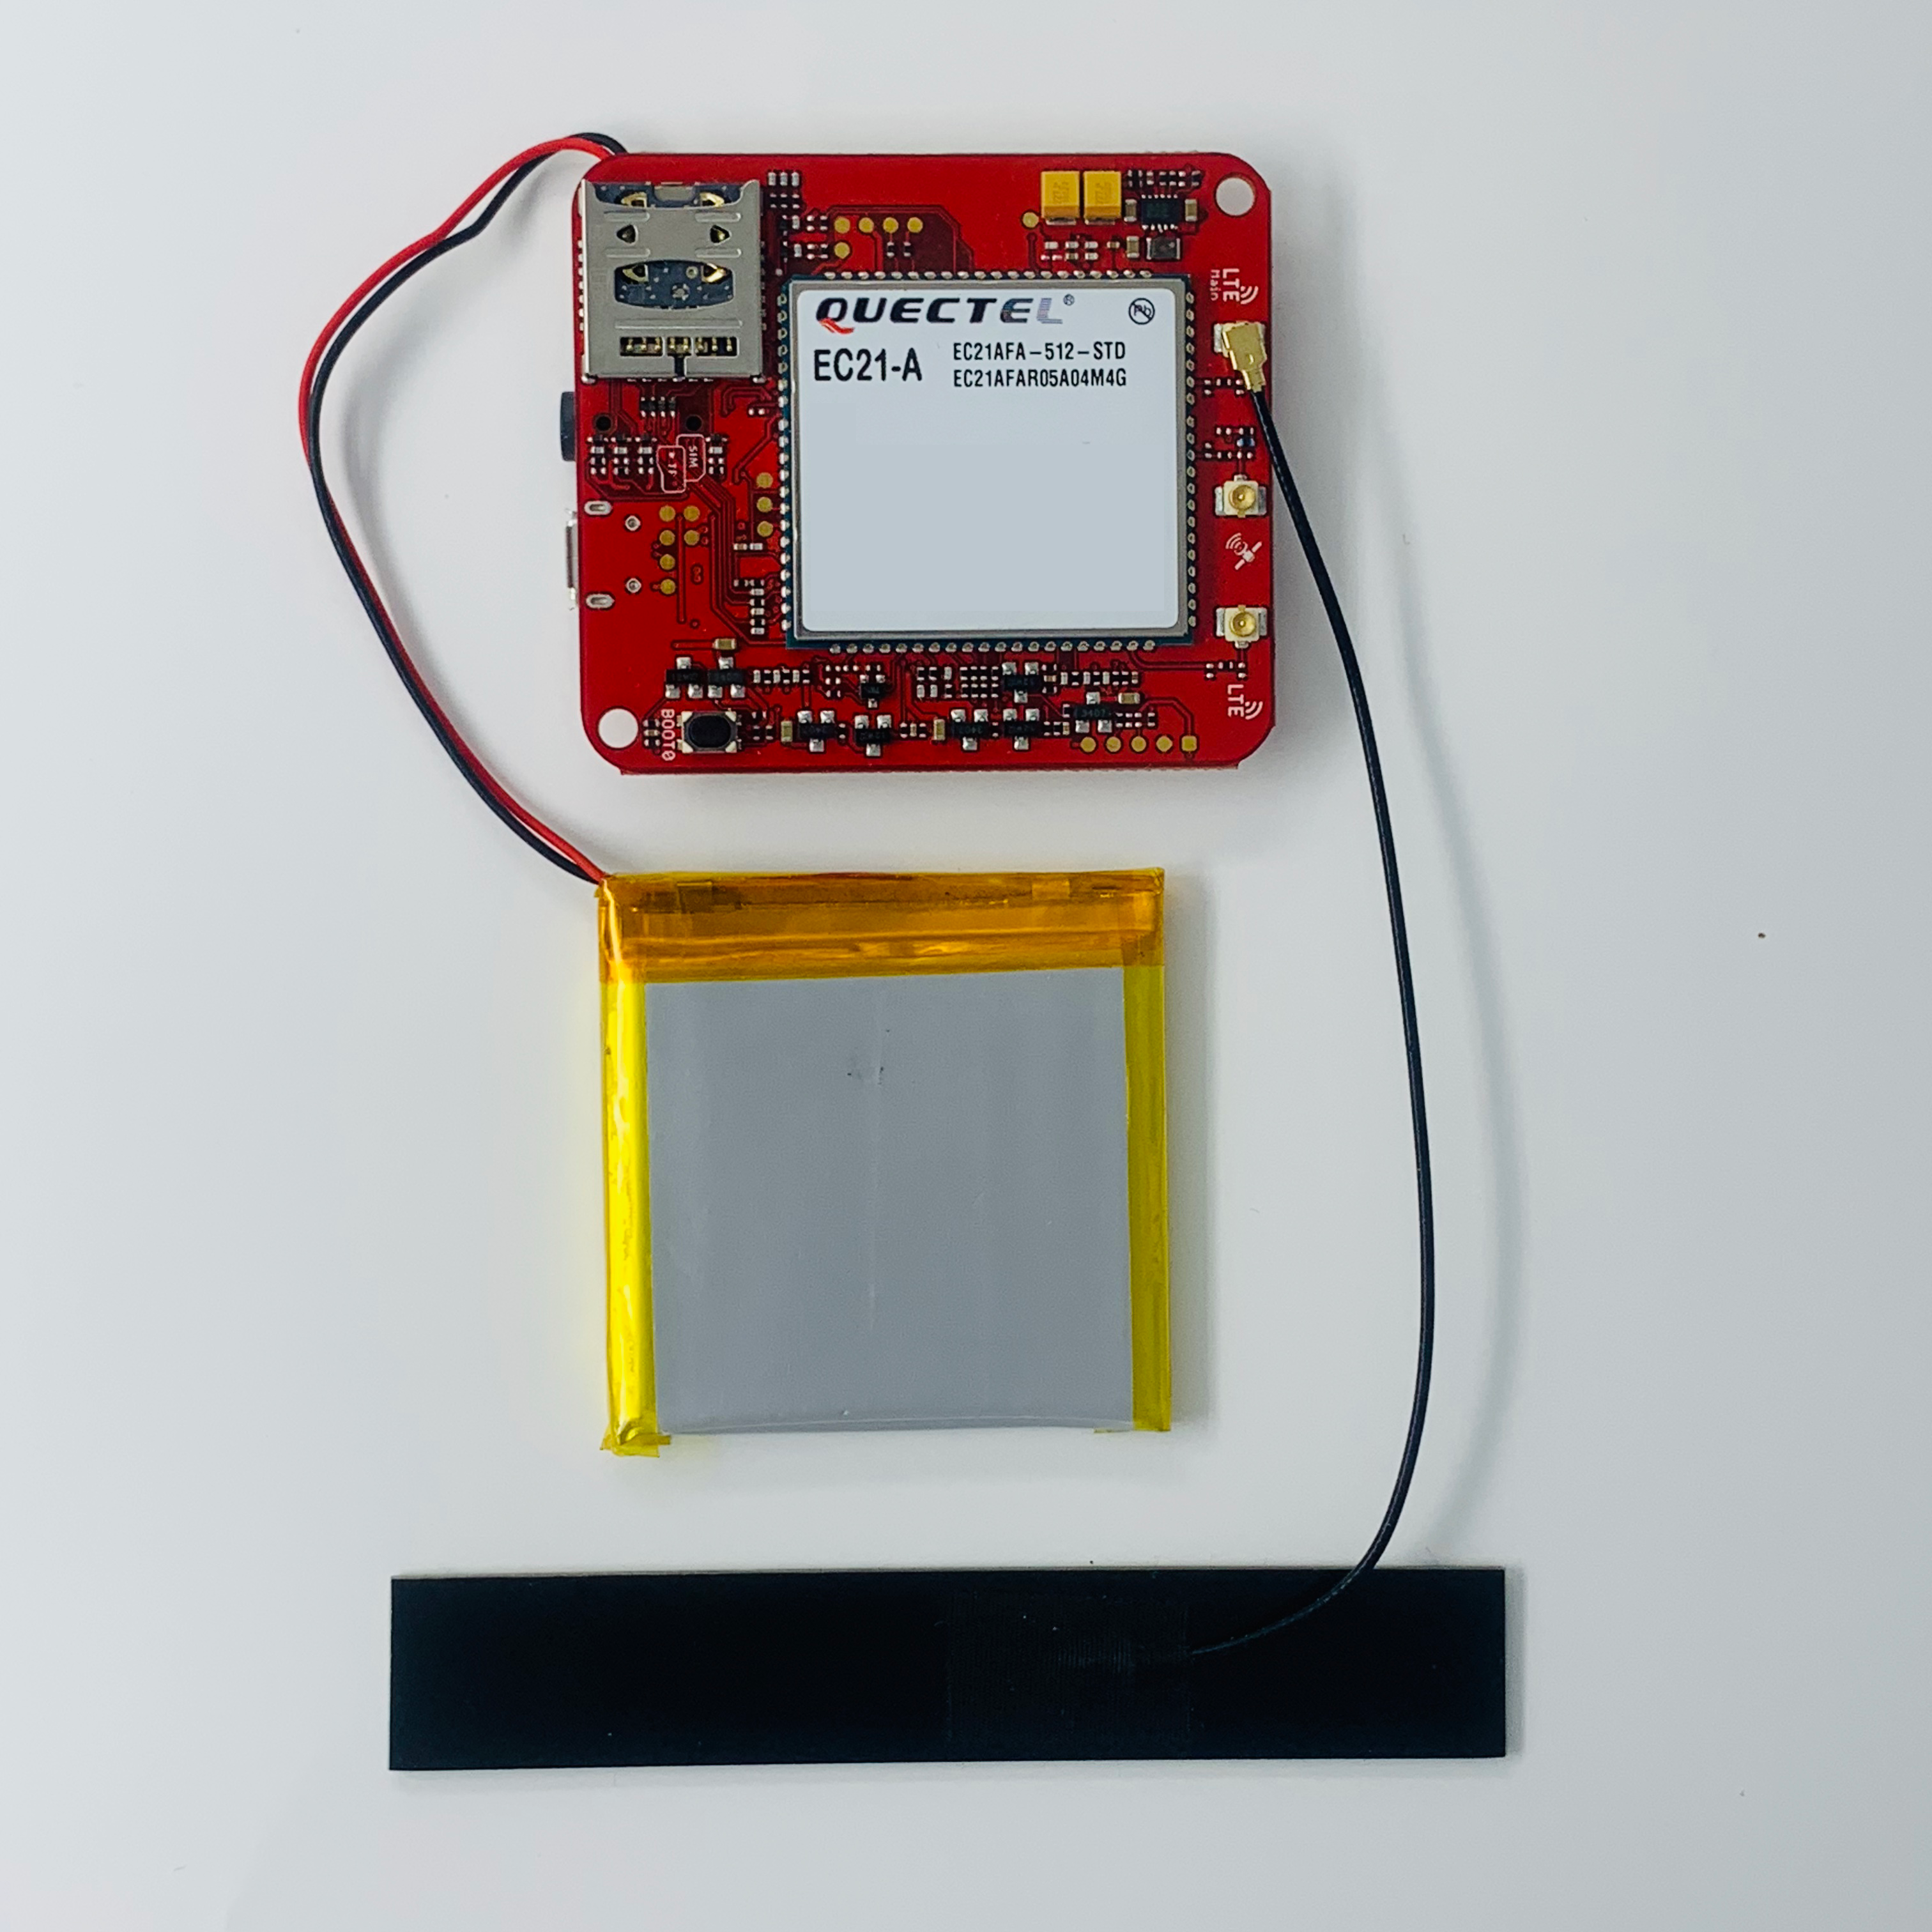
Locate the JST connector and plug the Lipoly Battery into the board. The battery must be plugged in at all times for connectivity to work.
The finished setup will look similar to the image below.
Next connect the Wio LTE to the computer using a Micro-USB cable.
The Wio LTE does not need a USB-Driver for the Macintosh. Instructions for installing the Wio LTE USB-Drivers for Windows and Linux can be found here.
Install the Wio LTE Arduino LibraryIn the Arduino IDE, go to Sketch > Include Library > Manage Libraries.
Using the Library Manager search for and install the Wio LTE Arduino Library
Go to Arduino > Preferences.
Find Additional Boards Manager URLs and paste the following JSON URL.
Press OK.
Go to Tools > Board > Board Manager.
Search for and install the Seeed STM32F4 Boards package.
Restart the Arduino IDE.
With the STM32F4 cores installed the Wio LTE is now ready to be programmed. Next select the board and the board port.
- Click Tools > Boards > Wio Tracker LTE
Click Tools > Port > {Your Modem Port Here}
- Macintosh:
/dev/{cu|tty}.usbmodem{XXXX} - Linux:
/dev/ttyACM{X} - Windows:
COM{X}
To upload code to the Wio LTE the unit needs to be put into Bootloader mode.
Press and hold the BOOT0 button underneath the Developer Board.
Press the RST button once while holding the BOOT0 button.
Now, release the BOOT0 button to enter Bootloader mode.
Flash the Wio LTEYou can download the code directly from this directory on Github.
Open the file m2m_command_wiolte.ino. Alternately, you can copy/paste the code into a new Arduino sketch using File> New Sketch.
Press the "Upload" button.
The progress of the upload can be viewed in the pane underneath the code.
Once the upload is complete exit Bootloader mode by pressing the RST button once. This will start the new program that was uploaded to the Wio LTE.
After restarting the Wio LTE open the Serial Monitor in the Arduino IDE.
- Tools > Serial Monitor
The output of the Serial Monitor will look something like this:
Here's the method to send a machine to machine command:
/*
   Twilio Machine to Machine Commands Quickstart for the Seeed Studio Wio LTE
*/
#include "wio_tracker.h"
/*
 Globals for receiving incoming Commands
*/
uint16_t newSMSNumber = -1;
char receivedMessage[128];
/*
 Create a Wio instance
*/
WioTracker wio = WioTracker();
void setup() {
 /*
   Modem setup
 */
 wio.Power_On();
 SerialUSB.println("Power On!");
 SerialUSB.println("Start network registration...");
 /*
   Network registration
 */
 if (!wio.waitForNetworkRegister())
 {
   SerialUSB.println("Network error");
   return;
 } else {
   SerialUSB.println("Network registration complete");
 }
 /*
   Set all "REC UNREAD SMS" to "REC READ SMS"
 */
 wio.readAllRecUnreadSMS();
 /*
   Keep `command` under 160 ASCII characters, or 67 UCS-2 characters.
   https://www.twilio.com/docs/glossary/what-sms-character-limit
 */
 SerialUSB.println("Sending Command");
 char message[128] = "Hello from the Wio LTE!";
 /*
   Send an SMS to short code 2936, which is a Twilio
   Machine-to-Machine command.
   Write a Twilio M2M command.
 */
 if (wio.sendSMS("2936", message))
 {
   SerialUSB.println("Command Sent");
 }
 else
 {
   SerialUSB.println("Send Error");
 }
 SerialUSB.println("Waiting for Command");
}
A message will appear in the Serial Monitor when the Command is sent successfully:
The easiest way to check the command was successful is through the Programmable Wireless Console.
- From the Console, select SIMs from the Programmable Wireless menu.
- Click the SIM you are using for this project, then navigate to the Commands tab.
- Copy the SIM Sid.
As you might guess, we will implement the reverse - you'll receive an inbound SMS from 2936 on the Wio LTE triggered by an API call using the SIM's Sid. Let's look at that next.
Again, we've included code to help you receive the M2M command easily.
void loop() {
 /*
   Detect unread Commands
 */
 int id = wio.detectRecUnreadSMS();
 /*
   Define the index of the incoming Commands
 */
 if (-1 != id) {
   newSMSNumber = id;
   /*
     Read a Twilio M2M command. Note that it will find the lowest
     indexed one with the code as is; in your code. if you cache the
     index you can start the next read_command to move to the next one.
   */
   wio.readSMS(newSMSNumber, receivedMessage, 128);
   SerialUSB.println("Command Received");
   SerialUSB.println(receivedMessage);
 }
 delay(1000);
}
To test this out, return to the Arduino IDE and make sure the Serial Monitor is still connected. The fastest way to respond to a command is to use cURL if available.
If you can, send a command (under 160 ASCII characters) back to the SIM using cURL:
curl -X POST https://wireless.twilio.com/v1/Commands -d 'Sim=DEXXXXXXXXXXXXXXXXXXXXXXXXXXXX' -d 'Command=Hello from cURL!' -u 'ACXXXXXXXXXXXXXXXXXXXXXXXXXXXX:YOUR_API_KEY'
If all goes well the Wio LTE will receive the Command and you should see a successful run:
... magic!
And that's all there is to Machine to Machine commands with the Wio LTE. You now know how to send Machine to Machine Commands and check their status in the console. You can also return a Command from your machine and have seen how to receive it with the Wio LTE.
With those basic building blocks you're ready to build the next big IoT Thing!
Complete code:
/*
   Twilio Machine to Machine Commands Quickstart for the Seeed Studio Wio LTE
*/
#include "wio_tracker.h"
/*
 Globals for receiving incoming Commands
*/
uint16_t newSMSNumber = -1;
char receivedMessage[128];
/*
 Create a Wio instance
*/
WioTracker wio = WioTracker();
void setup() {
 /*
   Modem setup
 */
 wio.Power_On();
 SerialUSB.println("Power On!");
 SerialUSB.println("Start network registration...");
 /*
   Network registration
 */
 if (!wio.waitForNetworkRegister())
 {
   SerialUSB.println("Network error");
   return;
 } else {
   SerialUSB.println("Network registration complete");
 }
 /*
   Set all "REC UNREAD SMS" to "REC READ SMS"
 */
 wio.readAllRecUnreadSMS();
 /*
   Keep `command` under 160 ASCII characters, or 67 UCS-2 characters.
   https://www.twilio.com/docs/glossary/what-sms-character-limit
 */
 SerialUSB.println("Sending Command");
 char message[128] = "Hello from the Wio LTE!";
 /*
   Send an SMS to short code 2936, which is a Twilio
   Machine-to-Machine command.
   Write a Twilio M2M command.
 */
 if (wio.sendSMS("2936", message))
 {
   SerialUSB.println("Command Sent");
 }
 else
 {
   SerialUSB.println("Send Error");
 }
 SerialUSB.println("Waiting for Command");
}
void loop() {
 /*
   Detect unread Commands
 */
 int id = wio.detectRecUnreadSMS();
 /*
   Define the index of the incoming Commands
 */
 if (-1 != id) {
   newSMSNumber = id;
   /*
     Read a Twilio M2M command. Note that it will find the lowest
     indexed one with the code as is; in your code. if you cache the
     index you can start the next read_command to move to the next one.
   */
   wio.readSMS(newSMSNumber, receivedMessage, 128);
   SerialUSB.println("Command Received");
   SerialUSB.println(receivedMessage);
 }
 delay(1000);
}
Now that you have seen how to send and receive Machine to Machine commands with the Wio LTE and your development machine, you're ready to build your first TwilioIoT project. Here are some possible ideas to take it to the next level:
- Try full end-to-end applications with Twilio Wireless Blueprints
- Dig into the Programmable Wireless API
- See all Programmable Wireless Guides and Tutorials
- Saying Happy Birthday to my Grandma with #TwilioIoT
We all do sometimes; code is hard. Get help now from our support team, or lean on the wisdom of the crowd browsing the Twilio tag on Stack Overflow.


Comments