

Hardware components | ||||||
 |
| × | 1 | |||
| × | 1 | ||||
 |
| × | 1 | |||
This project has been imagine in an educational Way, I would built some interactive machines for helping kids to understand New technology.
The Theme is Music, because it's universal and it's nice for kids.
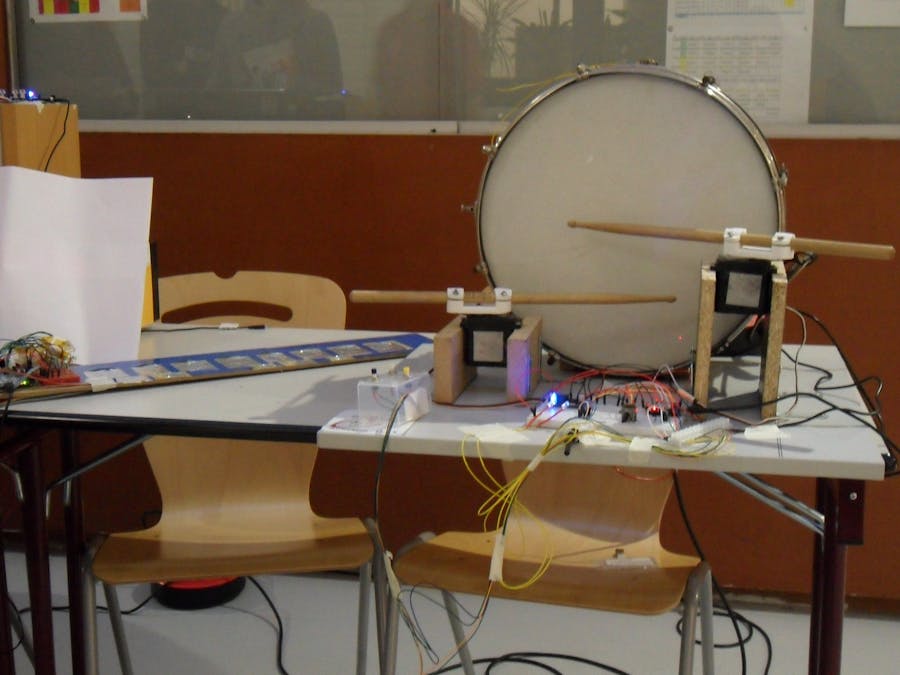
I built two machines who plays music in a different way !
The aim and a demonstration of the project can be fin in this video :
This project is in two part and can be extend one day !
1. An No-Contact Piano
2.An Automatics drum !
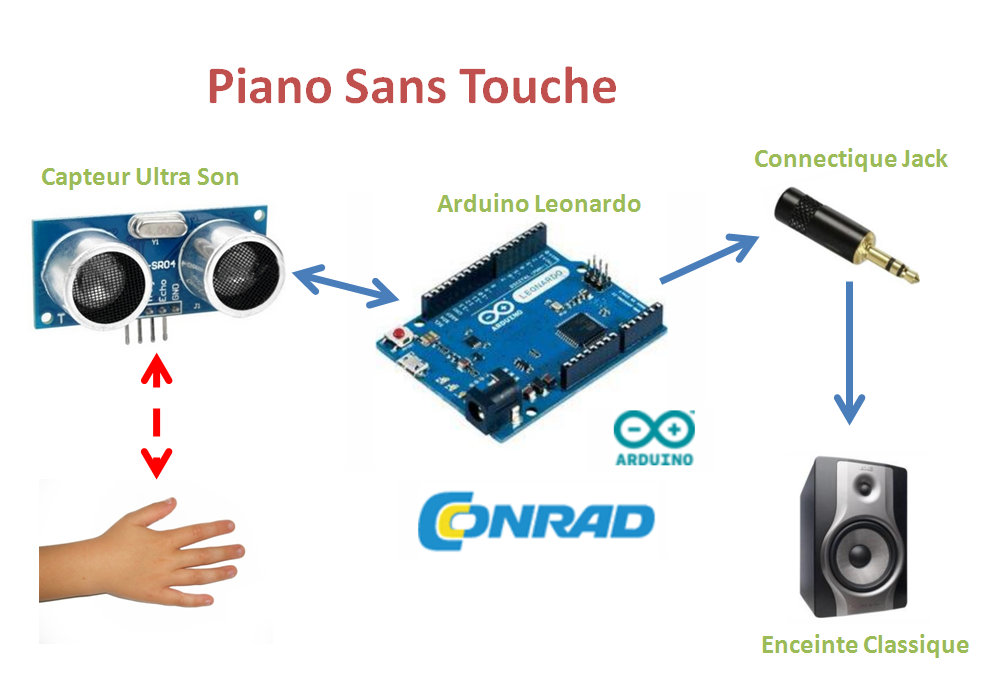
This System is an interactive piano wich you will never touch anything !
Just shake your hand at the top of the device and music will be play !
More high is your hand, more Sharp is the sound.
More down is your hand, more Low is the sound !
HOW IT'S WORK ?????
Hum... Intresting schematic.
So, the "capteur Ultra son" wich Means Ultrasonic Sensor will give us a distance.
And we will convert this distance in a frequency !!
Ready ?
Lets Play :
a. Electronics Part :
- Put a wire between GND of the HC - SR04 sensor and the GND of the Arduino
- Put a wire between VCC of the HC - SR04 sensor and the 5V of the Arduino
- Put a wire between TRIG and the I/O N°12 of the ARDUINO
- Put a wire between ECHO and the I/O N°13 of the ARDUINO
------------------Ultrasonic Part Done--------------------
Find a jack Plug Somwhere ^^
- Connect the + of the jack at the I/O N°11 of the ARDUINO
- Connect the - of the jack at the GND of the ARDUINO
If your plug is not with screw... use a soldering iron to help your wire to be connected.
b. Software Part :
Then you can deploy the code below :
// Name the pin as led.

#define speaker 11


// Set the Snt end Pin & Receive Pin.

int trig = 12;

int echo = 13;

long cmm;


void setup()

{

pinMode(trig, OUTPUT);

digitalWrite(trig, LOW);

pinMode(echo, INPUT);

Serial.begin(9600);

}


void loop()

{

// Set a timer.

long start = millis();


cmm=What_Range();


if(cmm>10 && cmm<70)

{

tone(speaker, 440*cmm/30);

delay(100);

}

else

{

delay(10);

}


Serial.println(cmm);

noTone(speaker); // arbitrary delay to limit data to serial port

}


int What_Range()

{

int cm;

digitalWrite(trig, HIGH);

delayMicroseconds(10);

digitalWrite(trig, LOW);

cm = pulseIn(echo, HIGH) / 58;

return(cm);

}
c. Test Part
Now you can plug the jack to your speaker (can be the Hi-Fi speaker of your bedroom !!)
Put your hand in front of the sensor and... Have fun !!
#DavidGuetta #FrenchSong #D.I.Y
Now lets moove on to the second music instrument : The amazing Automatic Drum.
This Drum has be made for lazy poeple or for poeple who just can't drum correctly... (Like me :-( )
You have in your hand a remote with two buttons, if you push the left buttons, the left stick hit the drum and if you push the right button : EVRYTHING FALL DOWN IN AN EXPLOSION... hum... no in fact the right stick hit the drum ^^
Lets explain this with a schem :
So for this module you will need
-Two Servomotor
-Two Potentiometer
-Three Buttons
-An Arduino Nano
a. Electronic part :
- Connect two Servomotors to the PIN 9 and 6 of your arduino.
- Connect two led to the PIN 7 and 8 of your arduino [Help for Debug]
- Connect two potentiometer to the PIN A0 and A1. [control Position and speed]
- Connect tree buttons to the PIN 12, 2 , 4.
Some help to connect your button and led :
Ok now we are ready to deploy our programm :
b. Sofware
You can conect the usb Wire, open arduino and deploy this programm :
#include <Servo.h>


Servo myservo1;  // create servo object to control a servo

Servo myservo2;


int pos = 0;

int pos1 = 0;

int potpin0 = 0;  // analog pin used to connect the potentiometer

int potpin1 = 1;


int angleMaxGauche;

int angleMinGauche;

int angleMaxDroite;

int angleMinDroite;

int temp;


int boutonIni = 12;

int bouton0 = 2;

int bouton1 = 4;

int led1 = 8;


void setup() {

  myservo1.attach(9);

  myservo2.attach(6);

  // attaches the servo on pin 9 to the servo object

    pinMode(boutonIni, INPUT);

    pinMode(bouton0, INPUT);

    pinMode(bouton1, INPUT);

    pinMode(led1, OUTPUT);

    Serial.begin(9600);


 //   digitalWrite(led1, HIGH);

    initialisation(); //on entre les positions min et max des servo

    Serial.println(angleMaxGauche);

     Serial.println(angleMinGauche);

      Serial.println(angleMaxDroite);

       Serial.println(angleMinDroite);


}


void loop() {


temp=pota(); //lit la valeur de la vitesse de la baguette (potard droit)


if(digitalRead(bouton0)==LOW){

 baguetteGauche(temp);

}  else if(digitalRead(bouton1)==LOW) {

  baguetteDroite(temp);

}  else if(digitalRead(bouton0)==LOW && digitalRead(bouton1)==LOW){

  baguetteGauche(temp);

  baguetteDroite(temp);


  }


}


void baguetteGauche(int temp) {

  digitalWrite(8,HIGH);

 for (pos = angleMinGauche; pos <= angleMaxGauche; pos += 5) {

    myservo1.write(pos);

         delay(temp);

  }

    for (pos = angleMaxGauche; pos >= angleMinGauche; pos -= 5) {

    myservo1.write(pos);

    delay(temp);

  }

  digitalWrite(8,LOW);

  }


  void baguetteDroite(int temp) {

     digitalWrite(7,HIGH);

 for (pos1 = angleMaxDroite; pos1 <= angleMinDroite; pos1 += 5) {

    myservo2.write(pos1);

         delay(temp);

  }

    for (pos1 = angleMinGauche; pos1 >= angleMaxGauche; pos1 -= 5) {

    myservo2.write(pos1);

    delay(temp);

  }

   digitalWrite(7,LOW);

  }


  int pota(){


  int poti = analogRead(A1);


   poti = map(poti, 0, 1023, 5, 50);


   return poti;


  }


void initialisation(){

 int val1 = analogRead(A0);

// Serial.read(boutonIni);


 Serial.println("Initialiser angle de frappe du moteur gauche");

 while(digitalRead(boutonIni)==HIGH){

 val1 = analogRead(A0);

  val1 = map(val1, 0, 1023, 0, 180);

 myservo1.write(val1);

 delay(10);


 }


delay(1000);


angleMaxGauche = val1;


  int val2 = analogRead(A0);


  Serial.println("Initialiser angle de repos du moteur gauche");

 while(digitalRead(boutonIni)==HIGH){

    val2 = analogRead(A0);

 val2 = map(val2, 0, 1023, 0, 180);

 myservo1.write(val2);

 delay(10);


 }


 delay(1000);


 angleMinGauche = val2;


 int val3 = analogRead(A0);

  Serial.println("Initialiser angle de frappe du moteur droite");

 while(digitalRead(boutonIni)==HIGH){

     val3 = analogRead(A0);

 val3 = map(val3, 0, 1023, 0, 180);

 myservo2.write(val3);

 delay(10);


 }

 delay(1000);


 angleMaxDroite = val3;


  int val4 = analogRead(A0);

  Serial.println("Initialiser angle de repos du moteur droite");

 while(digitalRead(boutonIni)==HIGH){

     val4 = analogRead(A0);

 val4 = map(val4, 0, 1023, 0, 180);

 myservo2.write(val4);

 delay(10);


 }

 delay(1000);


angleMinDroite = val4;


}
well done !
c. Use it
Sothe initialisation is started automatically :
Start with the left motor :
--Set the maximum position with the potentiometer A0, validate by pushing the button on pin 12.
--Set the minimum position with the potentiometer A0, validate by pushing the button on pin 12
Now the left motor :
--Set the maximum position with the potentiometer A0, validate by pushing the button on pin 12.
--Set the minimum position with the potentiometer A0, validate by pushing the button on pin 12
And it's over !!
So now you can play by pushing button 2 and 4 !
It's too slow ? No problem, the potentiometer A0 is here to control the speed of the motor.
Thank to Conard and Maximiliens Saunier For helping Me in this project !
Have Fun


Comments