

Step 1: Gather Components
For this project, you will need:
- W6300-EVB-PICO2 Microcontroller
- Sensirion SFA30 Sensor
- USBFan
- Breadboard and jumper wires
W5100S-EVB-PICO2 - Reliable IoT Foundation
- RP2350 dual Cortex-M33 (150MHz) + 520KB SRAM
- 16MB flash + 16KB network buffers
- 4 simultaneous sockets, IPv4 only
- Essential security with OTP memory
- Cost-effective for basic IoT applications
W6300-EVB-PICO2 - Advanced IoT Solution
- Same powerful RP2350 core foundation
- 64KB network buffers + 8 simultaneous sockets
- IPv4/IPv6 dual stack support
- Enhanced security with TrustZone + secure boot
- Wake-on-LAN and advanced power management
Key Difference: The W6300 doubles socket capacity, adds IPv6 future-proofing, and enhances security - making it ideal for complex multi-connection applications, while the W5100S handles basic IoT tasks reliably.
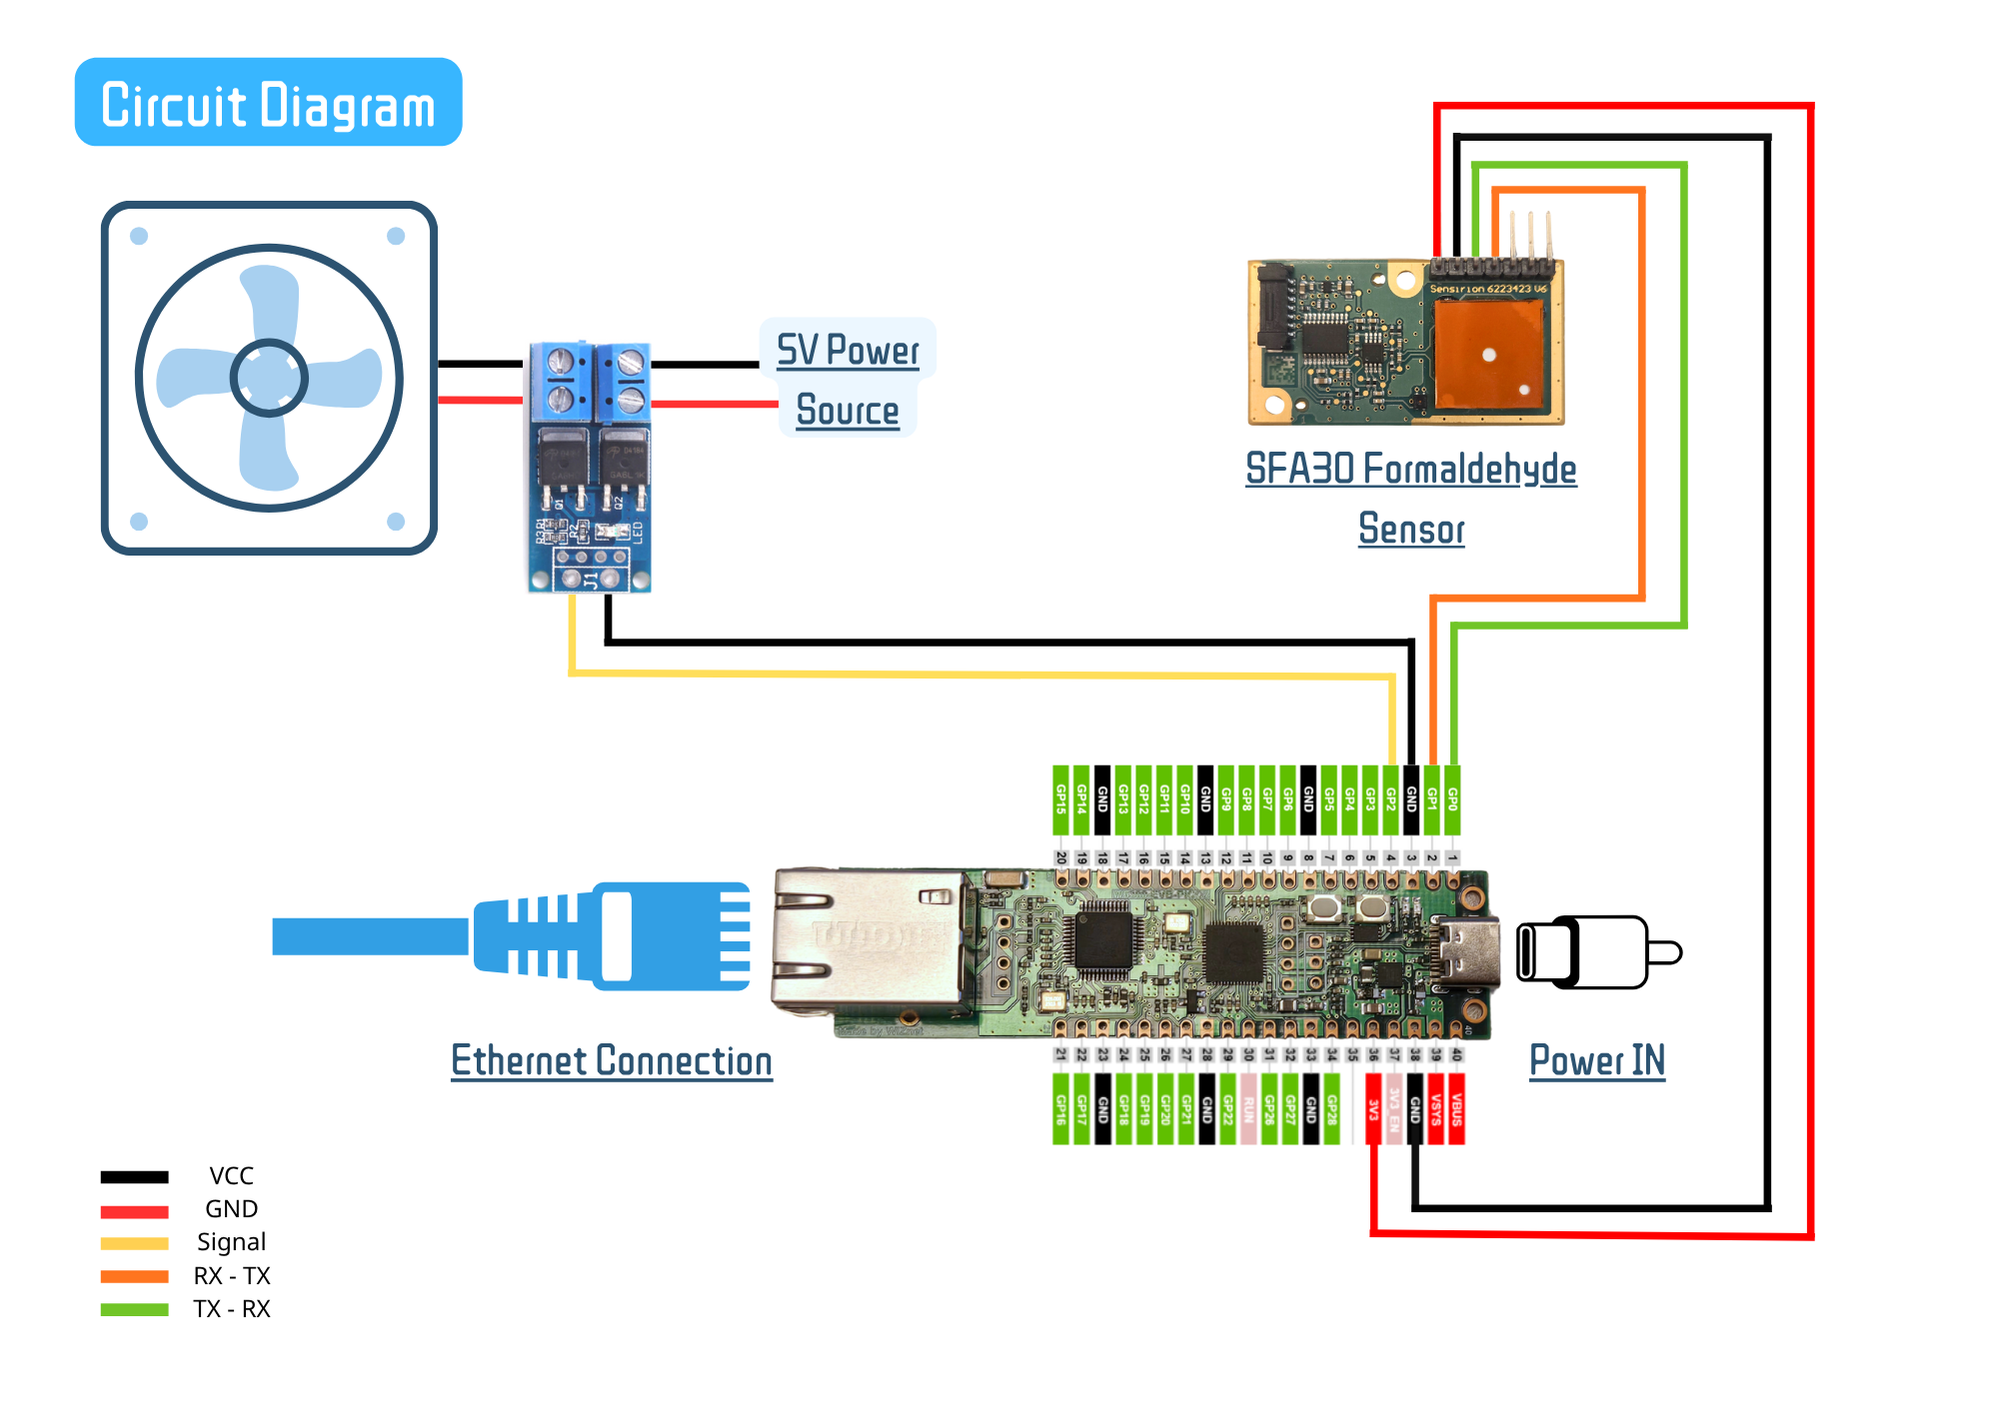
SFA30 Sensor
- TX → GP0
- RX → GP1
Fan Control Circuit
- MOSFET Trigger PWM → GP2 (control signal)
- MOSFET GND → Pico Board GND (shared ground)
- MOSFET VIN → 5V power source
- MOSFET VOUT → Fan
Ethernet
- Built-in RJ45 to network router
Important: Double-check all connections for security and accuracy before powering on the board.
Step 3: Software ConfigurationSetting Up Adafruit IOCreate Feeds:
- Temperature feed
- Humidity feed
- Formaldehyde concentration feed
Design Dashboard:
- Go to the Dashboard section to design your control interface, adding components like switches and color pickers
digitalio: For controlling GPIO pins.time: For delays in the code.board: Accesses board-specific pin definitions.busio: Handles serial communication (like SPI).adafruit_dht: For interacting with DHT temperature and humidity sensors.WIZnet Ethernet: Imports WIZnet library functions if the board is one of the specified Ethernet boards.MQTT Libraries: These libraries are for communicating with Adafruit IO using the MQTT protocol.
import digitalio
import time
import board
import busio
import adafruit_dht

# WIZnet Ethernet support
if board.board_id in ("wiznet_w55rp20_evb_pico", "wiznet_w6300_evb_pico2"):
    import wiznet

from adafruit_wiznet5k.adafruit_wiznet5k import *
import adafruit_wiznet5k.adafruit_wiznet5k_socketpool as socketpool

# MQTT and Adafruit IO
from adafruit_io.adafruit_io import IO_MQTT
import adafruit_minimqtt.adafruit_minimqtt as MQTThis dictionary stores your Adafruit IO credentials. You should create a separate secrets.py file to keep sensitive information secure.
secrets = {
    "aio_username": "YOUR_ADAFRUIT_IO_USERNAME",
    "aio_key": "YOUR_ADAFRUIT_IO_KEY"
}Defines the MAC address, static IP address, subnet mask, gateway, and DNS server addresses for network connectivity.
MY_MAC = "00:01:02:03:04:05"
IP_ADDRESS = (192, 168, 1, 100)  # Static IP configuration
SUBNET_MASK = (255, 255, 255, 0)
GATEWAY_ADDRESS = (192, 168, 1, 1)
DNS_SERVER = (8, 8, 8, 8)- Ethernet Configurations: Configures pins for Ethernet connectivity and resets the WIZnet module.
- Initialize Ethernet: The WIZnet module is initialized using SPI, with DHCP enabled to get an IP address auomatically.
# Ethernet reset pin
ethernetRst = digitalio.DigitalInOut(board.W5K_RST)
ethernetRst.direction = digitalio.Direction.OUTPUT

# SPI configuration for Ethernet
cs = digitalio.DigitalInOut(board.W5K_CS)
spi_bus = busio.SPI(board.W5K_SCK, MOSI=board.W5K_MOSI, MISO=board.W5K_MISO)

# Reset W5x00
ethernetRst.value = False
time.sleep(1)
ethernetRst.value = True

# Initialize Ethernet
eth = WIZNET5K(spi_bus, cs, is_dhcp=True, mac=MY_MAC, debug=False)# SFA30 device using UART
SFA30 = busio.UART(board.GP0, board.GP1, baudrate=115200, bits=8, parity=None, stop=1)- UART Initialization: This line initializes the SFA30 sensor using UART (Universal Asynchronous Receiver-Transmitter) for serial communication.
- Pin Definitions:
board.GP0andboard.GP1are used for TX and RX communication, respectively. - Baud Rate: Set to 115200 for fast data transmission.
# Reset sensor and wait for initialization
SFA_reset = bytearray([0x7E, 0x00, 0xD3, 0x00, 0x2C, 0x7E])
SFA30.write(SFA_reset)
print("Preparing SFA30 - waiting 10 seconds")
time.sleep(10)- Reset Command: The
SFA_resetarray contains a command to reset the SFA30 sensor. The command format typically includes start and end bytes (0x7E) and specific operation codes. - Waiting Period: After sending the reset command, the code waits for 10 seconds to ensure the sensor completes its initialization process. This is crucial for reliable readings.
# Configuration command
SFA_config = bytearray([0x7E, 0x00, 0x00, 0x01, 0x00, 0xFE, 0x7E])
SFA30.write(SFA_config)
time.sleep(0.2)- Configuration Command: The
SFA_configarray contains the settings for the sensor to start measuring. Similar to the reset command, it includes start and end bytes. - Short Wait: A brief wait of 0.2 seconds is implemented after sending the configuration command to allow the sensor to process the settings before taking measurements.
set_reading_values(recv_data) processes raw data from the sensor:
- Checks for a valid response frame.
- Extracts and converts raw values into meaningful measurements (formaldehyde, humidity, temperature).
def set_reading_values(recv_data):
    """Process raw sensor data and extract readings"""
    if len(recv_data) < 9 or recv_data[0] != 0x7E or recv_data[-1] != 0x7E:
        print("Invalid response frame")
        return None, None, None

    # Extract values from data frame
    formaldehyde_raw = (recv_data[3] << 8) | recv_data[4]
    humidity_raw = (recv_data[5] << 8) | recv_data[6]
    temperature_raw = (recv_data[7] << 8) | recv_data[8]

    # Convert to physical values
    formaldehyde = formaldehyde_raw / 5.0   # Scale by 5 ppb
    humidity = humidity_raw / 100.0         # Scale by 100 %RH
    temperature = temperature_raw / 200.0   # Scale by 200 °C

    return formaldehyde, humidity, temperature
get_reading_value: Sends a command to the sensor to request data, reads the response, and processes it using the set_reading_values function.
def get_sensor_readings():
    """Read data from SFA30 sensor"""
    SFA_get_data = bytearray([0x7E, 0x00, 0x03, 0x01, 0x02, 0xF9, 0x7E])
    SFA30.write(SFA_get_data)
    time.sleep(0.1)

    recv_data = bytearray()
    segmented_frame = SFA30.readline()

    while segmented_frame:
        recv_data.extend(segmented_frame)
        segmented_frame = SFA30.readline()

return set_reading_values(recv_data)Initializes a pin to control a fan:
- The
control_fanfunction turns the fan on if the temperature exceeds 27°C.
# Set up digital output for fan control
fan_control = digitalio.DigitalInOut(board.GP2)
fan_control.direction = digitalio.Direction.OUTPUT

def control_fan(temperature):
    """Control fan based on temperature threshold"""
    if temperature > 27:  # Threshold set to 27°C
        fan_control.value = True
        print("Fan ON - Temperature above threshold")
    else:
        fan_control.value = False
print("Fan OFF - Temperature normal")Socket Pool: Creates a socket pool for network communications.
- MQTT Client: Initializes the MQTT client with broker details and credentials from the
secretsdictionary.
# Socket pool for network connections
pool = socketpool.SocketPool(eth)

# MQTT Client setup
mqtt_client = MQTT.MQTT(
    broker="io.adafruit.com",
    username=secrets["aio_username"],
    password=secrets["aio_key"],
    socket_pool=pool,
    is_ssl=False,
)

# Adafruit IO MQTT Client
io = IO_MQTT(mqtt_client)

# Feed definitions
temp_feed = secrets["aio_username"] + "/feeds/Temperature"
humi_feed = secrets["aio_username"] + "/feeds/Humidity"
form_feed = secrets["aio_username"] + "/feeds/Formaldehyde"- MQTT Callbacks: Define functions to handle MQTT events:
connected: Confirms connection to the broker.disconnected: Notifies when disconnected.message: Handles incoming messages.publish: Logs when a message is successfully published.
# MQTT callback functions
def connected(client, userdata, flags, rc):
    print("Connected to MQTT broker!")

def disconnected(client, userdata, rc):
    print("Disconnected from MQTT broker!")

def message(client, topic, message):
    print(f"Received message on {topic}: {message}")

def publish(client, userdata, topic, pid):
print(f"Published to {topic} with PID {pid}")- Callback Assignment: Links the previously defined callback functions to the MQTT client.
Connect to Broker: Attempts to connect to the MQTT broker, with a message printed to indicate the status.

# Assign callbacks
mqtt_client.on_connect = connected
mqtt_client.on_disconnect = disconnected
mqtt_client.on_message = message
mqtt_client.on_publish = publish

# Connect to MQTT broker
print("Connecting to MQTT broker...")
mqtt_client.connect()- Handles MQTT tasks.
- Reads data from the SFA30 sensor.
- If valid readings are obtained, it applies a calibration offset to the temperature and controls the fan.
- Prints the sensor readings and publishes them to Adafruit IO
- Waits for 3 seconds before the next reading.
temperature_offset = -5.0  # Calibration offset if needed

while True:
    mqtt_client.loop()  # Handle MQTT tasks

    readings = get_sensor_readings()

    if None not in readings:
        # Apply temperature calibration
        temperature = readings[2] + temperature_offset

        # Automatic fan control
        control_fan(temperature)

        # Print readings to console
        print("HCHO Concentration:", readings[0], "ppb")
        print("Humidity:", readings[1], "%")
        print("Temperature:", temperature, "°C")

        # Publish to Adafruit IO
        mqtt_client.publish(form_feed, readings[0])
        mqtt_client.publish(humi_feed, readings[1])
        mqtt_client.publish(temp_feed, temperature)

        # Blink LED to indicate successful reading
        led.value = True
        time.sleep(0.1)
        led.value = False
    else:
        print("Failed to retrieve valid sensor readings.")

time.sleep(3) # Wait 3 seconds between readings- Continuous tracking of environmental parameters
- Immediate fan activation when temperature exceeds 27°C
- Live data streaming to Adafruit IO dashboard
- Automatic temperature regulation
- Formaldehyde level monitoring for air quality
- Robust error handling for sensor communication
- Real-time gauges for current readings
- Historical data charts for trend analysis
- Remote monitoring from any device
This system is perfect for:
Home environmental monitoring
Office air quality assessment
Laboratory safety systems
HVAC system integration
Smart greenhouse controls
Step 6: Video DemonstrationComing Soon
ConclusionThis environmental monitoring system provides a comprehensive solution for environmental monitoring with real-time data transmission and automated control. The combination of the W6300-EVB-PICO2's reliable Ethernet connectivity and Adafruit IO's robust cloud platform creates a powerful IoT application that's both educational and practical.
The project demonstrates important IoT concepts including sensor integration, real-time data processing, MQTT communication, and automated control systems - making it an excellent learning platform for IoT enthusiasts and developers.

Crazy Cat
 wiznethk

Comments