


Hardware components | ||||||
 |
| × | 1 | |||
| × | 1 | ||||
| × | 1 | ||||
| × | 1 | ||||
| × | 1 | ||||
| × | 1 | ||||
Software apps and online services | ||||||
 |
| |||||
Hand tools and fabrication machines | ||||||
 |
| |||||
 |
| |||||
 |
| |||||
 |
| |||||
Video version of the article:
Introduction
When I renovated my workshop, I decided to prepare for future automation instead of relying on Wi-Fi devices. Every wall switch and outlet location received an additional Ethernet cable, giving me a reliable communication channel for sensors, switches, and controllers.
This approach required more effort during installation, but it came with several important advantages: stable communication, immunity to Wi-Fi congestion, Power over Ethernet (PoE) support for compatible devices, and significantly lower power consumption for distributed sensors.
The goal of this project was to automate two everyday tasks:
- Turn the workshop lights on automatically when someone enters and switch everything off after the room has been empty for 15 minutes.
- Control the ventilation system based on both occupancy and indoor CO2 concentration, ensuring fresh air without running the fan unnecessarily.
To accomplish this, I used two recently released DFRobot sensors:
- C4002 mmWave Presence Sensor for reliable human presence detection.
- STCC4 CO2 Sensor for monitoring air quality and controlling the ventilation system.
Wireless smart home devices are easy to install, but they also introduce limitations that become noticeable as the system grows. Every battery-powered sensor needs maintenance, Wi-Fi networks become more crowded over time, and reliability depends on radio coverage.
Since the walls of my workshop were already open during renovation, adding Ethernet cables cost very little compared to the overall project. That small decision made it possible to build an automation system that behaves much more like industrial control equipment than a typical consumer smart home.
The benefits include:
- Reliable wired communication
- No dependence on Wi-Fi coverage
- Lower power consumption for remote devices
- PoE support where applicable
- Easy future expansion without opening the walls again
Of course, there is one obvious disadvantage - you have to plan the wiring before finishing the room.
System OverviewThe automation system consists of two Ethernet-connected ESPHome devices.
The first device is a DT-R008 Ethernet relay controller, which acts as the central PLC. It is responsible for switching the workshop lighting, reading the wall switches, controlling the ventilation fan, and communicating with Home Assistant over Ethernet.
The second device is built around a WT32-ETH01 module and serves as the environmental monitoring node. It collects data from the DFRobot sensors and reports it to Home Assistant using ESPHome.
This separation keeps the control logic modular. The relay controller focuses on switching loads, while the sensor node handles environmental measurements and occupancy detection. Since both devices are connected through Ethernet, the system remains completely independent of Wi-Fi.
The current implementation automates two tasks:
- Lighting - the C4002 mmWave sensor detects presence and turns the lights on automatically. If the workshop remains empty for 15 minutes, the lights and other selected devices are switched off.
- Ventilation - every 10 minutes Home Assistant checks the CO2 concentration reported by the STCC4 sensor. If the air quality drops below the configured threshold while someone is present in the workshop, the ventilation fan is turned on automatically.
The actual automation logic runs in Home Assistant, while both ESPHome devices expose their sensors and outputs as standard entities.
The project intentionally uses mostly off-the-shelf components. Aside from the custom 3D-printed sensor enclosure, everything can be purchased from common electronics suppliers.
- DT-R008 Ethernet Relay Controller - Main PLC responsible for switching loads, reading inputs, and communicating with Home Assistant.
- WT32-ETH01 - Ethernet-enabled ESP32 module used as the dedicated sensor node.
- DFRobot C4002 - mmWave presence sensor for occupancy detection.
- DFRobot STCC4 - CO2 sensor used for air quality monitoring and ventilation control.
- MeanWell HDR-30-12 - 12V DIN-rail power supply for the relay controller and relays.
- 5V AC-DC Power Supply - Powers the WT32-ETH01 sensor node.
- DIN-Rail Relay - Controls the workshop lighting and provides manual override with state feedback.
- Ethernet (UTP) Cabling - Provides reliable wired communication between all ESPHome devices.
One of the goals of this project was reliability.
Instead of installing a separate Wi-Fi relay behind every wall switch, all wiring terminates inside a single control panel. This approach makes maintenance significantly easier and allows the entire electrical system to be managed from one location.
Another important advantage is that the wall switches continue to operate even if Home Assistant or the network becomes unavailable.
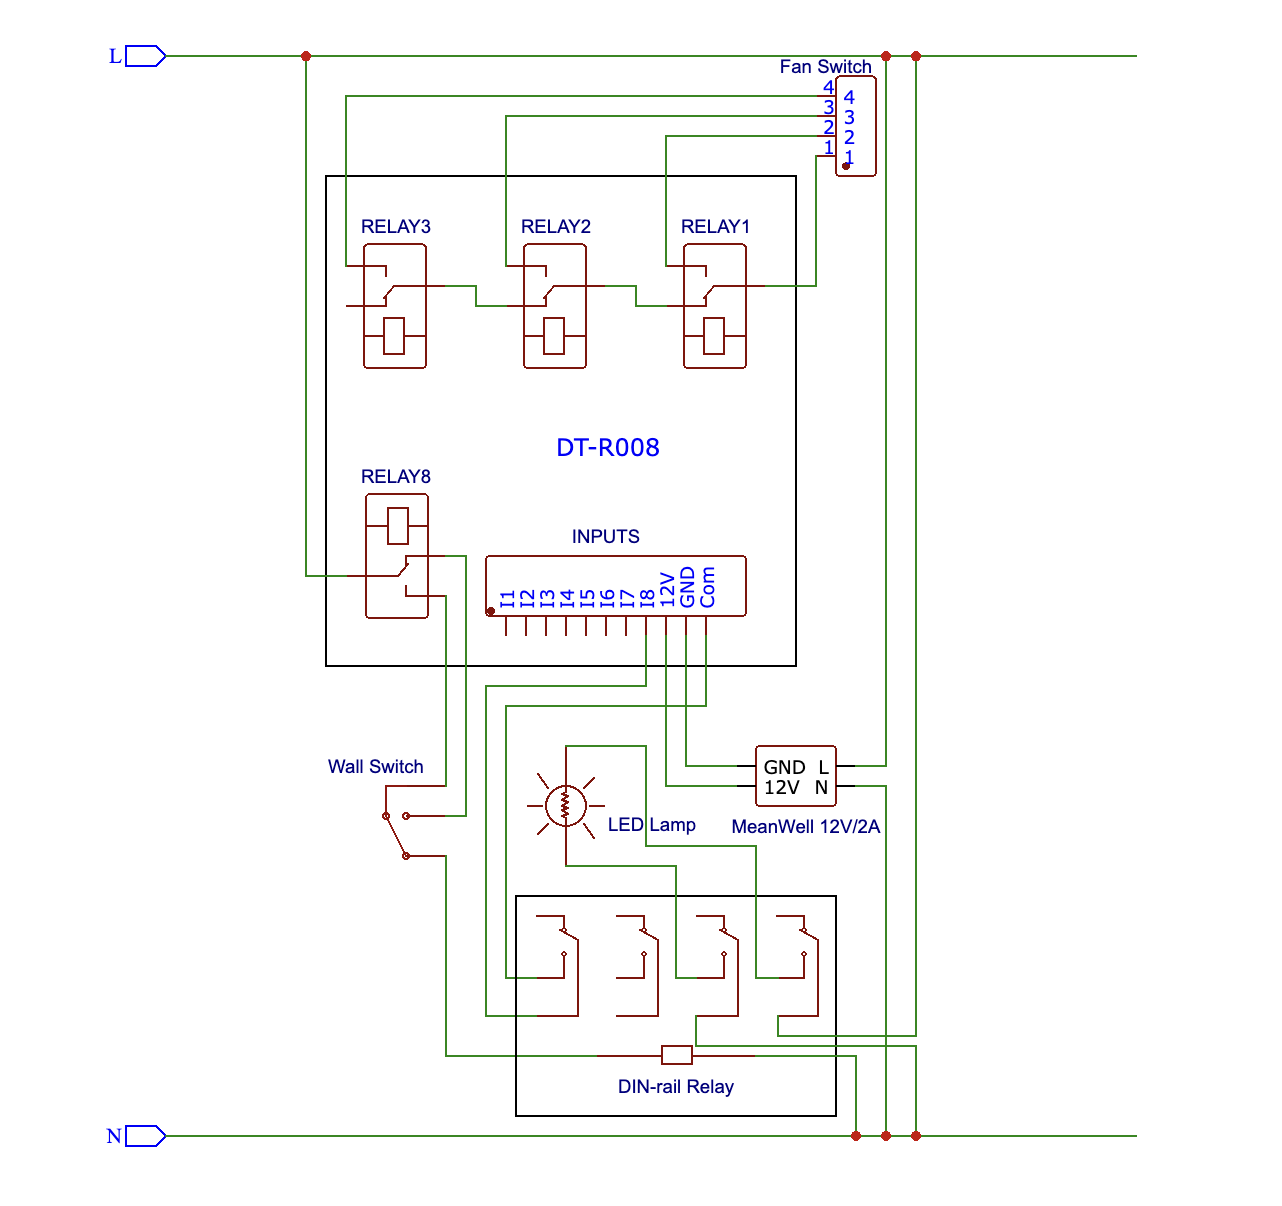
Relay #8 is wired together with the manual wall switch as a two-way switch. This circuit drives a separate DIN-rail relay that actually powers the lighting circuit. Additional auxiliary contacts on the DIN relay provide feedback to the DT-R008, allowing Home Assistant to know the true state of the lights regardless of whether they were switched manually or automatically.
For the multi-speed ventilation fan, relays 1-3 replace the original mechanical selector switch. They are connected in series so that only one fan speed can be energized at a time, preventing accidental short circuits caused by software or configuration errors.
Building the Control PanelTo accommodate all the required components, I cut a mounting plate to the desired size and installed a DIN rail, wire clips, and a wiring duct for cable management.
The actual wiring process is repetitive rather than difficult. Each wire must be measured, cut, stripped, routed through the wiring duct, and terminated.
Although time-consuming, careful cable routing makes troubleshooting much easier later.
The complete wiring schematic is attached to this project, so I won't repeat every connection here. Instead, I'd like to explain several design decisions that make the system reliable.
Lighting Control with Manual OverrideOne of my requirements was that the workshop lights must continue to work even if Home Assistant, ESPHome, or the network becomes unavailable.
To achieve this, Relay 8 and the wall switch are wired together as a two-way switch. Instead of switching the lighting circuit directly, they control a separate DIN-rail relay, which supplies power to the lights.
The auxiliary contacts of the DIN relay are connected back to the DT-R008 digital inputs, providing feedback about the actual state of the lighting circuit.
As a result, Home Assistant always knows whether the lights are ON or OFF, regardless of whether they were switched manually or automatically.
Safe Fan Speed SelectionThe workshop ventilation fan supports multiple speed settings.
Instead of replacing the original selector switch with a single relay, I dedicated three relays to fan speed control.
These relays are connected in series to mimic the original rotary switch. This wiring guarantees that only one speed can be energized at a time, preventing accidental activation of multiple windings due to software bugs or configuration errors.
This hardware safeguard makes the system significantly more robust than relying solely on software logic.
Why Ethernet?Many DIY automation projects rely entirely on Wi-Fi, but I deliberately avoided it for the core infrastructure.
Both ESPHome devices communicate exclusively over Ethernet, providing:
- stable communication without signal drops,
- deterministic latency,
- no dependence on Wi-Fi coverage,
- lower power consumption on the microcontrollers,
- room for future PoE-powered devices.
Since the Ethernet cables were installed during the workshop renovation, adding new devices later only requires connecting them to the existing network.
Flashing the DT-R008The DT-R008 ships with factory firmware that already supports MQTT and Home Assistant integration. For many users, this firmware will be perfectly adequate and requires no modifications.
However, I wanted to integrate the relay controller into my existing ESPHome ecosystem, so I decided to replace the factory firmware.
If you plan to do the same, make sure to order the developer version of the DT-R008. The standard version ships with the ESP32 protected against reflashing, while the developer version allows custom firmware to be uploaded without hardware modifications.
For ESPHome support, I used the excellent dtr0xx_io component by kecajtop, which provides native integration with the relay board.
Debug Port Pinout:
1 - GND
2 - IO3 (U0RXD/RS485 RX)
3 - IO1 (U0TXD/RS485_TX)
4 - NRST
5 - IO0 (RMII_RST/PWR)
6 - 3.3V
7 - IO4 (CAN_RX)
9 - IO5 (CAN_TX)
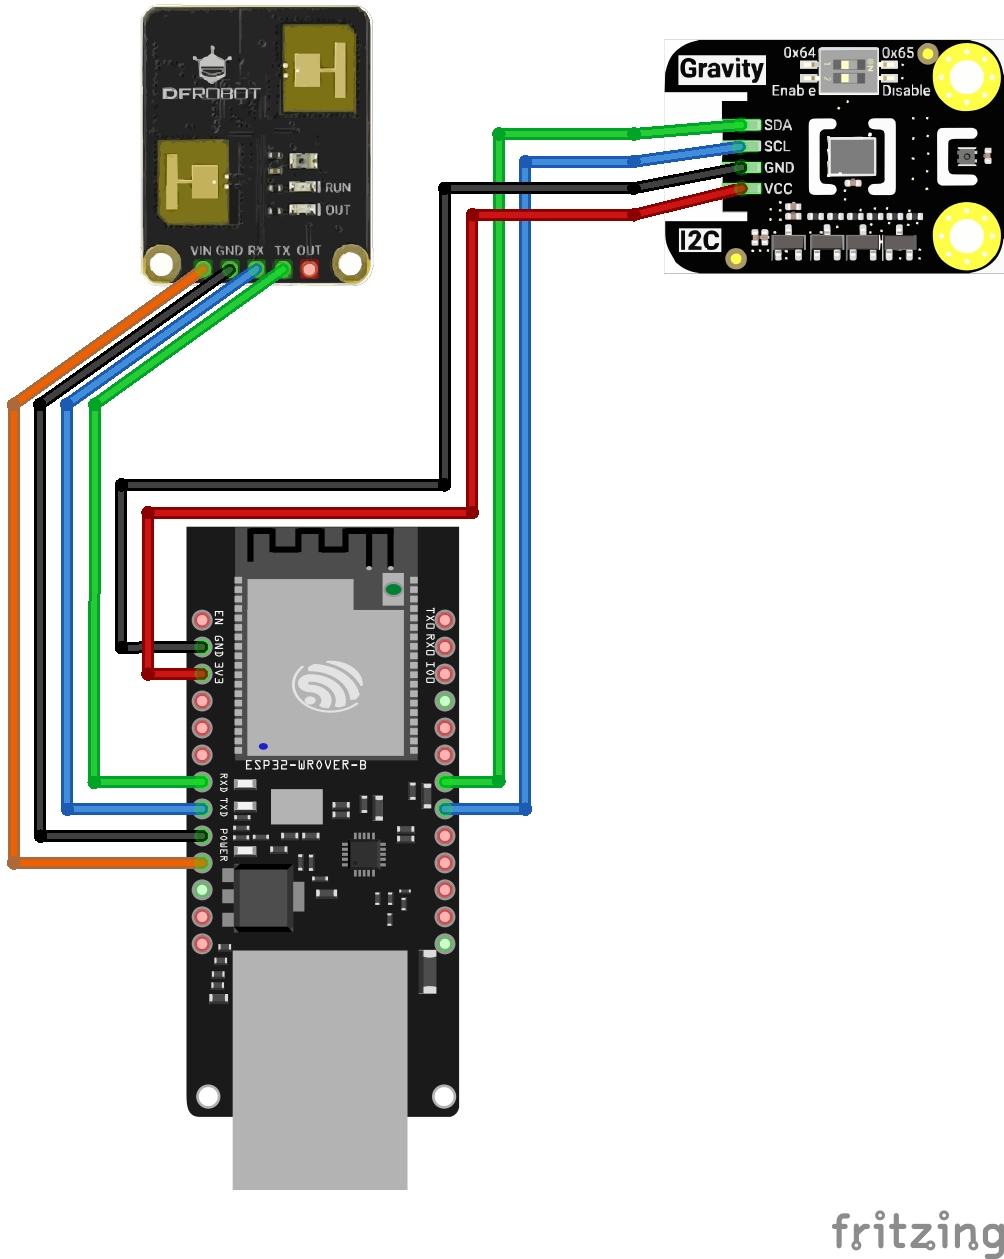
The workshop uses a dedicated Ethernet sensor node based on the WT32-ETH01. Instead of connecting every sensor directly to the relay controller, this separate node handles all environmental monitoring and publishes the measurements to Home Assistant through ESPHome.
The node combines two DFRobot sensors:
- C4002 mmWave Presence Sensor for occupancy detection.
- STCC4 CO2 Sensor for indoor air quality monitoring.
Both sensors communicate using different interfaces. The C4002 uses UART, while the STCC4 communicates over I²C, making them a good fit for the WT32-ETH01.
To simplify installation, I designed and 3D-printed a new enclosure that houses both sensors together with the WT32-ETH01 module. The STL files are attached to this project.
STCC4 CO2 SensorThe STCC4 is a low-power CO2 sensor based on thermal conductivity measurement. While it is not a laboratory-grade instrument, it provides more than enough accuracy for demand-controlled ventilation.
The sensor measures CO2 concentrations from 500 ppm to 5000 ppm with a typical accuracy of ±100 ppm. In practice, this is sufficient to determine when fresh air is needed inside the workshop.
Another useful feature is the integrated temperature and humidity sensor used for internal compensation. An external sensor can also be connected if higher temperature accuracy is required.
During testing, the CO2 readings proved to be stable and responsive enough for automation purposes.
ESPHome SupportAt the time of building this project, the STCC4 was not yet included in the official ESPHome release.
Fortunately, I found an open pull request by will-tm, which already contained a working implementation of the component.
Rather than waiting for the pull request to be merged, I used that implementation directly in my project.
The corresponding repository is linked in the Credits section of this project.
C4002 mmWave Presence SensorPresence detection is one of the most important parts of the entire automation system.
The C4002 offers a detection range of up to 11 meters and allows configuring separate sensitivity thresholds for each distance segment. It also includes an ambient light sensor, enabling additional automation based on illumination if required.
Unfortunately, the software support initially wasn't as polished as the hardware.
Improving the ESPHome ComponentDFRobot community provides an external ESPHome component for the C4002.
While it exposes the basic functionality of the sensor, it doesn't provide access to many configuration parameters that are required for proper tuning.
Without those settings, I noticed several issues:
- measured distances were noticeably larger than the actual distance,
- readings fluctuated significantly while moving,
- false detections occurred during the night.
To solve these problems, I rewrote the ESPHome component and implemented the missing configuration commands exposed by the sensor's protocol.
The updated component allows configuring:
- sensitivity mode
- per-zone detection thresholds
- detection parameters
- additional diagnostic entities
The complete source code is available on GitHub and linked in the project resources.
Sensor CalibrationAfter enabling automatic calibration, I reviewed the threshold values generated by the sensor and fine-tuned them for my workshop.
I also switched the sensor to 0.2 m sensitivity mode, which significantly improved distance estimation.
The difference was immediately noticeable.
Before calibration, measured distances could differ from the real position by almost a meter, with large fluctuations while walking.
After calibration and proper threshold tuning, the readings became much more stable and closely matched the actual distance.
Most importantly, the false detections that occasionally occurred during the night disappeared completely.
Originally, I planned to compare the C4002 directly with another mmWave sensor that I had already been using.
However, testing revealed an unexpected issue.
When both sensors operated simultaneously with overlapping detection zones, they interfered with each other. The C4002 continuously reported presence, while the second sensor became noticeably less accurate.
Although this behavior depends on sensor placement and operating conditions, it serves as an important reminder that multiple mmWave sensors should not monitor the same area without careful planning.
Proper placement is just as important as proper configuration.
Home Assistant AutomationsWith all entities available in Home Assistant, the automation logic became straightforward.
Instead of embedding complex logic into the microcontrollers, I prefer keeping automations inside Home Assistant. This makes them easier to maintain, debug, and extend without reflashing the devices.
Automatic LightingThe lighting automation is intentionally simple.
Whenever the C4002 detects presence, the workshop lights are switched on automatically.
If no presence is detected for 15 minutes, Home Assistant assumes that the workshop has been left and switches off the lights together with other non-essential equipment.
During the night, a configurable quiet period disables automatic light activation, preventing the system from turning the lights on because of unexpected detections.
This combination has proven to work reliably in daily use while remaining completely transparent to anyone entering the workshop.
Smart VentilationVentilation control combines information from both sensors.
Every ten minutes Home Assistant checks the current CO2 concentration.
If:
- someone is present in the workshop, and
- the CO2 level exceeds the configured threshold,
the ventilation fan is switched on automatically.
Once the air quality improves or the workshop becomes empty, the fan is turned off again.
This approach avoids unnecessary fan operation while maintaining comfortable air quality during long work sessions.
Why Home Assistant?Although ESPHome is capable of running automations locally, Home Assistant provides several advantages for this project:
- automation logic can be modified without reflashing devices,
- all sensors and actuators are available in one interface,
- historical data helps tune thresholds,
- dashboards make monitoring easy,
- additional automations can be added at any time.
Keeping the devices focused on hardware control while letting Home Assistant handle the decision-making results in a clean separation of responsibilities.
The system has now been running in my workshop for several weeks, and the wired approach has proven to be exactly what I was hoping for.
The lights turn on automatically whenever I enter the workshop and switch off after I leave, eliminating the need to think about them at all.
The ventilation system keeps the CO2 concentration under control during longer work sessions while avoiding unnecessary fan operation when the workshop is empty.
Just as importantly, the manual wall switches continue to operate independently of Home Assistant, so the workshop remains fully functional even if the automation system is temporarily unavailable.
Using Ethernet instead of Wi-Fi has also been a success. Communication has been completely stable, and I no longer have to worry about wireless coverage or battery-powered devices.
Lessons LearnedBuilding this project taught me several valuable lessons that may help others planning a similar system.
- Plan the wiring before finishing the room. Adding Ethernet cables during renovation is inexpensive compared to retrofitting them later.
- Separate sensing from switching. Using dedicated ESPHome nodes makes the system easier to maintain and expand.
- Hardware safety is just as important as software logic. Mechanical interlocks and feedback contacts can prevent failures that software alone cannot.
- Spend time calibrating mmWave sensors. Proper calibration significantly improves detection quality and reduces false positives.
- Keep automation logic in Home Assistant whenever possible. It simplifies maintenance and allows rapid iteration.
Although the system already meets my current needs, there are several ideas I'd like to explore in the future:
- powering the sensor node via PoE instead of a separate 5 V supply,
- adding energy monitoring for workshop equipment,
- expanding the control panel with additional Ethernet I/O modules,
- migrating to the official ESPHome STCC4 component once it is merged.
Building a wired automation system required more planning than installing a collection of Wi-Fi smart devices, but the result has been well worth the effort.
The combination of ESPHome, Home Assistant, Ethernet, and the DFRobot C4002 and STCC4 sensors provides a reliable and responsive solution for workshop automation. More importantly, the modular architecture makes the system easy to expand as new requirements emerge.
If you're planning a new workshop or renovating an existing one, I highly recommend considering wired infrastructure from the very beginning. Even if you don't automate everything immediately, having Ethernet available at key locations gives you far more flexibility for future projects.


Comments