

Hardware components | ||||||
| × | 1 | ||||
 |
| × | 1 | |||
 |
| × | 1 | |||
 |
| × | 1 | |||
 |
| × | 1 | |||
Software apps and online services | ||||||
 |
| |||||
 |
| |||||
MKR1000 is a powerful board that combines the functionality of the Zero and the Wi-Fi Shield. It’s based on the Atmel ATSAMW25 that is part of the SmartConnect family of Atmel Wireless devices, specifically designed for IoT. It offers the ideal solution for makers seeking to add Wi-Fi connectivity with minimal previous experience in networking.
Evothings Studio is a mobile application enabler for the industrial Internet of Things (IoT). It’s really interesting technology to simplify the development process and fun to make apps in using Web Technologies, instead of native languages, is also great to connect faster our cloud services platform to the mobile Apps.
This simple project shows how to make an app that controls an Arduino MKR1000 board with Evothings Studio, by communicating over the TCP networking protocol.
What you NeedThis example runs in Evothings Viewer on Android or iOS.
You need to run this example in Evothings Viewer. Alternatively, you can build a Cordova application if you wish to distribute the app. You then need to include the Cordova plugin org.chromium.socket. Read more in the documentation of the Evothings Viewer.
For the Arduino setup, you need:
- MKR1000
- LED
- Resistor 100 Ohm
Follow these steps to get started with this example:
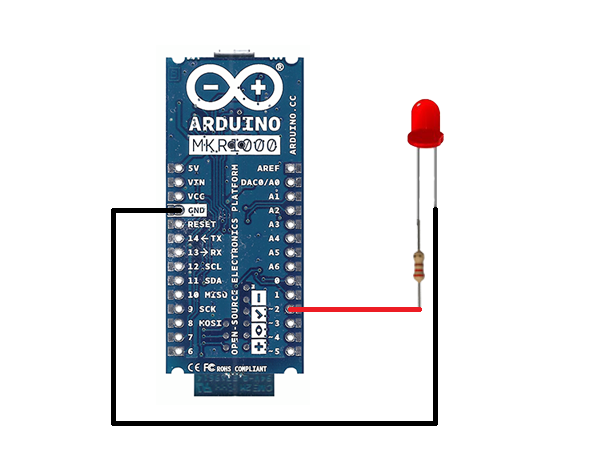
1. Wire up the Arduino MKR1000 board.
2. Open arduinowifi.ino in the Arduino development tool.
3. Enter the name and password for your WiFi network in arduinowifi.ino.
// Your network SSID (network name).
// TODO: Enter the name of your wifi network here.
char ssid[] = "wifi name";
// Your network password.
// TODO: Enter the password of your wifi network here.
char pass[] = "wifi password";
4. Upload the program to the MKR1000.
5. Open the Serial Monitor Window and look for the IP address of the MKR1000. (If the IP address is not displayed, check your WiFi network name and password.)
6. Run Evothings Workbench on your desktop/laptop computer. (If you not install Evothings Workbench, to download click here.)
7. Run Evothings Viewer on an iOS or Android mobile device and connect to the Workbench.
8. Launch the example "Arduino LED On/Off TCP" from the Workbench window.
9. Enter the IP address of the Arduino MKR1000 in the app.
10. If everything works, you should now be able to turn the LED on and off using the buttons in the app. If it does not work, check your wiring and that the right pins are used (remember pin 2 is used for output).


Comments