


Hardware components | ||||||
| × | 1 | ||||
| × | 1 | ||||
| × | 1 | ||||
 |
| × | 1 | |||
 |
| × | 1 | |||
 |
| × | 1 | |||
 |
| × | 1 | |||
Our V0.1 project successfully demonstrated a token-efficient, privacy-conscious AI assistant that used predefined, button-selected prompts (the "No-Mic" approach). It was a great concept, but the limitations were clear: the bot couldn't respond to anything new.
V0.2 shatters that limitation. By upgrading our hardware, we can now capture and process live, unscripted user voice, turning it into a true, conversational AI device. This migration guide focuses on the critical hardware and software changes required for this massive leap.
How V0.2 Works: The New ArchitectureThe client-server architecture remains, but the User Input step is fundamentally changed:
- User Input (NEW): The user presses Button 1 to start recording. The INMP441 Microphone captures the audio stream.
- Recording Control: The user can press Button 2 to manually stop recording, or it will stop automatically after 6 seconds. The inbuilt RGB LED flashes to indicate the listening status.
- Client Processing: The ESP32-S3, utilizing its expanded memory, processes and prepares the captured audio data.
- Server Processing: The audio is sent to speech-to-text service (Gemini 2.5 Flash-Lite), transcribed text is then sent to ai service (again Gemini 2.5 Flash-Lite) for generating response. AI response is then send to gTTS for performing TTS action and finally it is streamed back to the client.
- Audio Playback: The server streams the audio back to the ESP32. The ESP32 utilizes its I2S peripheral to play this stream through the MAX98357A amplifier and speaker.
- Status Updates: The OLED display shows "Thinking..." during server communication and "Speaking..." during audio playback, with corresponding LED indicators.
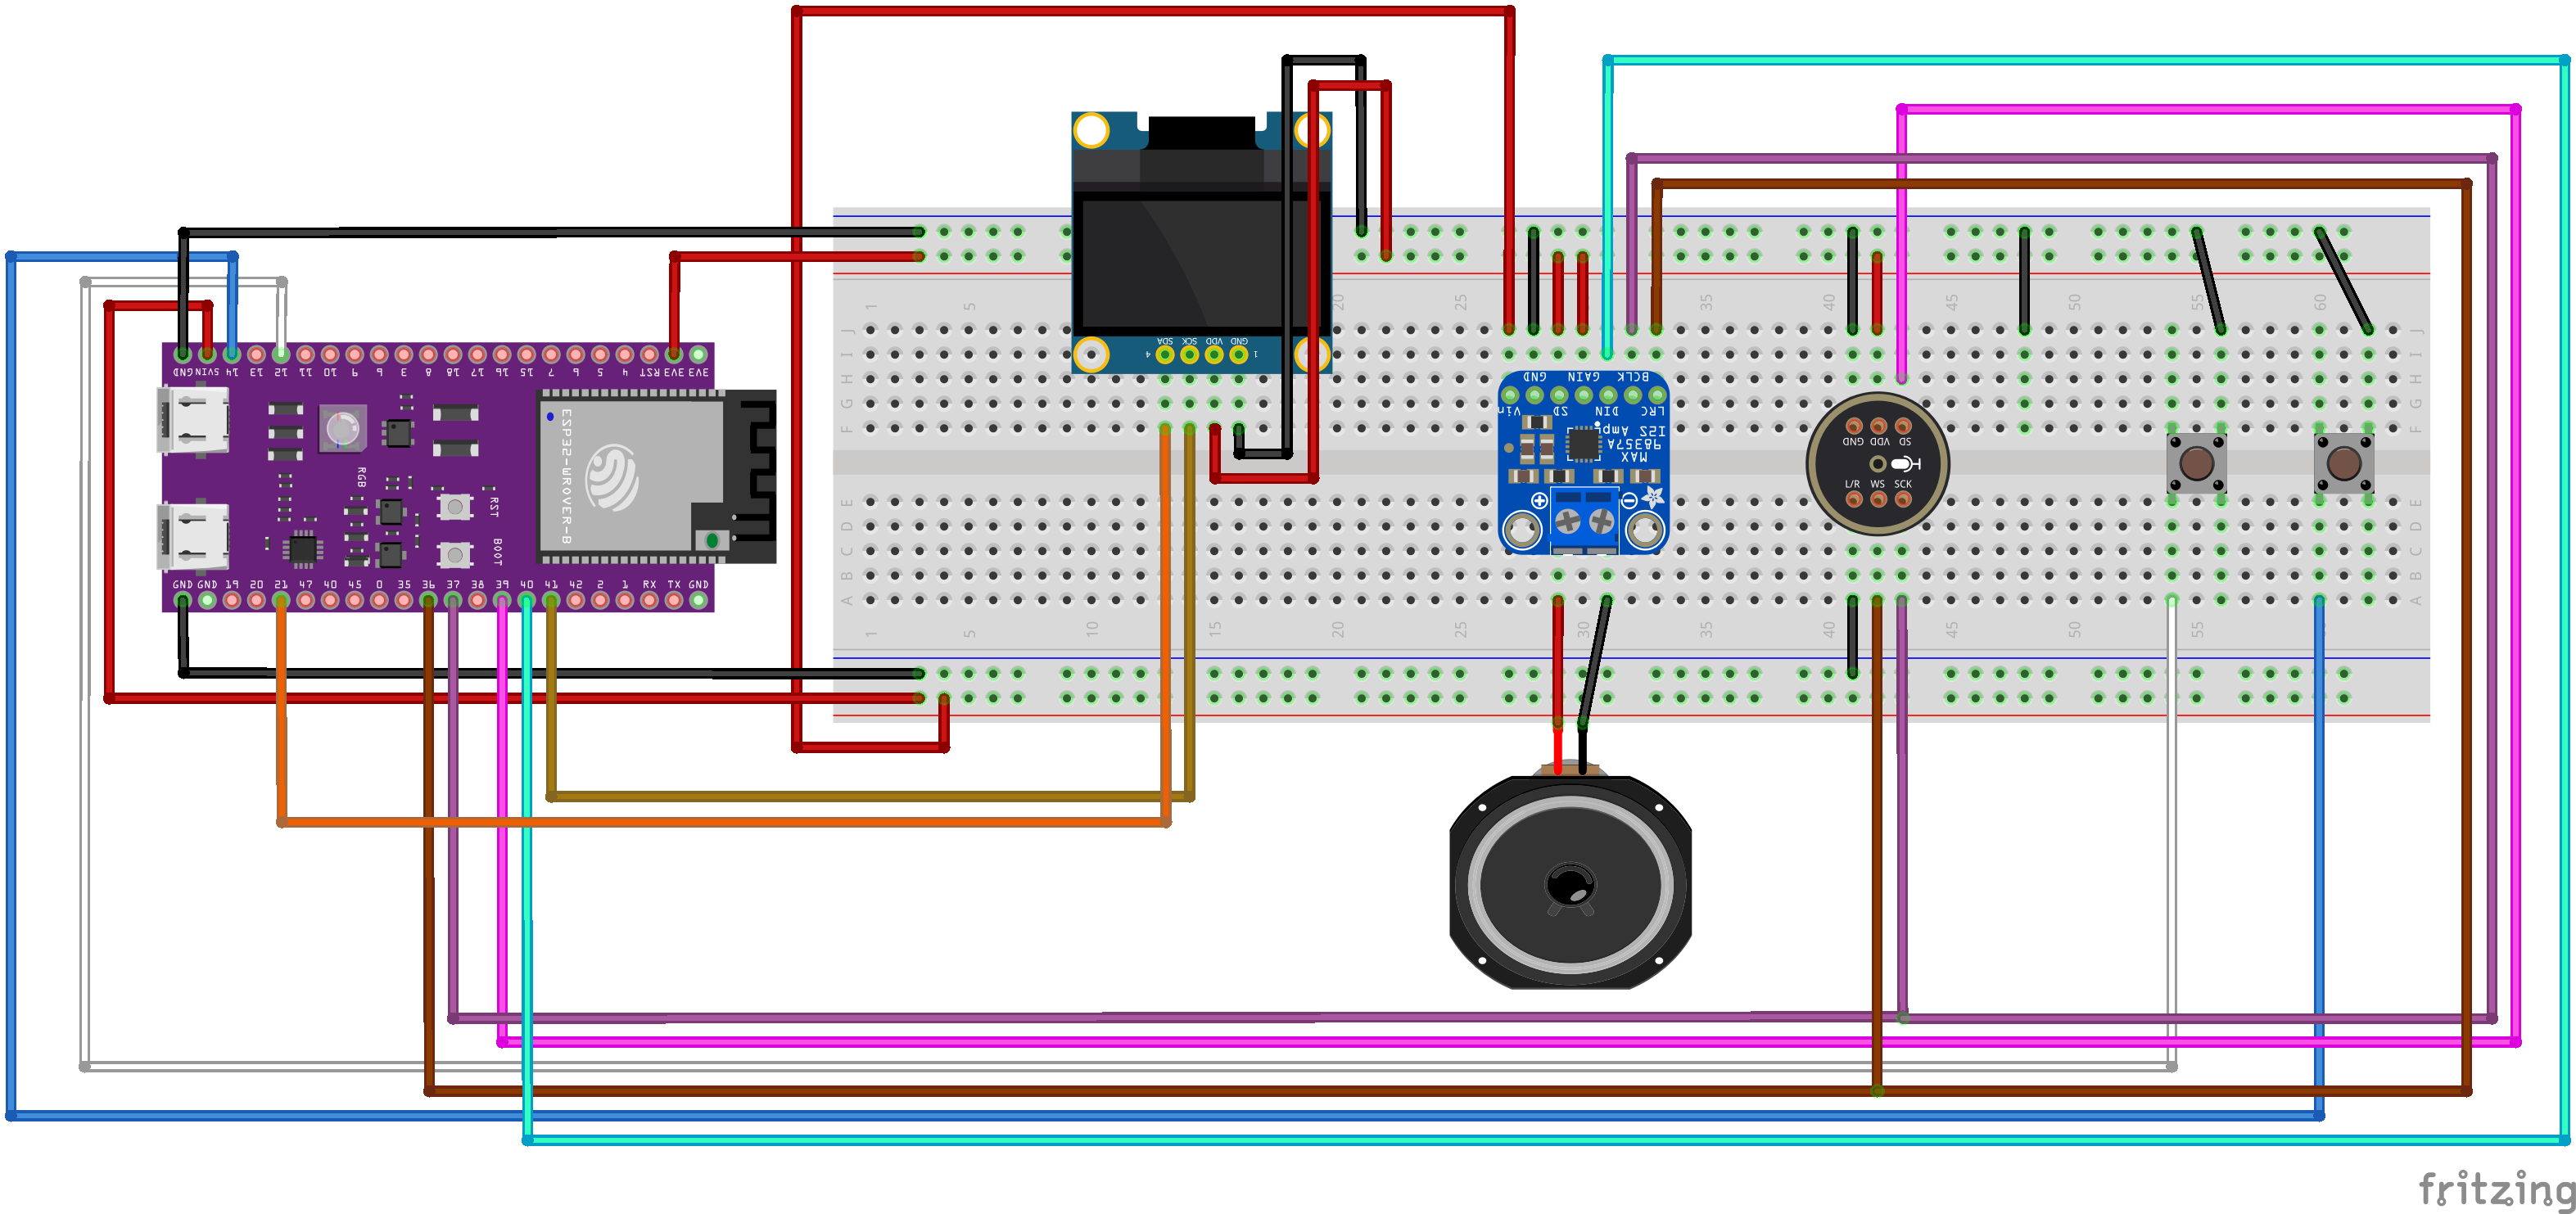
- Microcontroller: ESP32 S3 N16R8
- Display: 0.96" OLED Display (SSD1306)
- Audio Output: MAX98357A I2S Class-D Amplifier + 8-ohm speaker
- Audio Input: INMP441 I2S Microphone
- User Input: 2x Tactile Buttons
- Visual Cues: Onboard RGB LED
- Miscellaneous: Breadboard, jumper wires, 1A USB power supply
The core of the software change is the Speech-to-Text (STT) integration on the ESP32-S3 and the management of audio streaming via the new microphone.
1. Python Server Setup
- Ensure Python 3 is installed.
- Create and activate a virtual environment.
- Install dependencies: pip install -r requirements.txt
- Create a.env file with GEMINI_API_KEY="YOUR_API_KEY_HERE".
- Run the server: python server.py.
2. ESP32 Firmware Setup (Platform IO)Instead of the Arduino IDE, we're using PlatformIO (PIO), which is a powerful, professional tool built on top of VS Code. PlatformIO simplifies dependency management, board configuration, and building for the ESP32-S3.
- Install Visual Studio Code (VS Code), if you haven't already.
- Open VS Code and navigate to the Extensions view (Ctrl+Shift+X or Cmd+Shift+X).
- Search for and install the PlatformIO IDE extension.
- Download or clone the V0.2 firmware project from the repository (link shared below)
- Open the project folder in VS Code. PlatformIO will automatically recognize the project structure.
- Ensure the
platformio.inifile specifies the correct board and settings for the increased memory (link shared below) - Navigate to the
srcfolder and open the main firmware file (main.cpp). - Update the Python server URL (
SERVER_IP) where your code will send the audio data/request. - Click the PlatformIO Build button (check mark icon ✅) in the status bar at the bottom of VS Code.
- Connect your ESP32-S3-N16R8 board to your PC.
- Click the PlatformIO Upload button (right arrow icon ➡️) in the status bar.
Get the full firmware and server code for V0.2 here: [Link to GitHub Repository/Readme]
This V0.2 project moves beyond the limitations of its predecessor and provides a robust, real-world example of building a high-performance, voice-enabled AI device on an accessible microcontroller platform. Happy building!


Comments