


Name Tag
I designed two different name plates, and cut two different sizes of name tag. The base of the name tag has a slot underneath, to slide the name plate under when not in use. This increases the portability of the design, and keeps it from getting crushed in my backpack!
My design was fairly simple to execute, but I am thankful I made duplicates. In two of the duplicates, I was too sloppy with the glue, and the name plates did not fit in the designated slots properly. Luckily, the name tags featured below work!
Images and Ai. file below.
3D Printed Ring
My 3D printed ring has a chubby bluebird sitting on top. I sculpted the bluebird using 123D Sculpt for the iPad. I found this easy enough, but when I 3D printed my bird, I learned several important lessons. The features of the bird were not as defined in the print as they were in the program, and I had neglected to make a surface flat enough to allow for easy printing. Because of this, it took several tries to get a successful print.
The ring portion was designed in 123D Design. It was simple enough to create, but again I made a novice mistake of beveling both edges of the ring. As a result, there wasn't enough flat surface to allow for a good print. Eventually I fixed it, but it took a few tries to work out!
I used CA glue as an adhesive, and sanded both surfaces thoroughly before joining.
Below is a slideshow of the project, and STL, 123D x, and gCode files, in case anyone would like to replicate my ring.
Vehicle
I create three basic body designs for my robotic vehicle project. All sketches and files are below the following design subsections. Almost all joining was done with a glue gun.
Design 1
and two that steer in the front. the electronic components will be in the center (a hole is cut out now to access the steering mechanism), and the steering will be controlled by a servo motor. Creating this was exceptionally useful-- almost immediately, I devised a simpler steering mechanism.The first, a simple box, has two fixed back wheels
images and video below
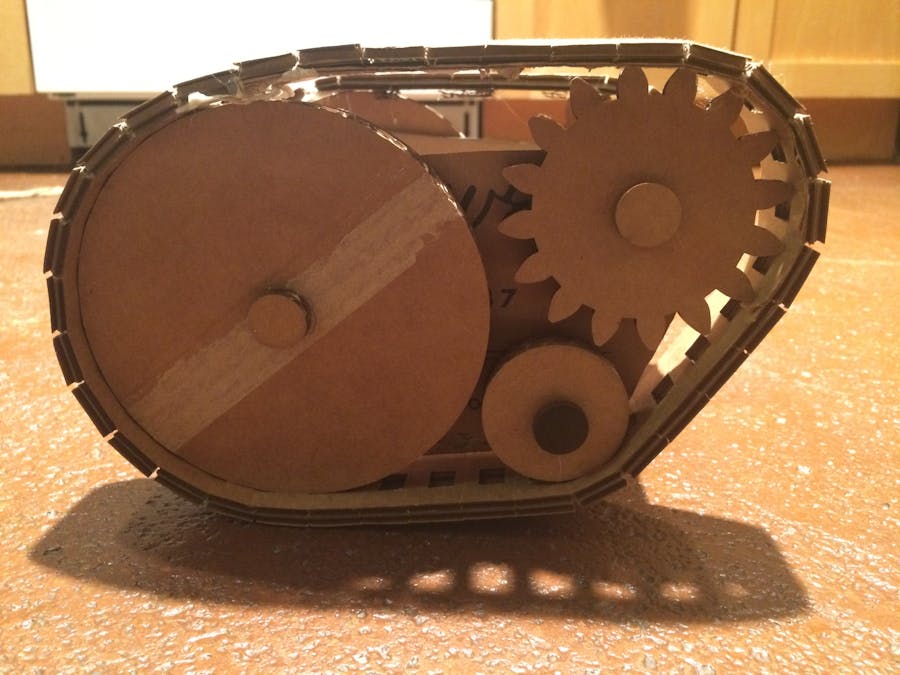
Design 2
This design was ambitious-- I attempted to make tank treads out of cardboard. It worked much better than expected! In this design, the controls are nested between two sides of the tank. Above them, motors will independently turn a gear on each side of the vehicle, which will steer the "tank". The tank treads themselves were laser cut, and then halfway cut through with an X-acto knife to increase flexibility. I encountered problems keeping the treads on the correct path, and found that my imprecise joining created problems keeping the wheels and track in sync.
images and video below.
Design 3
This design was far simpler than the others-- here I again make use of differential steering. The rear motors are independently controlled by motors, and the arduino control and battery sit in the center. Finding myself with a shortage of cardboard, the design is not to the scale I would have liked. In following iterations, I will leave more space in the center for other components.
Images and video below.
Sketches and Files
Ai Files:
Project from Last Week: Circuit Board
My circuit board projected presented some challenges. Firstly, it took me several attempts before my soldering was acceptable, so the board itself was a bit of a mess. (but a good learning experience!). I worked too quickly, and despite being careful, I still managed to order two of the LEDs incorrectly, so that the negative sides were facing the wrong way. Additionally, I wired the connections for my servo motor extremely unconventionally after I made an error I couldn't go back and fix. The LED in the center woks! However, I could not get it to work with the very simple Blink example program. Instead, I found a tutorial with this code, that I was able to modify. Using this code, the LED worked.
Code Source: https://www.arduino.cc/en/Tutorial/ForLoopIteration
Blinking LED on wired circuit board

Comments