


Hardware components | ||||||
 |
| × | 1 | |||
 |
| × | 1 | |||
Software apps and online services | ||||||
 |
| |||||
| ||||||
| ||||||
since childhood I have been dreaming and thinking of doing home chore things without efforts. I always wanted to make things much simple and less time consuming. And now I am happy that I can do it using BOLT IOT platform.
YES, I have used BOLT IOT platform and google assistance to control lights without even putting efforts. Now I can switch ON/OFF lights from far place too. The only thing I need to have is good internet connection to my phone.
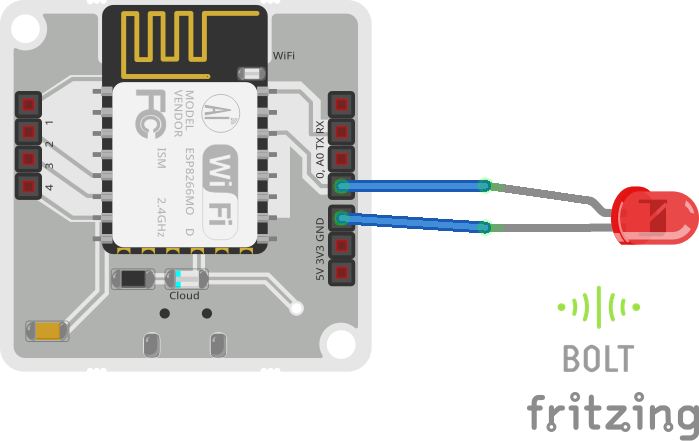
Plug the longer end of the LED to pin 0 of BOLT WIFI module and shorter end to the GND pin. Then supply power to the device. check whether the module has both the green and blue light in stable condition or not. If the lights are stable then it ensures that your module is connected properly.
step 2: Note down your BOLT API key and DEVICE ID:Go to cloud.boltiot.com and note down the API key and DEVICE_ID of your BOLT WIFI module.
steps are as follows:
1)login into bolt cloud account.
2)click on the API tab, click on enable option and copy API key
3)click on the Devices tab, copy DEVICE_ID.
step 3:configuring your product:==>select the products tab on BOLT cloud dashboard.
==>click on +add product.
==>Give product name as you wish. As the LED is output device select the option OUTPUT DEVICES.
==>collect the data through GPIO pin. Then click on done.
configure product as per the GPIO pin that you are going to connect in your hardware connections. Here I have mentioned pin number 0 in step 1 for the convenience of understanding.
In coding section write down the code as follows:
https://cloud.boltiot.com/remote/YOUR_API_KEY/digitalWrite?pin=YOUR_PIN_NUMBER&state=HIGH/LOW&deviceName=YOUR_DEVICE_IDAPI_KEY: Get it from API tab on BOLT cloud dashboard.
DEVICE _ID: get it from devices tab on BOLT cloud dashboard.
HIGH/LOW: HIGH for turning on the LED and LOW for turning off the LED.
PIN_NUMBER: this changes according to your hardware connections i.e. the pin to which you have connected your led.
here is a sample code :
https://cloud.boltiot.com/remote/your_api_key/digitalWrite?pin=0&state=HIGH&deviceName=BOLTxxxx(your_device_id)
https://cloud.boltiot.com/remote/your_api_key/digitalWrite?pin=0&state=LOW&deviceName=BOLT1xxxx(your_device_id)- click ifttt.com. login using your Gmail account.
- click create to create your own applets.
- click on "+This" to create the trigger.
- search for Google assistant in search tab.
- Then choose the trigger as: say a simple phrase.
Create suitable phrases to notify Google assistant through your voice.
Here I have given phrases as:
a. Ok Google, turn on LED.
b. LED on(optional)
c. Turn on LED (optional).
Then click on 'Create trigger'As soon as create trigger is clicked you will be redirected to 'if +this then that' page.
Again click on '+this' to make web request.
Search for Webhooks in search tab
- Enter the URL.URL is same as the code that I have mentioned in STEP 3.
- Choose GET method.
- choose content type as application/json.
- Then click on 'create action'.
Process for turning off the LED is same as for Turning on LED instead here Replace STATE=LOW for turning off LED and add suitable phrases to turn off LED.
NOW say "OK GOOGLE" in your android phone and say the phrase that you had set before while creating the trigger to turn on/off the LED.CONCLUSION:As I am still a beginner to this field, this simple and effective project had made me to take my step forward in doing more projects in future. I have learnt so many unknown things from this BOLT IOT platform.


Comments