


Hardware components | ||||||
 |
| × | 1 | |||
| × | 1 | ||||
 |
| × | 1 | |||
| × | 1 | ||||
| × | 1 | ||||
| × | 1 | ||||
| × | 1 | ||||
| × | 1 | ||||
| × | 1 | ||||
| × | 1 | ||||
Software apps and online services | ||||||
 |
| |||||
Hand tools and fabrication machines | ||||||
 |
| |||||
 |
| |||||
This is mostly a copy of Linawassong's project: http://www.instructables.com/id/Jellyfish-Skirt/
Her instructions are great, so just follow them! The only confusing part was how she connected the fiber-optic bundles to the LED strip. In a nutshell, she is trying to position each Fiber Optic bundle above a LED on top of the waterproof cover. Since the waterproof cover is made of Silicone, hot glue doesn't bond. So she lays down a HEAVY line of hot glue between each bundle, and then uses tape between the bundles to strap them onto the LED strip in position. This works, and relies very heavily on the STRENGTH of the hot glue, which is fine for a costume, but not great if you want to really move around.
For mine, I followed the same instructions mostly, except I just wanted something more durable so we could go dancing and not worry about it falling apart.
The key changes that I made were:
1) Used my own Arduino software so that I could switch between color modes.
--> Controlled this using a simple slide switch, connected to a digital PULLUP pin on the Arduino.
2) Hot Glued the Fiber Optic bundles directly to the LEDs instead of onto the strip's waterproof cover. The hot glue adheres very well to the strip directly. I also layed on lots of extra glue between the bundles etc to get some more strength. This will work great unless I go into a really hot place (which will make the glue soft), so no Burningman appearances are allowed.
3) Hot glued the LED strip/fiber optic assembly onto the nylon strap for more stability/durability. This will be my "belt" that supports the entire weight, and also minimizes the flex/stress on the actual LED strip.
4) Used an Arduino Pro Mini (5v) because I had one.
Key steps:Make 25 Fiber Optic Bundles
- Cut 1-1/2-in pieces of vinyl tubes. 1 for each fiber Optic bundle. I made 25 (because that's what I needed for my waist, you should adjust the # of bundles and LEDs based on your size!).
- Cut fiber optic strands into 1 meter lengths. No need to be precise. It's actually good to have difference lengths.
- Stuff ~20 strands (how ever many will fit snugly) into each vinyl tube. Align the fiber optic strands about 2 inches past the end of the vinyl tube.
- Apply E6000 Adhesive to the strands, making sure to get every strand. You want them to all stick together tightly so you don't lose strands as you move around.
- Pull back the strands so that the part covered with adhesive covered strands are now inside the tube. There should be 1/2 of strands still extended.
- After it has dried/cured, take some sharp scissors and cut the excess strands off so that you have a nice clean/flush end. This will sit directly onto the LED, so the cleaner the cut, the more light will get through to the cables.
Use Hot Glue to force each individual fiber to "fan out" from each bundle
- Being careful not to touch any fiber with the tip of your glue gun (which would cause the fiber to melt and not work anymore), apply a generous glob of glue to the optic fibers, NEAR the end of the vinyl tube where the optic fibers are coming out.
- Move the fibers around until each piece has been coated.
- Allow the glue to cool slightly (but not completely). Maybe 20-30 seconds.
- When it is still supple, but starting to solidify, use your fingers to press the cables so that the fibers are fanned out. HOT GLUE can be hot, so be sure not to burn yourself.
- After it has cooled, go back and reinforce the "fan" with hot glue, and also apply glue so that it attaches the vinyl tube. This will ensure that the fibers won't fall out when you are dancing/moving around.
- ALTERNATIVELY, I made this little jig with a T2 timing belt that spreads the fibers out pretty nicely...making it easier to apply the hot glue without as much hassle. Just use contact cement to attach the T2 timing belt to a piece of plastic (since regular glue won't adhere as well). Make 2 of these and then use the paper clips to hold them together so the fibers stay put. I think this saved me 1/2 the time and allowed me to not keep touching the hot glue :)
--> So now you have 25 fiber optic bundles ready to attach to the LED strip.
Attach Fiber Optic Bundles to LED Strip
- Get your glue gun nice and hot. (I used the low-temperature glue, which seems fine).
- Add a BIG glob of glue directly onto one of the LEDs (and surrounding it to the right and left.
- Take a Fiber Optic Bundle and put the flush side onto the first LED. Hold it in place until it dries with one hand. With the other hand, add more glue around the sides to build up good support around the base of the bundle. Really wait for it to cool down before move to maximize the strength. You will end up taking about 2 minutes to secure each bundle. Repeat this for all 25.
- MAKE SURE THAT you line up the direction of each bundle so all the fibers FAN out in the same direction along the direction of the strip.
- After they are all done, go back and add more glue to cover the whole strip with a thick layer of hot glue, and build up more glue around the base of the bundles.
Attach the Nylon Strap to the back for the LED Strip
- Going 4-5 inches at a time, generously apply hot glue to the back of the LED strip. Wait a 5-10 seconds to let it cool a little, then PRESS the nylon strip onto the glue. Do this until the whole strip is attached to the LED.
- MAKE SURE to leave 10 inches of extra nylon strap on each end. The Buckle (https://www.amazon.com/10-Adjustable-Release-Plastic-Buckles/dp/B00DCZRLZW/) will attach here.
- If you want to minimize the gap between the LEDs due to the buckle, then you can add the buckle onto the strap BEFORE you start hot-gluing onto the LED strip, and the glue the the first LED right on top of the buckle.
- I also used a few loops of masking tape between each fiber optic bundle to further secure the strip to the tape.
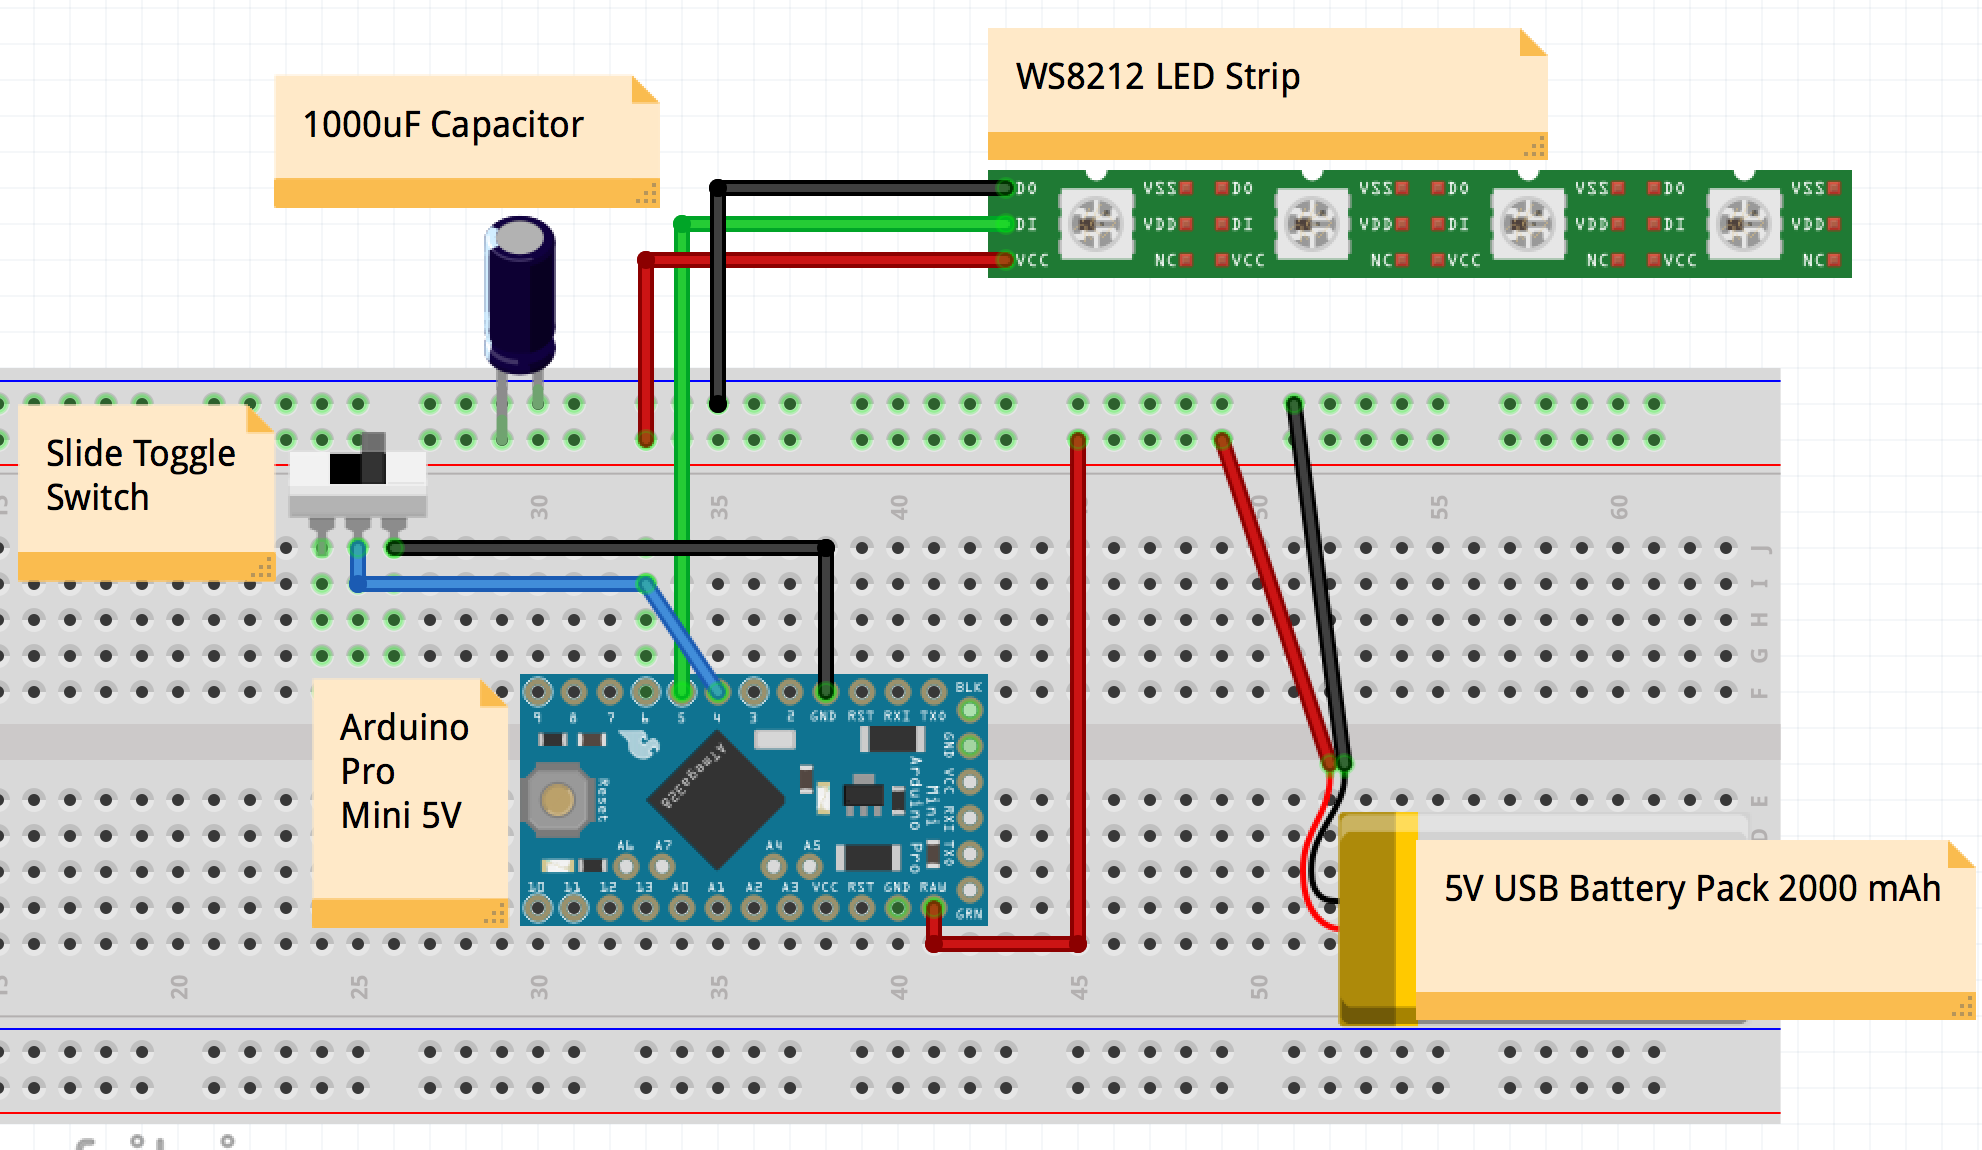
Electronics/Battery
- Build the circuit as shown in the schematic. Try to make it as small as possible.
- Make sure you have good strain relief (I usually make a hole in the prototype board, string the wire through, tie a knot in the wire and then hot glue the know in place) for the battery connection and also for the 3-wire LED connector. There will be some tugging/pulling as you dance, so you don't want anything to come loose.
Load the Arduino Sketch
- Note that the Pro-mini that I used doesn't have an input for USB cable, so you have to buy a separate FTDI connector. Other Arduino models usually do, so that may be easier. I just use them because they are tiny and cheap.
Plug in the battery and the LED connector!
- Use the Slide switch to toggle between one of 2 patterns (fire or rainbow pattern).


_3u05Tpwasz.png?auto=compress%2Cformat&w=40&h=40&fit=fillmax&bg=fff&dpr=2)


Comments