

Hardware components | ||||||
 |
| × | 1 | |||
_ztBMuBhMHo.jpg?auto=compress%2Cformat&w=48&h=48&fit=fill&bg=ffffff) |
| × | 1 | |||
 |
| × | 2 | |||
 |
| × | 2 | |||
 |
| × | 1 | |||
 |
| × | 1 | |||
 |
| × | 2 | |||
 |
| × | 1 | |||
 |
| × | 1 | |||
 |
| × | 1 | |||
 |
| × | 1 | |||
Software apps and online services | ||||||
 |
| |||||
Hello, in this tutorial, I will show how to make a LCD reactive bot, that reacts to movement, proximity and illumination.
Installing some LibrariesBefore Starting with connections and programming, we need some Libraries:
We are going to use a LCD display with I2C Module, because it is more easy to program and don't use any digital pin of our Arduino. It just needs a library, that is LiquidCrystal_I2C. To install it is very simple: Open your Arduino IDE, go to Tools → Manage Libraries...
This will open the Library Manager.
Now, go to search bar:
Now, type "LiquidCrystal I2C, and this will be the result:
Search the library: LiquidCrystal I2C:
Then, we click on "Install":
Installed the LiquidCrystal I2C Library, let's continue to the next Library
To use an ultrasonic sensor with Arduino, we need a another library, that can be downloaded here.
After downloading the library, go to your IDE, and open: Sketch→Include Library→Add.ZIP Library.
Search the file at your downloads, that is named as Ultrasonic.zip and select it.
Now you have the library.
The IdeaI2C LCD Display have 4 pins, here is the image:
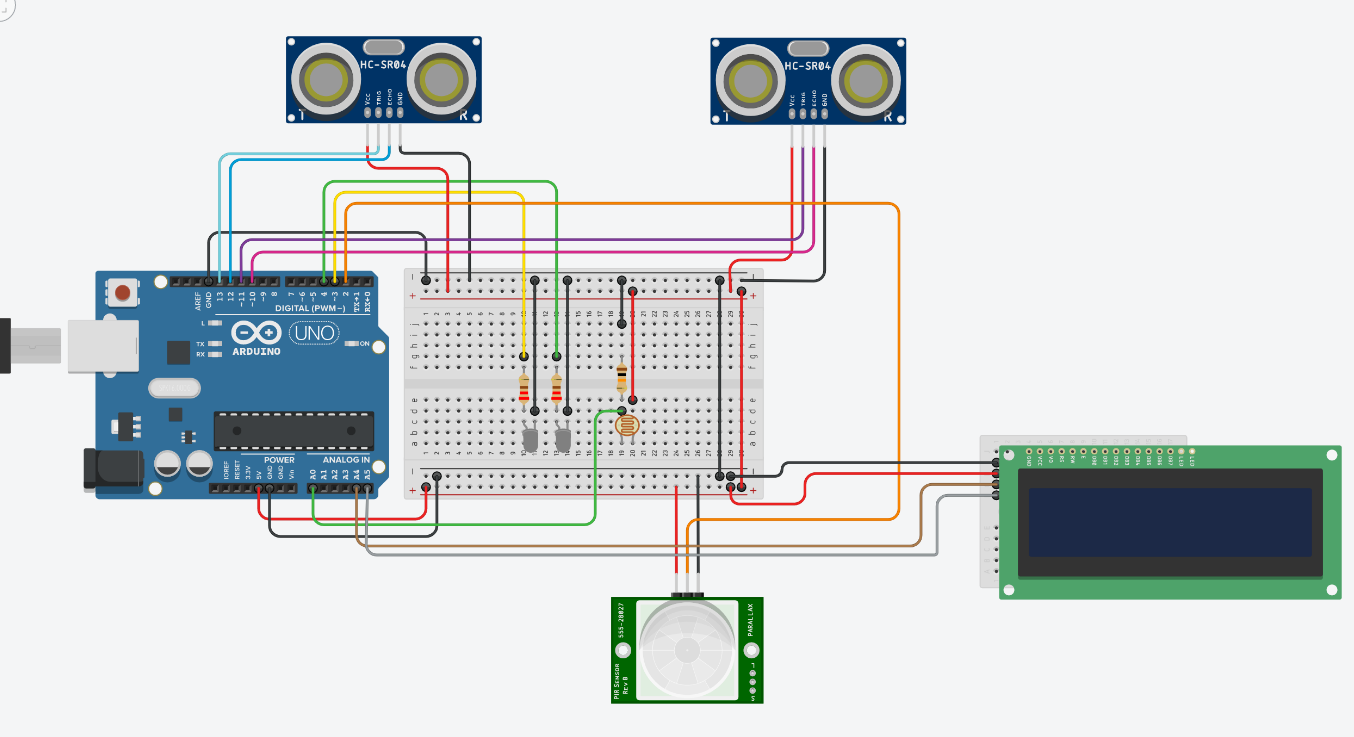
We will connect the SDA pin on A4 of Arduino (Analog 4) and SCL pin on A5 of Arduino (Analog 5). Gnd attached to Gnd of Arduino (Ground).
Here is the schematic of the LCD Display connections:
Click on image for a better view.
The idea is using the LCD Display to make a animated face with eyes:
Two ultrasonic sensors will be used to make this face move. Here is the Ultrasonic sensor pinout:
Here is the connection of the ultrasonic sensor to Arduino:
Click on image for a better view.
So, here, if the right sensor detects proximity, the face eyes will move to right, if the left sensor detects proximity, the face eyes will move to left.
In this project, we are going to use a PIR sensor, that detects movements, so the next idea is: if it detects movement, the LCD Display backlight turns on, if not, the backlight turns off.
Here is the connections of the PIR sensor to Arduino:
Click on image for a better view.
This project also have a LDR (Light Dependent Resistor), for detecting illumination. So if it don't detect illumination, the LEDs will turn on.
the LDR connection to Arduino:
Click on image for a better view.
Now, let's go to the best part of the project: Programming.
We start including the libraries:
2º step: Creating variables
3º step: Configurating our sketch
4º step: programming the face and the lights
Now our LCD bot is finished. lights working, face moving and PIR sensor detecting movement. Have fun with your LCD bot!


Comments