

A step-by-step guide to setting up your NU40 Development Kit with Arduino IDE — from bootloader to Blinky in minutes.
IntroductionThe NU40 DK is a development kit built around the Nordic nRF52840 SoC, designed and manufactured by NUCODE — a Nordic Semiconductor Authorized 3rd-Party Partner based in Seoul, Korea.
Whether you're prototyping a BLE sensor node, building a low-power IoT device, or exploring the nRF52840's capabilities for the first time, the NU40 DK paired with the Arduino IDE gives you the fastest path from unboxing to running code.
This guide walks you through the complete setup process.
- NU40 DK (NUCODE nRF52840 Development Kit)
- USB Cable : USB-C (included with the DK)
- PC Windows / macOS / Linux
- Arduino IDE (v1.6.12 or later)
- (Optional) nRF Connect for Desktop
- For bootloader flashing via Programmer
Step 1: Bootloader Flashing (First-Time Users Can Skip)Note: If you just purchased your NU40 DK, the bootloader is already pre-installed. You can jump straight to Step 2.
Note: If you just purchased your NU40 DK, the bootloader is already pre-installed. You can jump straight to Step 2.
For those who need to reflash the bootloader (e.g., after a firmware recovery or custom build):
- Download the pre-built bootloader hex file from the NUCODE resource page.
- Open nRF Connect for Desktop → Programmer.
- Connect your NU40 DK via USB.
- Load the downloaded
.hexfile. - Click Write to flash.
Download and install the Arduino IDE (version 1.6.12 or later) from arduino.cc.
2-2. Add NUCODE Board Manager URL- Open Arduino IDE.
- Go to File → Preferences (macOS: Arduino IDE → Settings).
- In the Additional Board Manager URLs field, paste the following:
https://raw.githubusercontent.com/Nucode01/Adafruit_nRF52_Arduino/refs/heads/master/package_nuduino_index.json- Click OK.
- Restart the Arduino IDE.
- Go to Tools → Board → Boards Manager.
- Search for
NUBoards. - Find "NUBoards nRF52 by NUCODE" and click Install.
Wait for the installation to complete. This will download the NUCODE nRF52 Board Support Package (BSP), which includes all the core libraries, variants, and toolchains you need.
Step 3: Select Your Board- Go to Tools → Board → NUBoards nRF52.
- Select NUCODE NU40 DK (nRF52840).
Make sure the correct Port is also selected under Tools → Port.
- Go to File → Examples.
- Browse the examples available under the NUCODE BSP.
- Pick one — Blinky is always a great start.
- Click Upload.
That's it. You're running code on the NU40 DK.
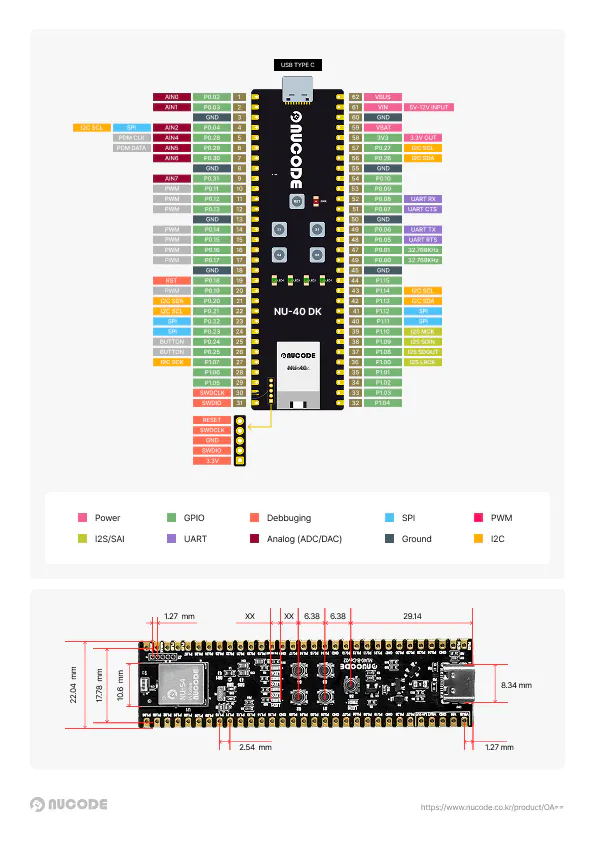
The NU40 DK exposes the full GPIO capability of the nRF52840 through clearly labeled headers. Refer to the NU40 DK Pinmap included in the product documentation for detailed pin-to-function mapping, including:
- Digital I/O
- Analog Input (ADC)
- SPI / I2C / UART
- PWM
- NFC
- PDM (for microphone / audio input)
Credits & Open Source
This Arduino core is built on top of the open-source community's excellent work:
Project
By
Adafruit_nRF52_Arduino
Adafruit
Arduino-nRF5
Sandeep Mistry
Arduino SAMD Core
Arduino
The following libraries are integrated:
- FreeRTOS — Real-time operating system
- LittleFS — Internal file system
- nrfx — Nordic peripheral drivers
- TinyUSB — USB stack
The NU40 DK is your gateway into the Nordic nRF52840 ecosystem with the simplicity of Arduino. From BLE beacons to sensor hubs to USB HID devices — the possibilities are wide open.
Have questions or want to connect with other developers? Join the NuMakers community or reach out to the NUCODE team:
- Website: nuworks.io
- GitHu

Comments