

Hardware components | ||||||
| × | 1 | ||||
Software apps and online services | ||||||
 |
| |||||
By NUCODE | Difficulty: Beginner | Time: 15 minutes
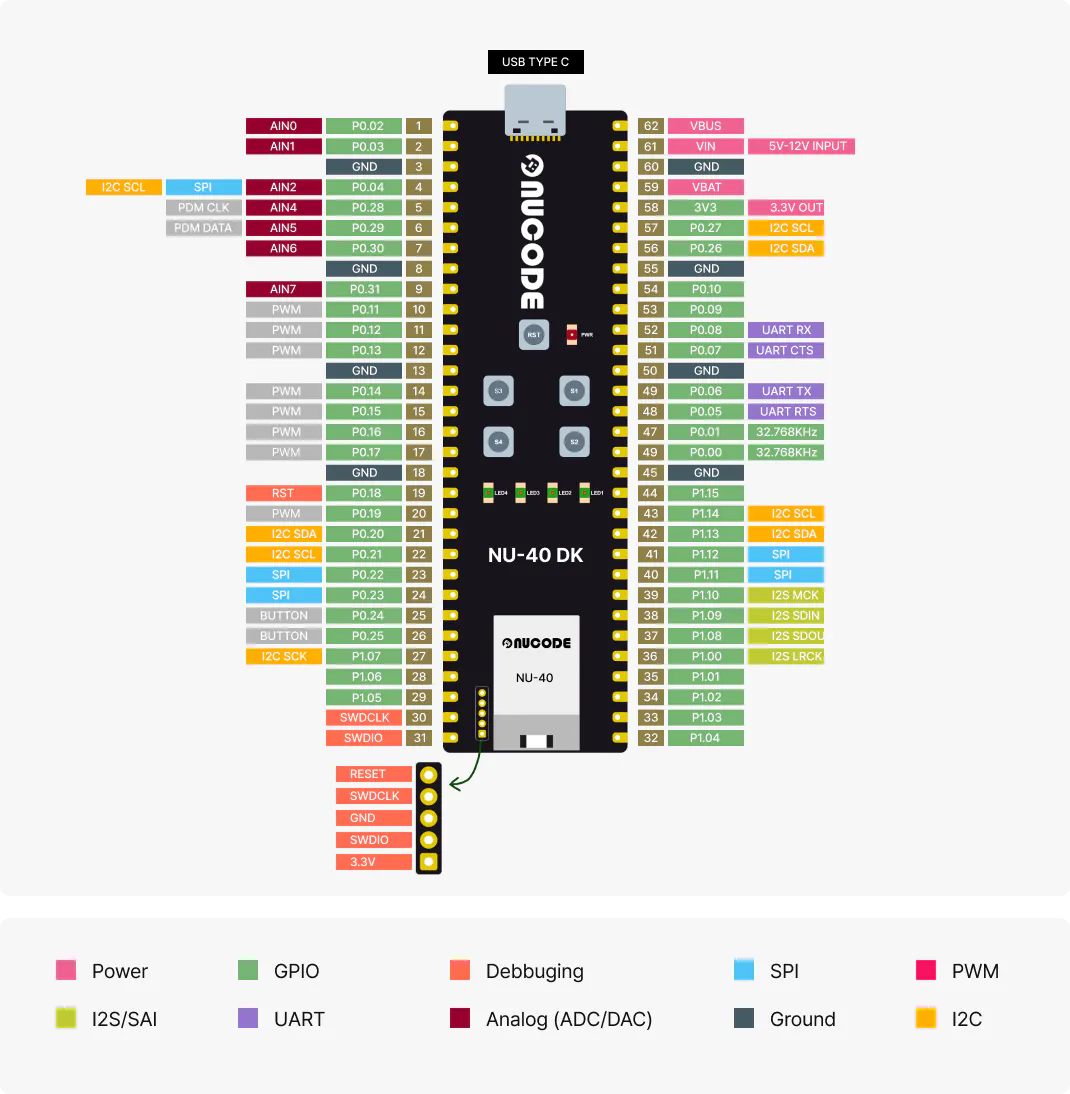
OverviewThe NU40DK is NUCODE's development kit built around the Nordic Semiconductor nRF52840 — a powerful BLE 5.0 SoC with a 64 MHz Cortex-M4 processor. In this tutorial, you'll install the NUCODE BSP (Board Support Package) in Arduino IDE and run the classic Blink example to verify your setup is working correctly.
No extra libraries required. No extra #include lines needed. Just plug in and blink.
- NU40DK nRF52840 development board
- USB cable (USB-C)
- Arduino IDE 2.x installed on your PC or Mac
- Internet connection
Open Arduino IDE and go to:
File → Preferences
In the "Additional boards manager URLs" field, paste the following URL:
https://raw.githubusercontent.com/Nucode01/Adafruit_nRF52_Arduino/refs/heads/master/package_nuduino_index.jsonClick OK.
Step 2 — Open Boards ManagerGo to Tools → Board → Boards Manager
Search for:
NUCODEYou will see NUBoards nRF52 by NUCODE appear in the list.
Step 3 — Install the BSPSelect version 1.0.1 (or the latest available) and click Install.
Installation takes about 1 minute depending on your internet speed.
Note: This BSP is based on Adafruit's nRF52 Arduino core and includes full TinyUSB support built-in. You do not need to install any additional USB libraries.
Note: This BSP is based on Adafruit's nRF52 Arduino core and includes full TinyUSB support built-in. You do not need to install any additional USB libraries.Step 4 — Select the NU40DK Board
After installation, go to:
Tools → Board → NUBoards nRF52 → NU40DK nRF52840
Step 5 — Load the Blink ExampleGo to:
File → Examples → 01.Basics → Blink
The Blink sketch opens. It looks like this:
cpp
void setup() {
  pinMode(LED_BUILTIN, OUTPUT);
}

void loop() {
  digitalWrite(LED_BUILTIN, HIGH);
  delay(1000);
  digitalWrite(LED_BUILTIN, LOW);
  delay(1000);
}
No additional #include lines are needed. The BSP handles USB initialization automatically.
- Connect your NU40DK to your PC via USB-C
- Go to Tools → Port and select the COM port for your NU40DK
- Click the Upload button (right arrow icon)
Arduino IDE will compile and upload the sketch via DFU over USB. You should see:
Device programmed.
Done uploading.
The onboard LED will start blinking once per second.
Port not showing up?Make sure the bootloader is running. Double-tap the RESET button to enter bootloader mode — the LED should pulse slowly to indicate it's ready.
Upload fails?Verify that the correct board (NU40DK nRF52840) and port are selected under the Tools menu.
Serial port disappears after upload?This is solved in BSP v1.0.1 and later. If you are on an older version, update the BSP via Boards Manager.
What's Next?Now that your NU40DK is up and running, here are some things to try:
- Serial Monitor — Add
Serial.begin(115200)andSerial.println("Hello!")to verify USB CDC serial communication - BLE Advertising — Try the BLE peripheral examples under
File → Examples → Bluefruit52 - NUWORKS Platform — Visit nuworks.io to explore cloud-based firmware development for your NU40DK
Matter over Thread — Control Your LED from Samsung SmartThings
In the next tutorial, we'll take this Blink sketch further — commissioning the NU40DK as a Matter-certified light endpoint and controlling it directly from Samsung SmartThings. No custom app, no cloud middleware. Just standard Matter over Thread running on the same board you just set up.
Stay tuned.
Resources- NUCODE Official Site: nuworks.io
- NU40DK Documentation: nucode.gitbook.io/nuserie
- BSP Source Code: github.com/Nucode01/Adafruit_nRF52_Arduino
- NUWORKS Platform: nuworks.io
NUCODE — Ideas Deserve Production.


Comments