


Hardware components | ||||||
 |
| × | 4 | |||
 |
| × | 3 | |||
| × | 1 | ||||
 |
| × | 1 | |||
Hand tools and fabrication machines | ||||||
 |
| |||||
 |
| |||||
UIBox -
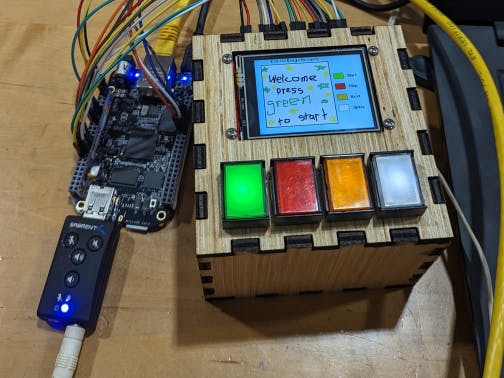
For our project, we put the buttons and screen into a box that we called the UI box. The wiring inside was very simple, we soldered the screen and buttons on a prototyping board. The inside of the box is shown in the picture below.
The file to laser cut the box is located on our github.
Schematic -
These two images show how to connect the devices in the UI box to the bone. The buttons we used for this project had the lights integrated into the buttons so the schematic is not perfect.
Software - The program that controls the MIDI player was written in python and utilizes shell scripts. The first thing the program does is initialize the GPIO for the buttons and lights. Once that happens, then the program is ready to play music. There are four buttons and they are color coded for their features.
Green - Play music
Red - Stop music
Orange - Next track
White - Options
Within the options page the buttons have a different usage:
Green - Switch MIDI soundfonts
Red - enable/disable shuffle play
Orange - Switch between playing MIDI/WAV
White - Exit Options
Buttons that are illuminated are buttons that will do something when pressed. For example, the options menu is not accessible during playing music so that button will not be illuminated.
When a song plays, a picture will be put on the screen that corresponds to that song. If no picture is given, then a default image will be placed instead.
To add music, images, or soundfonts, just add that file into the appropriate directory in the project folder.
Sound - The sound output of our project is from a Sabrent USB audio dongle.
VideoDemo -


_3u05Tpwasz.png?auto=compress%2Cformat&w=40&h=40&fit=fillmax&bg=fff&dpr=2)
Comments