

Hardware components | ||||||
_zhWsCcSEcl.jpg?auto=compress%2Cformat&w=48&h=48&fit=fill&bg=ffffff) |
| × | 1 | |||
 |
| × | 1 | |||
 |
| × | 1 | |||
Software apps and online services | ||||||
 |
| |||||
| ||||||
| ||||||
| ||||||
Welcome to the first part, of at least 4 parts, of my Particle Mesh series. I wanted to have a way of learning more myself and also share some of the things I've picked up along the way about Particle hardware and Particle Mesh. This series is made for anyone who wants to learn more about Particle Mesh and created by the HacksterMIA community. Hopefully this becomes useful for many others!
With that let's get started!
What Is Particle Mesh?Before diving into messing with Particle Mesh, its important to know what it is and why its so cool! It would also be helpful to know who Particle even is.
So just a quick blurb about Particle and who they are (it's also important for me to mention that I am in no way affiliated with Particle and my promotion of them is purely based on my experience with their products). Particle is a company, at its core, aimed to help push IoT forward, anyways possible. They produce IoT hardware and software, all aimed at making things easier. If you want to learn more about them, check em out here. I've been a fan of Particle since their Kickstarter back in 2013 for the Spark Core, they make some really awesome hardware worth checking out!
Alright enough about Particle, now let's talk about Particle Mesh!
Particle Mesh is new mesh platform made by Particle (obviously), and more importantly it runs Device OS. Device OS is Particle's special brand of embedded operating system that comes loaded onto the Particle hardware that I will be covering throughout this series. Check it out here to learn a little more about Device OS, oh and it's open-sourced too! For the curious.
There is just so much to talk about when it comes to Particle Mesh, with extensions like Device OS and Device Cloud and compatibility with Adafruit Feather and built on Thread, it's just easy to see how rich the new platform already is. For the sake of this series, I will try to stick to the topic of Particle Mesh in general, but if you are interested in additional projects and tutorials on Feather, Thread, Device OS, or anything else mentioned that isn't covered, please let me know! :) Always looking out for new project ideas that others would be interested in.
So back to Particle Mesh, it's a mesh platform, what this means is that you can connect several devices together and not all of them need to be connected to the internet directly in order to send or receive data over the wire. Instead, the way the mesh network works, is you have at least one node that is connected directly to the outside world, this is your gateway, and then it communicates and facilitates this connection throughout the additional connected to the device. Now what this allows is a stronger and far reaching network between devices, and that important data you need from the devices are reliably being communicated across.
Another to look at it, think of a spider web (a large one). At the center of the web you have your gateway device (orange dot) and then you have this interconnected series of devices (green dots). Because they all have a path back to the gateway, they are able to communicate out, and just as important, since all devices have a path to each other, they can communicate with each other.
The important point to make here is that this network between devices are not dependent on an active internet connection, but on the nodes themselves, which in theory makes them more resilient and independent, improved stability by allowing nodes to work around broken nodes (should any go down) since they all have a path to all other nodes, this is the high level of self-healing which is a major gain for mesh networks. This is the high level idea of a mesh network. As you can probably tell it would take a large tutorial in itself just to cover mesh networks (maybe something to cover in a future project).
What to ExpectReal quick, I just want to explain what you can come to expect throughout this series. For starters, this is a 4-part series, which will take you from the very beginner's stage of Particle Mesh to more advanced stages towards the end. Each lab will build up on the previous, with the end goal in series to have your very own mesh network up and running. Now it's very possible that even after the 4 parts, this series can continue but that's for later. I hope you will stick through the entire series!
What Is Argon?Alright, let's meet our first guest in the series, Argon! The Particle Argon is the first piece of mesh-compatible hardware we will cover in the series and sports Wi-Fi & Bluetooth on-board and can act as our gateway for our eventual mesh network. Check this out for more info.
We will work with this piece of hardware for the rest of this lab and continue to add to it as we slowly expand with additional nodes as the series continues.
Getting Particle ReadyNow we're ready to almost get down to business. First we have to make sure that we have an environment ready to start working with the hardware and make sure the right tools are in place.
If you haven't already, be sure to create an account with Particle. You'll need an account in order to access the Web IDE and work with the Particle hardware.
Once you have your account ready to go, you should download the Particle app. Android / iOS
The Particle app will be important for setting up the hardware and getting it connected and added to the Particle system so you can flash the device over the internet using the Web IDE (and Visual Studio Code if you want ;) ) or manage the device using the Particle app.
Let's go ahead and start covering some of the dev environment setup that you'll need to start writing some code and flash the hardware.
Plug in your Argon and make sure the blue light towards the center is blinking.
Next open up the Particle app on your smartphone. And tap the plus button on the top right and then tap "Argon / Boron / Xenon" to start setting up the device.
Next you'll be asked to scan the QR code on the device, follow the next step and scan the code. After scanning it you should see a similar screen below.
Be sure to follow the video on the screen and make sure you have connected the antenna to the device. Continue through the setup process (should be a couple quick screens to the end).
After you finished the setup you should be back on the device list screen and you should see your newly added Argon device in the list.
Next up we will head over to the Web IDE. Let's go ahead and verify the device is up and connected. Navigate to the devices section:
Hopefully you see your device listed, if you do then we're good to go!
Note: If you're interested in using Visual Studio Code instead of the Web IDE, check out Particle Workbench. You will receive VSCode extensions for Particle which you can install and work with Particle devices using Code.
Wire Up HardwareNow that we have our dev environment setup, we're ready to start playing with some hardware!
First we'll go ahead and setup our components. For this first lab we will try to keep things simple, as I feel this lab which introduces all of Particle is already pretty dense. So for our first project we'll make an LED blink using the Argon and Web IDE.
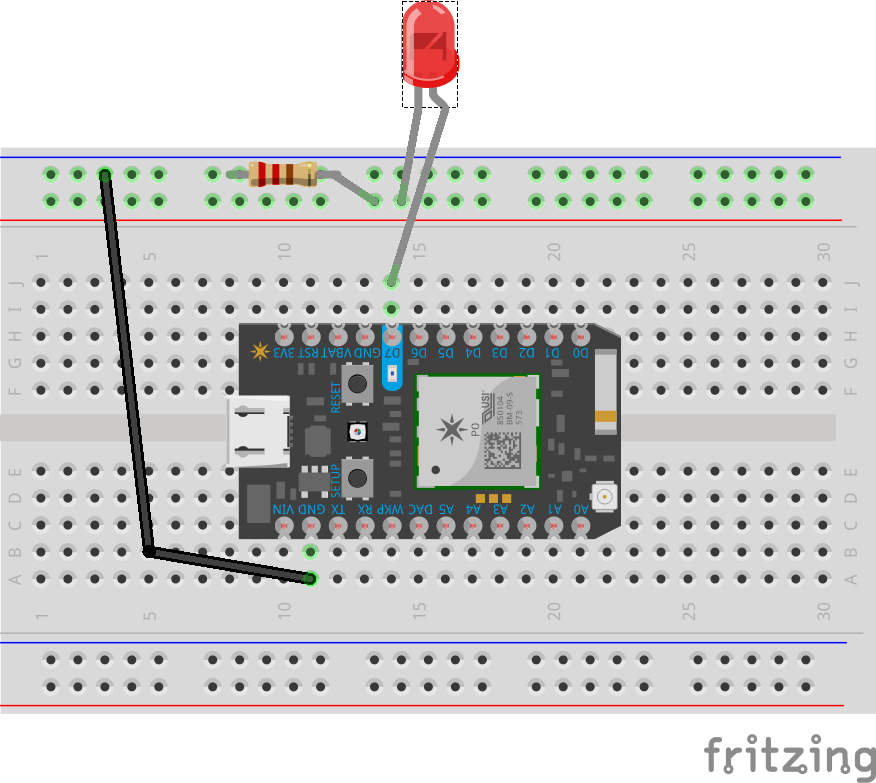
Let's start with making the following connections:
- Connect a small jumper cable from the GND pin to the negative rail on the side of the breadboard
- Connect the 220Ohms resistor from the negative rail to the positive rail
- Finally, connect the LED (negative end) to the positive rail where the resistor is and then the positive end next to the D7 pin
Below is a photo of the setup, make sure you verify your setup is correct.
Next we're ready to plug in the device, go ahead and plug in the USB cable to power on the device and wait for the pulsing light (should start of with a green blinking light as it is trying to connect to the Device Cloud).
Once connected, head on over to the Web IDE and let's flash our device!
Blink LEDIn the Web IDE, go ahead and navigate to the Code section and look for the example projects.
Select the "Blink an LED" example and then click on "Use this Example" to create a new project.
You should have the following code opened:
Next we're going Verify and then we'll finally Flash our code to the device.
Click on the checkmark button first to Verify your code, this will make sure that it compiles and gives some level of confidence that your code should at least "work".
Once that passes, click the lightning bolt button to Flash your code to the device. You may have to confirm the device to flash is the Argon, verify this by looking at the bottom on the IDE:
You should see the name of your device, this is the device that it will attempt to flash.
Give it about a minute to complete flash your device, should be quicker but times can vary. You should see the following when it is completed:
And hopefully you should a blinking LED too!!
Wrap UpThat's if for this part! If you have a blinking LED then congrats on making through the first lab for the Particle Mesh series. If you had any trouble along the way and need some help, feel free to leave me a comment or send me a message, I'll try to respond as soon as I can.
Thanks a lot for checking out this first part and stay tuned for the next chapter as we dive into the Particle Xenon and start getting deeper into mesh networking.


Comments