


Hardware components | ||||||
 |
| × | 1 | |||
 |
| × | 1 | |||
 |
| × | 1 | |||
 |
| × | 1 | |||
Software apps and online services | ||||||
 |
| |||||
 |
| |||||
 |
| |||||
_4YUDWziWQ8.png?auto=compress%2Cformat&w=48&h=48&fit=fill&bg=ffffff) |
| |||||
| ||||||
Hand tools and fabrication machines | ||||||
 |
| |||||
 |
| |||||
Littering in nature is a common problem in many parts of a world. Discarded waste poses a serious problem harming wildlife, polluting ecosystems and disrupting the beauty of the nature.
In this project I will present a proof of concept device called LitterWatch 👁, an Edge AI powered monitoring station for detecting littering and discouraging people from throwing trash in nature. LitterWatch, is a relatively low cost, solar & battery device, that uses computer vision and local ML models to monitor nature. It detects littering and other illegal activities and notifies owners / authorities via low power networks such LoRa/LTE-M.
The heath and eye of LitterWatch stations are the Raspberry Pi Compute Module 5 (CM5) and Camera Module (v2.1). Specialized Edge AI models are used to detect littering and other unwanted activities locally. In case of a detection, a notification is sent to the cloud, using a low bandwidth network such as LoRaWAN, Meshstastic or LTE-M. Video evidence is be stored locally, and will be retrieved by via WiFi and Bluetooth. A Solar panel, Batteries (2x18650) and IP54 enclosure ensure reliable operation in nature.
The HardwareIn order to detect littering activity effectively we need a device that is powerful enough to run Computer Vision and AI/ML models on Edge, and it also able to withstand harsh conditions present in nature.
To handle this requirement, I designed a device with an IP54 enclosure an a custom PCB designed to fit into it:
The heart of the project I choose to be a Raspberry Pi Compute Module 5 (CM5) as it offers powerful compute capabilities, good connectivity and a relatively low power consumption.
Around a the CM5 we need a set of peripherals such as a Camera, sensors and other miscellaneous blocks.
The block diagram of the project (shown above) contains the following:
- a Raspberry Pi Compute Module 5 (CM5) for running complex ML models and applications
- a 4-lane MIPI CSI camera connector with a a Raspberry Pi Camera Module (v2.1) connected to it - these act as the main video input for the project - others versions of the RPi camera, and as well as USB cameras are also supported
- an microSD Card slot used as storage for the Operating System (OS) and Video footage
- a USB Type C socket (USB2.0 speed) that can be a power source (when the battery is not connected) or can host accessories (when in OTG mode)
- an USB 3.0 socket (Type-A) used for accessories (ex. USB webcam or AI accelerator) and storage
- a MikroBUS socket for a Communication Module with support for UART, SPI and I2C protocols - a module used in the project is a LoRa 15 Clickwith support for LoRaWAN and Meshtastic - other modules (ex. lte-iot-10-click) can be used for other protocols such as LTE-M
- two MikroBUS sockets for Sensor Modules with support for I2C and SPI communication - the project uses the Temp & Hum 15 Click and UV 3 Click modules for environmental monitoring
- two Li-Ion Batteries (18650) withholders, protection circuit, and boost converter (3.7 to 5V @ 5A) to provide battery power to the CM5
- Solar Input with battery charge circuit
- an RTC Battery and holder used to keep time
- a Raspberry Pi RP2350 chip used for management functionality (ex. sleep / low power mode or remote management)
- Buttons (power, reset) and Connectors (prog, boot mode, etc.)
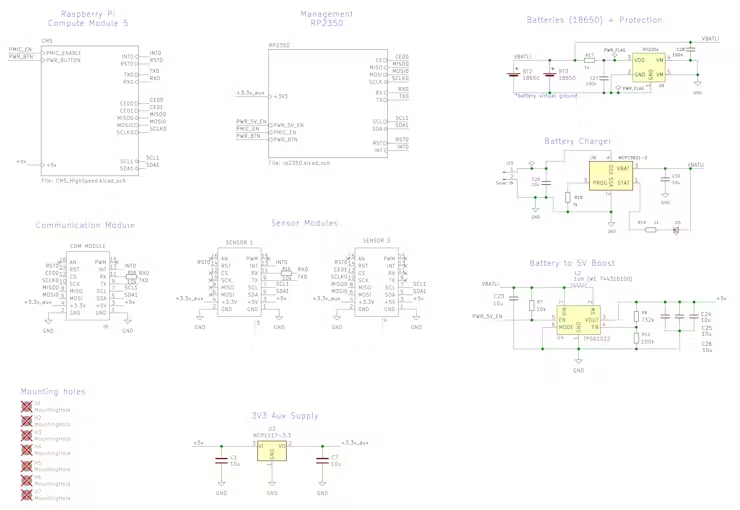
To implement the features listed above a custom project was designed in KiCad.
As a starting point for the schematics I used the official design files published for the Raspberry Pi Compute Module 5 IO Board. First, I stripped everything that was not needed (ex. HDMI, Ethernet, NVMe, etc.) from the downloaded KiCad project. Then I added new parts for each of the items from block diagram.
The schematics of the project are organized in hierarchical sheets as follows:
- the Top Level sheet aggregates major blocks for CM5, management, power and sensors functionality
- the CM5 / High Speed Signals sheet implements everything needed for the Compute Module 5, and high speed signaling (MIPI CSI, USB 3/2, etc)
- the RP2350 Management sheet contains the necessary circuits to run the RP2350 chip used for (remote) management feature
The PCB was designed mostly around the IP54 enclosure selected for the project. It has a size of 142 x 102 mm, with five primary mounting holes and cutouts for the box corners and the USB connectors:
It PCB features the following:
- a socket for the Raspberry Pi Compute Module 5
- three MikroBUS sockets for the Communication Module (large size) and Sensor Modules (medium size)
- a Camera connector and mounting holes
- 4-layers, with Top and Bottom used for signal and power, with the inner layers mostly used a ground plane
- Impedance controlled and length matched traces for the MIPI CSI, USB 3.0 and USB 2.0 signals
The PCBs for this project were manufactured NextPCB in EING finish. They offer both PCB manufacturing and assembly. As I already had some parts, I chose to order PCBs in a semi-assembled form, with most of the components already mounted:
Note: the KiCad project with schematics and PCB design files can be found in the attached GitHub repository in the KiCad folder.
> Mechanical DesignBeing a project deployed in nature the device needs be able to withstand harsh weather conditions. To address this I chose to build the project in a big enough IP54 rated enclousure:
FreeCAD was used to create an accurate 3D model of the enclosure:
Using this PCB and the rest of the components were designed to fit into the box:
Some components such as the Camera and Solar Panel needed special mounts which were designed in FreeCAD and then 3D printed in ABS plastic:
Note: the FreeCAD design files and 3D models can be found in the attached GitHub repository in the FreeCAD folder.
> Assembly and TestingThe project uses a mix of of-the-shelf pars, a custom PCB and 3D printed parts.
As soon as I received the PCB-s from NextPCB, I started the assembly process by soldering the rest of the components to the semi-assembled PCB received:
Next, I inserted the the Compute Module 5, the Communication & Sensor Modules into their sockets, and fixed the Camera module and its mount to the PCB. Then, the assembly was ready to be mounted into the project box using some screws:
After this I installed the Solar panel:
and fixed the transparent lid to the top of box. This is the what the final product looks like:
Note: as I received the custom PCB with a bit of a delay, not all the functionality of the custom PCB is tested. Most of the development was actually done on a Raspberry Pi4.
The SoftwareOn the software side the core functionality of the of the device with consists in:
- running an Littering Activity Detection Edge AI model
- Sending notifications to a Cloud service using the Communication Module
- Storing Videofootage locally with evidence
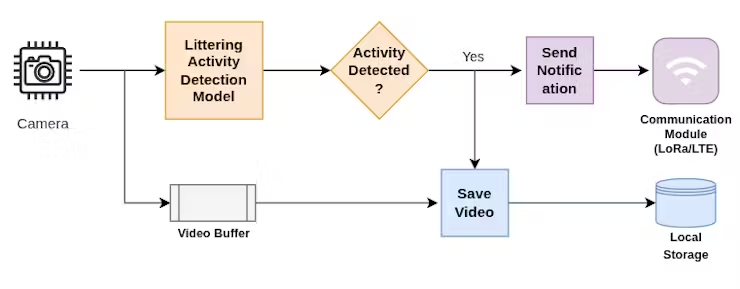
The heart of the software is be the ML models and logic used to detect littering activity. To keep the implementation flexible, I went with the following model architecture:
- images captured with the Camera are placed into a Frame Buffer
- a Person Detection Model used to detect human presence in the scene
- a Litter Detection Model used to detect litter / thrash in the scene
- two Detection Buffers store the detection results for a short time period (a couple of seconds)
- a Logic block (AI or classic) is used to classify detection as Littering Activity
This approach allows us to experiment with different models for Person and Litter detection. The opens the possiblity to use simple specialized models for each function.
The Littering Activity detection logic can be classic logic, or an ML model itself. For the PoC I went with a simple logic that classify Littering Activity based on the detection and timing in the Person and Litter detection buffers:
This implementation looks at the timing of the Person and Litter detection in the two buffers. If detect new trash in the scene near/shortly after a people was there we can say it was a potential littering activity.
> Raspberry Pi Initial SetupOn the software side the first thing we need to do is to prepare an operating system image for the Raspberry Pi OS. As we don't need a graphical interface we go with the Raspberry Pi OS Lite (64 bit) version. To flash the OS to a microSD card we can use the Raspberry Pi Imager software. During flashing it is recommended to also set up thinks like SSH access and WiFi connectivity.
After this we should be able to boot the Pi, connect with SSH and run install the latest updates:
$ sudo apt update -y && sudo apt dist-upgrade -y && sudo apt autoremove -y && sudo apt autoclean -yTesting Camera: If we use a MIPI CSI camera like the oficial Rpi Cam v2.1 we can test it was successfully detected by the Pi:
$ rpicam-still --list-cameras

Available cameras
-----------------
0 : imx219 [3280x2464 10-bit RGGB] (/base/soc/i2c0mux/i2c@1/imx219@10)
    Modes: 'SRGGB10_CSI2P' : 640x480 [103.33 fps - (1000, 752)/1280x960 crop]
                             1640x1232 [41.85 fps - (0, 0)/3280x2464 crop]
                             1920x1080 [47.57 fps - (680, 692)/1920x1080 crop]
                             3280x2464 [21.19 fps - (0, 0)/3280x2464 crop]
           'SRGGB8' : 640x480 [103.33 fps - (1000, 752)/1280x960 crop]
                      1640x1232 [41.85 fps - (0, 0)/3280x2464 crop]
                      1920x1080 [47.57 fps - (680, 692)/1920x1080 crop]
                      3280x2464 [21.19 fps - (0, 0)/3280x2464 crop]
Preparing a Python virtual environment: In case we want to test multiple software stacks / models it a good idea to use Python virtual environments to ensure we can stable and reproducible results.
On the Raspberry Pi this is a bit trickier as we will need some native packages from camera support. First install these, along with Jupyter notebook as system Python packages:
# Install camera packages
$ sudo apt install -y python3-venv python3-opencv python3-picamera2 libcamera-dev libcamera-apps

# Install Jupyter notebook
$ sudo apt install python3-notebook
Once we have all Python system packages, we can create individual Python virtual environments as follows:
# Create Python virtual environment
$ python3 -m venv --system-site-packages .venv-yolo

# Activate the venv
$ source ~/.venv-yolo/bin/activate

# Register the venv as a Jupyter notebook kernel
(.venv-yolo) $ python -m ipykernel install --user --name=venv-yolo
With this we can start Jupyter notebook, and start experimenting there.
> Trying out YOLOFor this project the first model I wanted to test was YOLOv11, as it should be relatively powerful and easy to use on a Raspberry Pi.
We can install YOLO11 as:
(.venv-yolo) $ pip install ultralyticsThen we can test it on both static images and frames captured from the Pi camera:
We should observe that the model is capable to detect people, animals and other common objects.
> Evaluation on the TACO datasetNext, I wanted to test the plain YOLO model on images containing litter / waste. I tested the model both with nature photos with litter and the TACO dataset.
The results, as somewhat expected, were not that great. From the TACO dataset litter was successfully detected in 625 of 1500 images, with object being classified as most often as bottle (236), cup (45) or book (43).We can also observe that litter is often not detected in images, or detected as various other objects:
Note: The code for the plain YOLO modelevaluation experiments can be found in the attached GitHub repository in the 4-YOLO-on-Littering-Image.ipynb and 5-YOLO-on-TACO-dataset.ipynb
> Fine-tuning YOLO for Litter DetectionAs the results from with the plain YOLO models were not that good for litter detection, I wanted to experiment with fine-tuning YOLO for the specific task of litter detection.
In the interest of time I started with the notebook I found on Kaggle: Litter-detection using YOLOv8 (by Aniket Kesarwani). This implements fine-tuning for trash detection for on older version of YOLO (v8). I adapted this to YOLO11: Litter-detection with YOLO11 (Kaggle), and quickly trained a fine-tuned model.
The fine-tuned model seem to perform significantly better. On the TACO dataset it detects trash on 1344 of 1500 images. This is around a 216% improvement over the plain model. It also classifies trash with more appropriate classes;
Note: The source code for the customYOLO model can be found in the 6-YOLO-Finetuned-on-Littering-Image.ipynb and 7-Finetuned-YOLO-on-TACO-dataset.ipynb notebooks.
> Fine tuning YOLO on a Custom DatasetThe fine tuned model works well enough, but if we look at some images with litter in nature, we can see that there are certain type of trash that are not always detected by the model. For example plastic bags and groups of small trash is often missed by the model.
As I wanted to improve on this, I decided to try to build a model specialized in detecting litter in nature.
For this, I first collected a small dataset with "litter in nature" images took from Google search:
The dataset can be downloaded from here.
Next, I used Label Studio to annotate the images with the following two classes:
- Plastic Bag - plastic trash bags thrown in nature
- Random Litter - areas of small pieces of trash
After this I combined the images and labels in both a standalone dataset, and a combined dataset with the litter-dataset we used above. Using these datasets I experimented with building fine-tuned models in Kaggle. The notebook I used can be seen at Fine tuning YOLO with Litter in Nature dataset (Kaggle).
Note: The resulting model does not yet perform particularly well, so I decided to use the previous fine-tuned model for now.
> Building the AppHaving some working models I started working on App for the project. For a proof of concept I decided to implement a simplified version of the proposed architecture. It does the following:
- continuously captures images from the Camera, and stores the frames in a buffer
- runs the Person Detection an Litter Detection models, and stores the last few results in queues
- runs a Littering Activity Detection logic
- runs a Web server, serving a video feed and detection results
Next steps for the App is to implement functionality such as:
- sending notifications to the Cloud using the Communication module (LoRA, LTE-M, etc.)
- store Video footage locally when Littering Activity is detected
- collect Sensor data, run local models, and send alerts to the Cloud
- and many others
Note:The source code for the application can be found in the attached Github repository in the App folder.
Future WorkThis project is far from being complete, with lot of things that can be improved.
The areas are plan to work on next are:
- The customized Litter Detection model - with the goal to improve small trash detection in nature
- Connectivity / Cloud - add connectivity to the cloud
- Exploring YOLO / SSD style models with less restrictive licenses (compared to Ultralytics YOLO's AGPL)
Hope you enjoyed this project! 😎


_Ujn5WoVOOu.png?auto=compress%2Cformat&w=40&h=40&fit=fillmax&bg=fff&dpr=2)


Comments