


Hardware components | ||||||
| × | 1 | ||||
Software apps and online services | ||||||
 |
| |||||
In this project I will present a low-power Edge AI / IoT Development Server based on the ZimaBoard 2 single board computer.
The server comes with features like:
- Docker setup for containerized applications
- Jupyter Lab install for ML / AI / IoT development
- secure UFW based firewall setup
- dedicated Ether network for IoT devices with traffic monitoring and filtering
- dedicated WiFi network for IoT devices with client isoltaion
The ZimaBoard 2 is single board server / mini-PC built around the Intel N150 processor. It comes with 4 CPU cores clocked at 3.60 GHz, 8/16 GB of memory and 32/64 GB of built in eMMC storage. In terms of connectivity we have two 2.5G Ethernet ports, two USB 3.1 ports, a 4K compatible Mini-DisplayPort port, two SATA ports and a PCIe 3.0 extension slot.
Compared to Raspberry Pi 5 and other ARM based SBC-s, the ZimaBoard 2 offers higher performance and better app compatibility (due to the x86 architecture), while keeping power consumption at a reasonably low level at a 10W TDP.
The board features an aluminium case, and we get a power supply, a combined SATA power + data cable, and a little cooling fan that can be optionally installed.
On cool thing about ZimaBoard's packaging is that part of it can be used as a stand if we with a two SSD setup:
The ZimaBoard 2 can be also purchased in various kits. IceWhale Technology sent me the ZimaBoard 2 Mini Nas Kit which comes with an 2-bay HDD rack and a a PCIe to Dual NVMe M.2 SSD Adapter. This can be used build a mini-server with 2 hard drives, NVMe SSD-s, or other M.2 devices:
For this build I wend with an NVMe SSD, and two older HDD-s for data storage.
Note: IceWhale Technology offered the ZimaBoard 2 NAS kit for free of charge for this project. You can use the tokes_atti15 discont code to get $15 off for ZimaBoard 2 orders.
The ZimaBoard 2 comes pre-installed with ZimaOS, an operating system designed specifically for NAS use. ZimaOS comes with web interface an focuses on NAS specific features such as disk management, cloud backups and a collection of containerized apps.
ZimaOS offers a nice overall experience and seems to be a good solution for NAS and basic home server use. One downside to mention it the ZimaOS is not open source and some features require a paid license.
For more flexibility I decided to install Ubuntu Server 26.04 (LTS) on the machine. The ZimaBoard 2 being an x86 based system, installing Ubuntu is pretty straightforward process: download the ISO image from the official website, flash it to an USB stick, boot from it, install the OS on the built in eMMC or a dedicated nVME or SATA drive.
During the installation we will need a display, a keyboard and a mouse, but once the installation is complete we can set up SSH to control the machine remotely.
Enabling the FirewallThe default install of Ubuntu Server does not comes with a firewall enabled. This is not great from a security perspective as any app we run we will be automatically exposed to the network. To avoid this we need a firewall that will be used to restrict network traffic to only what we want.
As our firewall we will go with the UFW (Uncomplicated Firewall) which is standard on Ubuntu. To install it run:
$ sudo apt install ufw
$ sudo ufw allow 22 # allow SSH
$ sudo ufw enable
$ sudo ufw status verbose
$ sudo reboot now
This will enable the firewall and block all traffic but SSH on port 22.
Later we will make adjustments to the firewall rules to control access to various applications and devices.
Docker for ContainerizationInstalling various components such as compilers, development frameworks and others directly on the host machine can quickly become chaotic. Because of this we will do most of our setup using containers. This ensures our setup is repeatable and host OS is kept relatively clean.
For containerization we will use Docker Engine. This can be installed on Ubuntu as using the official installation script:
$ sudo apt purge -y docker.io docker-doc docker-compose podman-docker containerd runc
$ curl -fsSL https://get.docker.com -o /tmp/get-docker.sh
$ sudo sh /tmp/get-docker.sh
$ sudo usermod -aG docker $USER
To check Docker working correctly we can run the official hello world app:
$ docker run hello-world

Hello from Docker!
This message shows that your installation appears to be working correctly.
...
One problem with Docker installs is that by default containers will bypass the firewall rules we set in UFW. To fix this we can use ufw-docker, a small utility that solves UFW Docker compatibility. This is how we can install it:
$ sudo wget -O /usr/local/bin/ufw-docker https://github.com/chaifeng/ufw-docker/raw/master/
$ sudo chmod +x /usr/local/bin/ufw-docker
$ sudo ufw-docker install
This will make ports exposed by containers isolated by default. To allow external traffic to a container we can use the ufw-docker command:
$ sudo ufw-docker allow <container> <port>/tcpOptionally, we can also link our setup to a container management UI such as Portainer. We can ran Portainer itself as a container as described in the official documentation, or if we already have a Portainer install (as it was my case) we can link our new host to it using Portainer Edge Agent. Once connected we can manage our containerized application from a nice UI:
We can make our applications running on our server accessible in multiple ways. The simplest, but not too secure one is to simply open firewall port using the sudo ufw allow <port> command.
To expose our applications in a secure way we will use Nginx as a HTTPS proxy with custom domain names such as app.<our-domain>.com. For this we will need to obtain our domain name, which can be a free sub-domain (ex DuckDNS) or domain name bought online. Once we have it, the idea is to assign our server's local IP address to the DNS name, and then use a wildcard SSL certificates to securely expose our application under HTTPS sub-domains. For generating SSL certificates I like to use Let's Encrypt as it free and certification renewal can be automated via CertBot.
We will install nginx directly on the host OS using apt:
$ sudo apt install nginxThe default install will start a web server on the HTTP port 80. We will change this to secure HTTPS port 443, and will configure application proxying as follows:
/etc/nginx/sites-enabled/default:

# Internal server: *.our-domain.com, port=443
server {
    server_name *.our-domain.com;

    # Routes
    location / {
        proxy_set_header Host $host;
        proxy_redirect http:// https://;
        proxy_http_version 1.1;
        proxy_set_header X-Forwarded-For $proxy_add_x_forwarded_for;
        proxy_set_header Upgrade $http_upgrade;
        proxy_set_header Connection $connection_upgrade;
        proxy_set_header Authorization $http_authorization;

        # Always send the mapped Origin header (empty if not matched)
        proxy_set_header Origin $origin_header;

        # Jupyter Lab
        if ($host = jupyter.our-domain.com) {
           proxy_pass http://localhost:8888;
        }

        # more apps ..
    }

    # SSL / HTTPS
    listen 443 ssl http2;
    ssl_certificate /etc/letsencrypt/live/our-domain.com/fullchain.pem;
    ssl_certificate_key /etc/letsencrypt/live/our-domain.com/privkey.pem;

    # Add the Strict-Transport-Security header
    add_header Strict-Transport-Security "max-age=15552000; includeSubDomains" always;
}
After a restart we should see nginx started on port 443, and we can expose it to the local network via the firewall with: sudo ufw allow in on enp1s0 to any port 443 proto tcp
After this we can access our app on DNS names like: <app>.<our-domain>.com.
Jupyter Lab is a great web based IDE for AI / ML / data science projects. It can be ran in a container using one of the official Docker images. From these I selected the datascience-notebook image which comes with Conda and a couple Python, R, and Julia libraries pre-installed.
The Docker compose setup for it looks something like this:
services:
  # Init Jupyter Lab with default configs
  init:
    image: jupyter/datascience-notebook:latest
    user: root
    command: >
      sh -c "
        for dir in notebooks config data envs custom; do
          mkdir -p /target/$$dir;
          if [ -z \"$(ls -A /target/$$dir 2>/dev/null)\" ]; then
            echo \"Initializing $$dir...\";
            case $$dir in
              config)    cp -r /home/jovyan/.jupyter/. /target/$$dir/ 2>/dev/null || true ;;
              data)      cp -r /home/jovyan/.local/share/jupyter/. /target/$$dir/ 2>/dev/null || true ;;
              envs)      cp -r /opt/conda/envs/. /target/$$dir/ 2>/dev/null || true ;;
              custom)    true ;;
              notebooks) true ;;
            esac
          else
            echo \"$$dir already present, skipping.\";
          fi
          chown -R 1000:100 /target/$$dir;
        done
      "
    volumes:
      - /home/zima/jupyter:/target

  jupyter:
    image: jupyter/datascience-notebook:latest
    container_name: jupyterlab
    depends_on:
      init:
        condition: service_completed_successfully
    ports:
      - "127.0.0.1:8888:8888"
    volumes:
      - /home/zima/jupyter/notebooks:/home/jovyan/work          # notebooks
      - /home/zima/jupyter/config:/home/jovyan/.jupyter         # lab settings, jupyter_notebook_config.py
      - /home/zima/jupyter/data:/home/jovyan/.local/share/jupyter  # kernels, nbextensions, runtime
      - /home/zima/jupyter/envs:/opt/conda/envs                 # conda environments
      - /home/zima/jupyter/custom:/home/jovyan/.jupyter/custom  # custom JS/CSS
      - /var/run/docker.sock:/var/run/docker.sock
    environment:
      - JUPYTER_ENABLE_LAB=yes
    restart: unless-stopped

networks:
  jupyter:
    name: jupyter
    ipam:
      config:
        - subnet: 172.25.0.0/16
To check out our Jupyter Lab install works, we can create (or download) and try it out. I went with an example from the sealion library from GitHub:
One other thing worth setting up is some kind of isolation ensuring our projects / frameworks / applications have a stable environment to run in:
- For Python projects the Jupyter Lab image comes with Conda pre-installed and it can efficiently used to create dedicated environments for various projects
- For other projects such as embedded frameworks, compilers and other it may worth using dedicated Docker containers
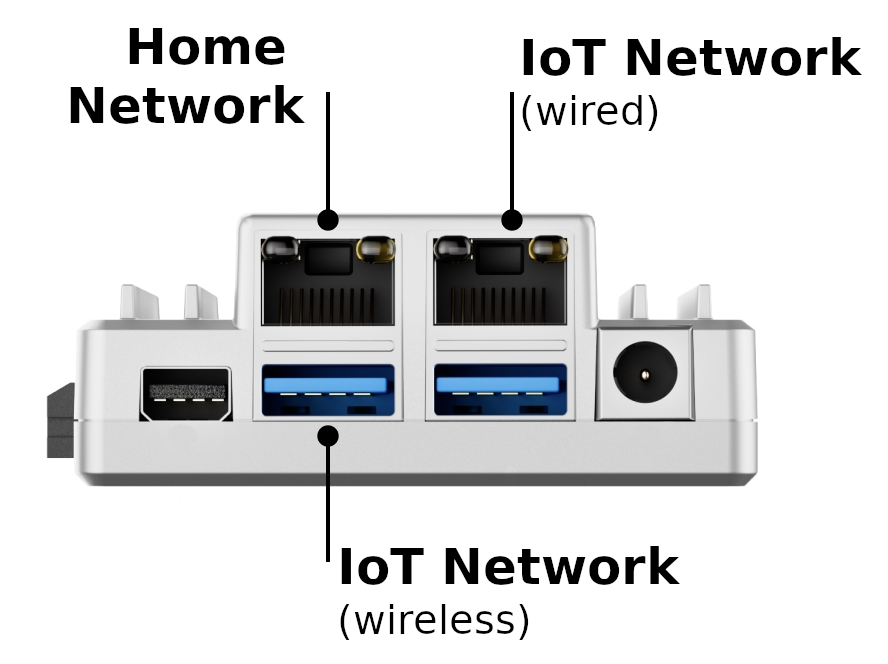
The ZimaBoard 2 comes with two 2.5G Ethernet ports, which can be used for various purposes. Over this WiFi connectivity can be added and using USB adapter.
For this build I decided to set up networking as follows:
- Ethernet Port 1 - is used as main network port providing Internet connectivity and network access
- Ethernet Port 2 - provides an isolated network for IoT devices
- WiFi Adapter - runs a dedicated Access Point with an isolated network for Wireless IoT devices
Setting up basic network / internet connectivity is straight forward. All we need to do is make port 2 optional in the Netplan configs, allowing the board to boot without a network cable attached just to port 1:
/etc/netplan/00-installer-config.yaml:
network:
  ethernets:
    enp1s0:          # primary port
      match:
        macaddress: 00:f0:xx:xx:xx:a1
      accept-ra: true
      dhcp4: true
      dhcp6: false
      optional: false
    enp2s0:          # IoT port
      match:
        macaddress: 00:f0:xx:xx:xx:a2
      accept-ra: false
      dhcp4: false
      dhcp6: false
      optional: true
...
On Port 2 we will set up an isolated network that will allow us to monitor and debug IoT devices. This can be useful to get an insight on what connections various IoT device, what kind of traffic they generate make and how they will behave in limited network environments.
The same monitoring setup can also be replicated on a dedicated WiFi network adding support for wireless IoT devices.
The network architecture for the isolated IoT devices work as follows:
- Ethernet Port 2 and a dedicated WiFi adapter is used to provide isolated wired and wireless networks for non-trusted devices
- PiHole will be used as DHCP and DNS server for the network
- UFW firewall rules will be used to provide Internet access for the IoT devices, while block access to the local network
- ipset in combination with PiHole's DNS server will be used to block / control traffic
- ntopng will we used for network monitoring
As the basic building blocks for this setup we need to prepare some infrastructure on the host:
- In the NetPlan configs we should configure two interfaces for the wired (ens2s0) and wireless (br-iot-wifi) networks
- For the Wireless Access Point we need to create a hostapd configuration with SSID, passkey and other settings
- In the UFW configuration files we configure routing rules for the isolated networks
As the DHCP and DNS server for the isolated network I used a PiHole install running in a container. PiHole provides the following functionality:
- It acts as the DHCP server, providing IP addresses for the wired (192.168.10.x) and wireless (192.168.11.x) networks
- It acts as the DNS server providing host name to IP resolution in the network. Along this we can also use it allow / block traffic to the websites / servers we want
For additional security we can also set up:
- DNS capturing avoid devices using DNS servers other then PiHole
- IP set based access control with PiHole (dnsmasq) integration to limit connectivity strictly to pre-configured websites / servers
- client isolation on the WiFi and Ethernet networks (needs a managed switch)
Note: Sample configuration files and detailed guides can be found in the Github repository of the project.
Future WorkAs next steps I want to experiment with various M.2 accelerators such as the Hailo 10H M.2 or the Axelera's Metis M.2 AI Edge / Max cards. These are low power cards offering hardware acceleration for various AI workloads such as computer vision or even running smaller LLM-s. Unfortunately the availability (and pricing) for this boards is a bit crazy at the moment, so this need to wait a bit.
Hope you enjoyed this project! 😎


Comments