

Hardware components | ||||||
 |
| × | 1 | |||
Software apps and online services | ||||||
| ||||||
 |
| |||||
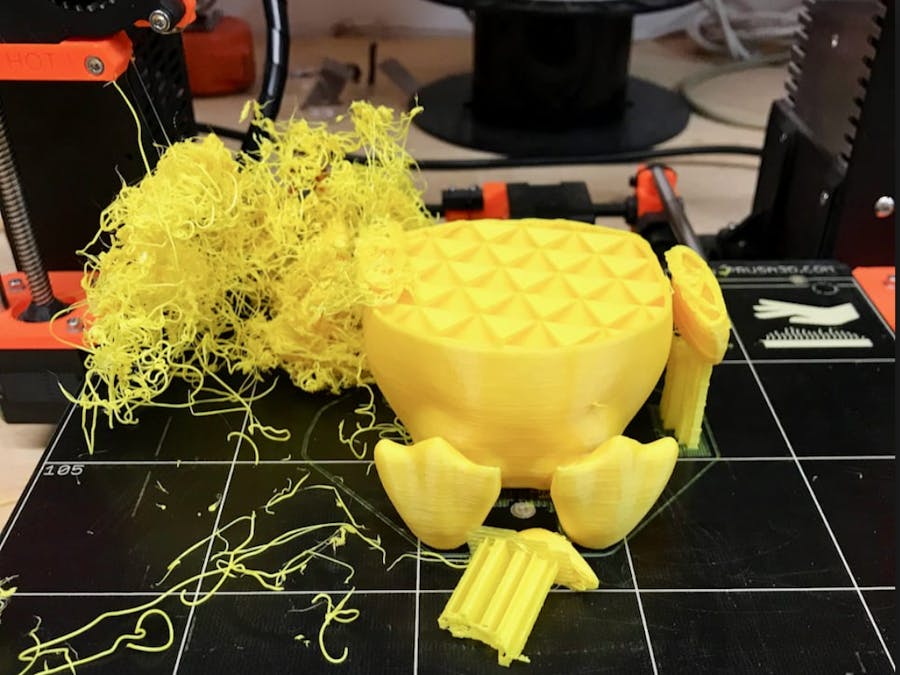
This guide is intended to teach you how to leverage the capabilities of the Movidius Neural Compute Stick (NCS) using an UP Squared development board to extend OctoPrint to detect and control a 3D printer to stop when an error is detected. A camera is installed via USB to the the UP Squared board and the Movidius NCS is used to accelerate the detection of print failure so the print job can be paused and the user can be alerted to resolve, saving time and money by reducing print loss.
This project utilizes a powerful platform for orchestrating 3D printers, OctoPrint (https://octoprint.org/) and leverages a plug-in called The Spaghetti Detective (https://thespaghettidetective.com ) that is too resource intensive to be run on single board computers. Because of the acceleration achieved from the NCS it is being processes at the edge on the UP2 hardware.
The first series of steps will help you install octoprint on your UP Squared board.
Install OctoPrint on UP SquaredLogin to your UP Squared board;
default user: upsquared
default password: upsquared
Update and upgrade your OS
1. sudo apt-get update
2. sudo apt-get upgrade

Create octoprint user and give it sudo permissions
3. sudo adduser octoprint
4. sudo usermod -a -G tty octoprint
5. sudo usermod -a -G dialout octoprint
6. sudo adduser octoprint sudo
7. sudo visudo

Scroll to the bottom of the document, and add the line at the bottom
octoprint ALL=(ALL) NOPASSWD:ALL

Ctrl + O to save, Ctrl + X to exit

Remove the password from the octoprint user
8. sudo passwd octoprint -d

Install the required support software to make this all work
9. sudo apt-get install git python-pip python-dev python-setuptools psmisc virtualenv

Switch to the octoprint user and confirm your identity
10.sudo su octoprint
11. whoami

Install PySerial V2.7
12. cd ~
13. wget https://pypi.python.org/packages/source/p/pyserial/ pyserial-2.7.tar.gz
14. tar -zxf pyserial-2.7.tar.gz
15. cd pyserial-2.7
16. sudo python setup.py install

Download and compile the latest version of OctoPrint

17. cd ~
18. git clone https://github.com/foosel/OctoPrint.git
19. cd OctoPrint
20. virtualenv venv
21. ./venv/bin/python setup.py install

Start OctoPrint for the first time
22. ~/OctoPrint/venv/bin/octoprint serve

With OctoPrint running, you should be able to access it using your local browser.

Open the page in your local browser by entering [youipaddress]:5000

Make OctoPrint run on startup
Stop running process (CTRL-C). Reboot UP Squared board

23. sudo cp ~/OctoPrint/scripts/octoprint.init /etc/init.d/octoprint
24. sudo chmod +x /etc/init.d/octoprint
25. sudo cp ~/OctoPrint/scripts/octoprint.default /etc/default/octoprint

26. sudo nano /etc/default/octoprint

Change the user to octoprint, and then edit the DAEMON line to remove the hashtag ad the beginning, and set the proper operating directory

DAEMON=/home/octoprint/OctoPrint/venv/bin/octoprint
OCTOPRINT_USER=octoprint

Ctrl + O to save, Ctrl + X to quit

Update the defaults
27. sudo update-rc.d octoprint defaults
28. sudo service octoprint start


Make everything accessible on port 80
29. sudo apt install haproxy
30. sudo nano /etc/haproxy/haproxy.cfg

Add this to the end of the file

frontend public
    bind :::80 v4v6
    use_backend webcam if { path_beg /webcam/ }
    default_backend octoprint

backend octoprint
    reqrep ^([^\ :]*)\ /(.*)  \1\ /\2
    option forwardfor
    server octoprint1 127.0.0.1:5000

backend webcam
    reqrep ^([^\ :]*)\ /webcam/(.*)  \1\ /\2
    server webcam1 127.0.0.1:8080


Ctrl + O to save, Ctrl + X to quit


Install Camera

31. cd ~
32. sudo apt install subversion libjpeg62-dev imagemagick ffmpeg libv4l-dev cmake
33. git clone https://github.com/jacksonliam/mjpg-streamer.git
34. cd mjpg-streamer/mjpg-streamer-experimental
35. export LD_LIBRARY_PATH=.
36. make

This should hopefully run through without any compilation errors. You should then be able to start the webcam server using:

37. sudo ./mjpg_streamer -i "./input_uvc.so" -o "./output_http.so"
If you now point your browser to http://<your IP>:8080/?action=stream, you should see a moving picture at 5fps. (If you get an error message about missing files or directories calling the output plugin with -o "./output_http.so -w./www" should help.)
Open OctoPrint's settings dialog and under Webcam & Timelapse configured the following:
- Stream URL: /webcam/?action=stream
- Snapshot URL: http://127.0.0.1:8080/?action=snapshot
- Path to FFMPEG: /usr/bin/ffmpeg
Touch UI is a plugin that provides an interface for touch screens. This project took advantage of the RocketTouch 7" Touchscreen.
Install the plugin using the plugin manager in the OctoPrint settings. If you want to use is for a local LCD, you need to setup epiphany to start automatically. To do so, first install xautomation to send the keypress for fullscreen later and the epiphany browser if it is not already installed:
sudo apt install epiphany-browser xautomation
Next, create a file startTouchUI.sh in ~/ and add:
#!/bin/bash

function check_octoprint {
    pgrep -n octoprint > /dev/null
    return $?
}

until check_octoprint
do
    sleep 5
done

sleep 5s
epiphany-browser http://127.0.0.1:5000 --display=:0 &
sleep 10s;
xte "key F11" -x:0
Make it executable: chmod +x startTouchUI.sh and add the following to ~/.config/lxsession/LXDE-pi/autostart
@/home/octoprint/startTouchUI.sh
On the UP2 board:
Clone the Spaghetti Detective got repo
1. cd ~
2. git clone git@github.com:TheSpaghettiDetective/TheSpaghettiDetective.git
3. cd TheSpaghettiDetective && sudo docker-compose up -d
Step 3 will take up to 30 minutes.
Basic server configurationThese are the bare minimum configuration required for the server to be functional.
Obtain server's IP addressThe Spaghetti Detective server needs to have an IP address that is accessible by OctoPrint. It can be an private IP address (192.168.x.y, etc) but there needs to be a route between OctoPrint and The Spaghetti Detective server.
Port/FirewallThe Spaghetti Detective server listens on port 3334 (will be configurable in later version). Please make sure this port is not blocked from OctoPrint.
You can set up a reverse-proxy, such as nginx, in front of The Spaghetti Detective server, so that it's exposed on a different port. In this case, please use whichever port you choose to expose in the steps below. For simplicity sake, this document assumes the server port is 3334.
Login as Django admin- Open Django admin page at
http://your_serer_ip:3334/admin/ - Login with username
root@example.com, passwordsupersecret. Once logged in, you can optionally (but highly encouraged to) change admin password using this link:http://your_server_ip:3334/admin/app/user/1/password/.
- On Django admin page, click "Sites", and click the only entry "example.com" to bring up the site you need to configure. Change "Domain name" to
your_server_ip:3334. No "http://", "https://" prefix or trailing "/", otherwise it will NOT work. - Click "Save".
The following is using gmail as an example. Other web mail services may vary slightly, such as EMAIL_PORT
- In
TheSpaghettiDetectivedirectory, find and opendocker-compose.ymlusing your favorite editor. - Find the following lines, and set them to the correct values of your email account:
EMAIL_HOST:  # -> such as smtp.gmail.com
EMAIL_HOST_USER:  # -> such as your email address for a Gmail account
EMAIL_HOST_PASSWORD: # -> your email account password
EMAIL_PORT: 587
EMAIL_USE_TLS: 'True'
That's it! You now have a fully-functional The Spaghetti Detective server that your OctoPrint can talk to.
----------------------------Configure The Spagetti Detective OctoPrint Plugin to use your own serverBefore you can configure The Spagetti Detective OctoPrint Plugin to use your own server, you need add a printer to The Spagetti Detective server you just built and obtain the secret token for that. To do so:
- Pointing your browser to
http://your_server_ip:3334/. - Log in as a user (you can just login with
root@example.combut it's more secure to use a non-admin user). Add a new printer as described in this guide and obtain the secret token.
Then, on The Spaghetti Detective plugin settings page:
- Check the box "I have my own TSD server. Don't check this unless you know what you are doing."
- Enter
http://your_serer_ip:3334/. This time you need to enter both "http://" and the trailing "/". I know it's confusing but... - Enter the secret token you copied from the previous step.
- Click "Save".
Note: There is sufficient lighting to illuminate the printing area of your printer. If your printer is in a lighted room, you are probably fine. If you'll print with light off, you will need to make sure the printing area is illuminated when your printer is printing. A LED strip or small LED lamp will do the trick.Step 1: Install The Spaghetti Detective plugin in OctoPrint.
Go to your OctoPrint page. Open OctoPrint settings page by clicking the wrench icon. On the settings page, click "Plugin Manager", then "Get More...".
Type "The Spagehtti Detective" in the box, you will see "The Spagehtti Detecive (Beta)" plugin. Click "Install". OctoPrint will ask you to restart after the plugin is successfully installed.
After OctoPrint is restarted, you will see a wizard page. Click on "Sign up a beta testing account". It'll open a new browser tab for the next step.
Click "Advanced" to set up your own server URL.
-----------------
OpenVINOInstalling OpenVINO
https://docs.openvinotoolkit.org/latest/_docs_install_guides_installing_openvino_linux.html
Download the Intel® Distribution of OpenVINO™ 2019 R1 toolkit package file from Intel® Distribution of OpenVINO™ toolkit for Linux*. Select the Intel® Distribution of OpenVINO™ toolkit for Linux package from the dropdown menu.
- Open a command prompt terminal window.
- Change directories to where you downloaded the Intel Distribution of OpenVINO toolkit for Linux* package file.If you downloaded the package file to the current user's
Downloadsdirectory:cd ~/Downloads/By default, the file is saved asl_openvino_toolkit_p_<version>.tgz. - Unpack the.tgz file:tar -xvzf l_openvino_toolkit_p_<version>.tgzThe files are unpacked to the
l_openvino_toolkit_p_<version>directory. - Go to the
l_openvino_toolkit_p_<version>directory:cd l_openvino_toolkit_p_<version>If you have a previous version of the Intel Distribution of OpenVINO toolkit installed, rename or delete these two directories: /home/<user>/inference_engine_samples/home/<user>/openvino_models
Installation Notes:
Choose an installation option and run the related script as root.
You can use either a GUI installation wizard or command-line instructions (CLI).
Choose your installation option:
- Option 1: GUI Installation Wizard:sudo./install_GUI.sh
- Option 2: Command-Line Instructions:sudo./install.sh
These dependencies are required for:
- Intel-optimized OpenCV
- Deep Learning Inference Engine
- Deep Learning Model Optimizer tools
- Change to the
install_dependenciesdirectory:cd /opt/intel/openvino/install_dependencies - Run a script to download and install the external software dependencies:sudo -E./install_openvino_dependencies.shThe dependencies are installed. Continue to the next section to set your environment variables.
You must update several environment variables before you can compile and run OpenVINO™ applications. Run the following script to temporarily set your environment variables:
source /opt/intel/openvino/bin/setupvars.sh
Optional: The OpenVINO environment variables are removed when you close the shell. As an option, you can permanently set the environment variables as follows:
- Open the
.bashrcfile in<user_directory>:vi <user_directory>/.bashrc - Add this line to the end of the file:source /opt/intel/openvino/bin/setupvars.sh
- Save and close the file: press the Esc key and type
:wq. - To test your change, open a new terminal. You will see
[setupvars.sh] OpenVINO environment initialized.
The environment variables are set. Continue to the next section to configure the Model Optimizer.
Configure the Model OptimizerThe Model Optimizer is a Python*-based command line tool for importing trained models from popular deep learning frameworks such as Caffe*, TensorFlow*, Apache MXNet*, ONNX* and Kaldi*.
The Model Optimizer is a key component of the Intel Distribution of OpenVINO toolkit. You cannot perform inference on your trained model without running the model through the Model Optimizer. When you run a pre-trained model through the Model Optimizer, your output is an Intermediate Representation (IR) of the network. The Intermediate Representation is a pair of files that describe the whole model:
.xml: Describes the network topology.bin: Contains the weights and biases binary data
For more information about the Model Optimizer, refer to the Model Optimizer Developer Guide.


Comments