

Hardware components | ||||||
 |
| × | 1 | |||
 |
| × | 1 | |||
| × | 1 | ||||
 |
| × | 1 | |||
This project will take you through the steps on how to use the XinaBox xChips with a DragonBoard 410C that has a 96Boards standard header interface. I will not dive deep into how to get your DragonBoard working straight out of the box, but provide some links that has instructions on how to do this. The main focus is to show how to communicate with an xChip that uses I2C as communication protocol.
What you will need- XinaBox B901
- XinaBox SW10 (used for demonstration)
- DragonBoard 410C and required accessories such as the power supply.
Simply follow the steps in the link below, I found it quite straight forward and detailed enough to follow without any issues.
There are several methods on getting this to work, from the options in the link you will need Debian to run on the DragonBoard for this tutorial.
Link to instructions: https://www.96boards.org/documentation/consumer/dragonboard/dragonboard410c/installation/
Adding a Sensor to the DragonBoardThe XinaBox platform makes this step very easy, the modular platform uses simple connectors to click boards together.
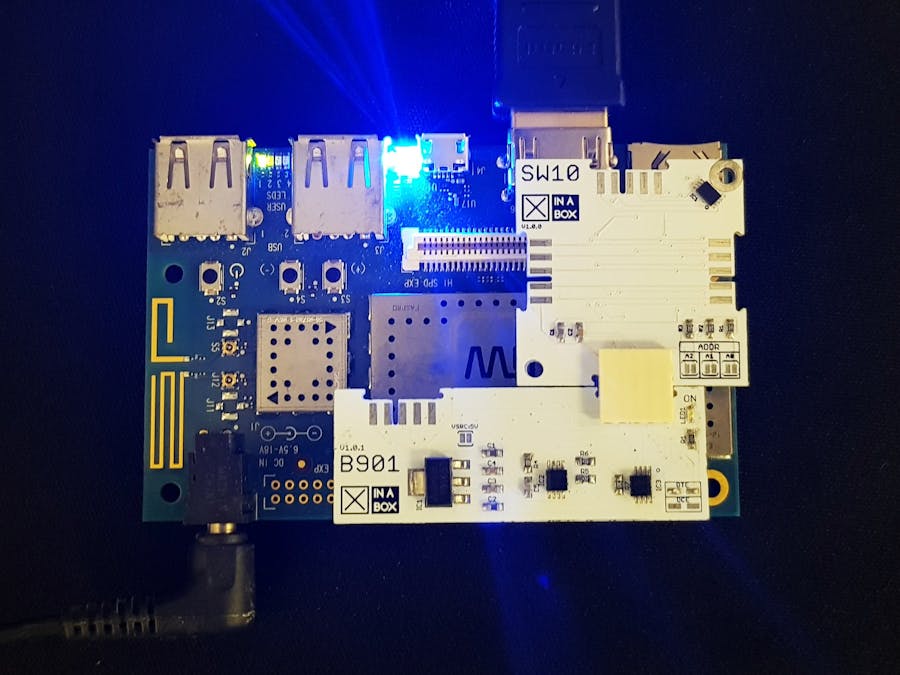
The first thing you need to do is plug the B901 bridge xChip into the DragonBoard so it resembles the picture below.
Next you can connect the sensor we will use as an example for this project, the SW10 from XinaBox, which is a LM75B temperature sensor. Simply use a XC10 connector and click it into the B901 board as indicated in the picture below.
The only thing to bare in mind, the small XinaBox logos with chip name must all face the same direction, the bus at the top and bottom of the board are NOT the same. Usually the boards have a large logo at the bottom.
Once connected you can power the DragonBoard up!
You will want to make sure your install of Debian is up to date first. Open a terminal window on Debian and run the following command.
sudo apt-get update && sudo apt-get upgrade
This will download all the updates and install the latest dependencies for your OS. Once it finishes you need to install the necessary I2C dependencies by running the following.
sudo apt-get install i2c-tools
Now that this is installed we can start doing some I2C operations. First thing to do is ensure your SBC can see the sensor by checking for the I2C address. This is easy to do by doing an I2C Scan. You can run the following command to do this.
sudo i2cdetect -r -y 0
You should see the following result if it works correctly.
    0  1  2  3  4  5  6  7  8  9  a  b  c  d  e  f
00:          -- -- -- -- -- -- -- -- -- -- -- -- --
10: -- -- -- -- -- -- -- -- -- -- -- -- -- -- -- --
20: -- -- -- -- -- -- -- -- -- -- -- -- -- -- -- --
30: -- -- -- -- -- -- -- -- -- -- -- -- -- -- -- --
40: -- -- -- -- -- -- -- -- 48 -- -- -- -- -- -- --
50: -- -- -- -- -- -- -- -- -- -- -- -- -- -- -- --
60: -- -- -- -- -- -- -- -- -- -- -- -- -- -- -- --
70: -- -- -- -- -- -- -- --
The scan shows that we have detected address 0x48 connected to I2C, which is the default address of the LM75B on the SW10.
Reading the temperatureThis is as simple as running a single line now that everything is set up. Simply run the following.
sudo i2cget -y 0 0x48 0x00 w | awk ‘{printf(“%.1f\n”, (a=(((“0x”substr($1,5,2)substr($1,3,1))*0.0625)+0.1))>128?a-256:a)}’
As easy as that you will get a temperature reading in Celsius output such as below.
26.3
So now that you have gotten a single temperature reading from the sensor, you probably want to put it to use or at the very least read it continuously and display it on the console.
We will need a script to do this for us on Debian. To create a script you will need to create a file in the location you are currently in on the console. You can create a file by running this.
sudo touch readTemperature.sh
This has created a shell script that we can edit with some code that we want to execute. We can edit the script file by running the following command.
sudo nano readTemperature.sh
The console screen will change to the contents of the file, which should be empty at this point in time. Copy and paste the following code into the file.
#!/bin/bash
while true;
do
i2cget -y 0 0x48 0x00 w | awk ‘{printf(“%.1f\n”, (a=(((“0x”substr($1,5,2)substr($1,3,1))*0.0625)+0.1))>128?a-256:a)}’
sleep 1000
done
The script above will read the temperature and write it out to the console and then sleep for 1000 ms (1 Second) then repeat. Once you have edited the file you will need to save it by pressing CTRL+X to exit and then agree to overwriting the contents of the file to save it.
Now you can run the script file you just created by running the following command.
sudo bash readTemperature.sh
The temperature will now be written out the the console once per second like this.
26.1
26.0
26.1
26.3
26.3
That's it! No wires needed to use a sensor, just a little bit of coding. This script file can be changed to do many other things, but that's outside the scope of this article. You can read any of the XinaBox sensors over I2C with this method, but will vary in coding complexity to get the data from the respective registers. Happy coding!!


Comments