Brett Walach
Published © CC BY-NC-SA

Particle Sumo Bot

3D Printed Particle.io powered Sumo Bot with Pololu motor controller

IntermediateFull instructions provided6,053
Particle Sumo Bot

Things used in this project

Hardware components

Spark Core
Particle Spark Core
×1
Pololu - Micro Breadboard
×1
Pololu - TB6612FNG Dual Motor Driver Carrier
×1
Pololu - 50:1 Micro Metal Gearmotor HP (625 RPM)
×2
Pololu - 22T Track Set
×1
Pololu - 4-AAA Battery Holder
×1
22AWG Stranded Hook-up Wire
×1
NiMH AAA Batteries
×1
Double sided foam tape (to mount AAA battery pack)
×1

Story

Read more

Custom parts and enclosures

Particle Sumo Bot Dozer Blade 1

The main part of the dozer blade, minus second color Spark logo.

Particle Sumo Bot Dozer Blade 2

The secondary part of the dozer blade, second color Spark logo insert

Dozer Blade Riser

This is just a little spacer to raise up the dozer blade. Adjust the height of the blade to your own personal taste!

Generic Dozer Blade

This is the dozer blade without a logo. Great for single color printers or to customize yourself!

Particle Sumo Chassis (Outdated - use MOD3)

This is the main sumo bot chassis which motors just snap into to and wheels and dozer blade bolt right on. Designed for a 4AA battery holder, but shown in this project with a 4AAA holder just because. You could also use a large single cell LiPo pack.

Particle Sumo Chassis (MOD3)

I noticed that the tracks on the original spark-sumo-chassis.stl design would bow out in the front when the tracks pulled on the wheels. The motor mounts were a little weak, and with added play in the motor shaft and wheel there was nearly 5 degrees of tilt. This chassis is the 3rd modification I did that toes in the front wheels, and moves the rear wheels up 2mm to compensate for the front wheels actually moving forward as well. Subsequently I had to increase the nose by 3mm for dozer-blade to track clearance. I also changed one of the accessory mounting holes to a rectangle cut out to allow me to easily remove the battery pack cable. This came in handy moving the battery pack between several designs! Overall, this chassis ROCKS!

Schematics

TB6612 Motor Driver Pinout

Solder in a male header to the right side. Wires go on the left side.
There is no need to use multiple GNDs, just the bottom right GND is fine.
VCC goes to 3V3 output on the Spark Core.
VMOT goes to BATT+ from the Battery Pack.
BATT+ also goes up to VIN on the Spark Core.
Spark Core GND is connected to BATT- and GND of the Motor Driver.
AO0/AO1 goes to the left motor, BO0/BO1 goes to the right motor.
PWMA on the Motor Driver will align with A6 and PWMB will align with A0.

TB6612 and Spark Core Wiring

Code

Particle Sumo Bot Firmware

C/C++
This is the firmware that gets flashed to the Spark Core. Copy/Paste this into a new application at https://build.particle.io and flash to your Core. Through the use of one Spark.function(), all commands to control the robot can be sent in a comma delimited string. The format is `x,yyy,zzz,` where x = direction commands: f b l or r, y = the speed in percentage and z = the duration in milliseconds. E.g., `f,100,500,` or `r,50,100,`
/* 
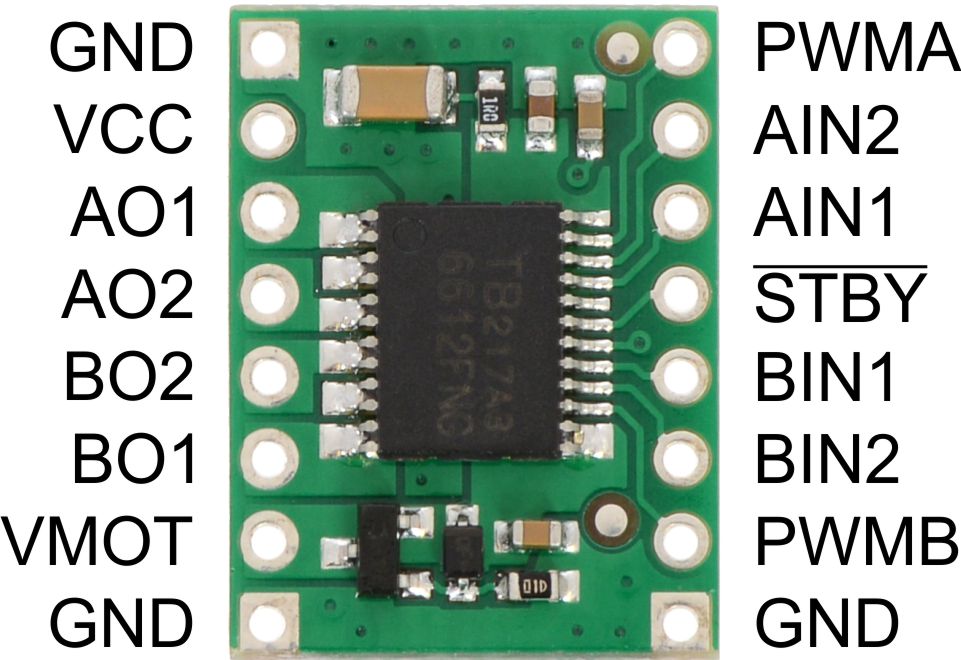
    A0 - PWMB (speed right)
    A1 - BIN2 (direction bits)
    A2 - BIN1
    
    A3 - /STBY (motor enable)
    
    A4 - AIN1 (direction bits)
    A5 - AIN2
    A6 - PMWA (speed left)
*/

#define STBY A3
#define MOTOR_L 0
#define MOTOR_R 1
#define FWD 0
#define RVS 1
#define BIN1 A2
#define BIN2 A1
#define AIN1 A4
#define AIN2 A5
#define PWM_L A6
#define PWM_R A0

int _speed = 0;
int _duration = 0;
bool _new_command = false;

void setup() {
    
    Serial.begin(9600);
    
    int pin;
    for (pin=A0; pin<=A6; pin++) {
        pinMode(pin, OUTPUT); 
    }
    for (pin=A0; pin<=A6; pin++) {
        digitalWrite(pin, LOW); 
    }
    
    enableMotors(true);
    
    Spark.function("cmd",cmdRobot);
}

void loop() {
    if (_new_command == true) {
        setSpeed(MOTOR_L, _speed);
        setSpeed(MOTOR_R, _speed);
        delay(_duration);
        setSpeed(MOTOR_L, 0);
        setSpeed(MOTOR_R, 0);
        _new_command = false;
    }
}

int cmdRobot(String c) {
    // c format: x,yyy,zzz,
    // x = direction (f/b/l/r)
    // y = speed in percentage
    // z = duration in milliseconds
    //
    // fblr, forward, backward, left turn, right turn
    
    int start = 0;
    int end = 0;
    int speed = 0;
    int duration = 0;
        
    if (c.charAt(0) == 'f') {
        setDirection(MOTOR_L, FWD);
        setDirection(MOTOR_R, FWD);
        Serial.println("F");
    }
    else if (c.charAt(0) == 'b') {
        setDirection(MOTOR_L, RVS);
        setDirection(MOTOR_R, RVS);
        Serial.println("B");
    }
    else if (c.charAt(0) == 'l') {
        setDirection(MOTOR_L, RVS);
        setDirection(MOTOR_R, FWD);
        Serial.println("L");
    }
    else if (c.charAt(0) == 'r') {
        setDirection(MOTOR_L, FWD);
        setDirection(MOTOR_R, RVS);
        Serial.println("R");
    }
    
    start = c.indexOf(',');
    if (start != -1) {
        end = c.indexOf(',', start+1);
        if (end == -1) {
            return 2;
        }
    }
    else {
        return 1;
    }
    
    speed = c.substring(start+1,end).toInt();
    
    start = end;
    end = c.indexOf(',', start+1);
    if (end == -1) {
        return 3;
    }
    
    duration = c.substring(start+1,end).toInt();
    
    Serial.print("Speed: ");
    Serial.println(speed);
    Serial.print("Duration: ");
    Serial.println(duration);
    
    _speed = speed;
    _duration = duration;
    _new_command = true;
    
    return _duration;
}

void enableMotors(bool enable) {
    if (enable) digitalWrite(STBY, HIGH); // enable motor output
    else digitalWrite(STBY, LOW); // disable motor output
}

void setDirection(bool motor, bool dir) {
    if (motor == MOTOR_L) {
        if (dir == RVS) {
            digitalWrite(AIN1, LOW);
            digitalWrite(AIN2, HIGH);
        }
        else if (dir == FWD) {
            digitalWrite(AIN2, LOW);
            digitalWrite(AIN1, HIGH);
        }
    }
    else if (motor == MOTOR_R) {
        if (dir == FWD) {
            digitalWrite(BIN1, LOW);
            digitalWrite(BIN2, HIGH);
        }
        else if (dir == RVS) {
            digitalWrite(BIN2, LOW);
            digitalWrite(BIN1, HIGH);
        }
    }
    else {
        digitalWrite(AIN1, LOW);  // disable all motors
        digitalWrite(AIN2, LOW);
        digitalWrite(BIN1, LOW);
        digitalWrite(BIN2, LOW);
    }
}

void setSpeed(bool motor, int speed) {
    if (motor == MOTOR_L) {
        analogWrite(PWM_L, map(speed,0,100,0,255) );
    }
    else if (motor == MOTOR_R) {
        analogWrite(PWM_R, map(speed,0,100,0,255) );
    }
    else {
        analogWrite(PWM_L, 0);  // stop all motors
        analogWrite(PWM_R, 0);
    }
}

Pebble Watch Simply.js App

JavaScript
This is a simple app to control the Particle Sumo Bot from your Pebble Watch. Install Simply.js on your Pebble, host this script somewhere that will give you a URL (a Public Dropbox link works well), and paste that link into the Simple.js app settings. UP is forward, DOWN is reverse. SELECT is left turn, LONG PRESS SELECT is right turn.
var DEVICE_ID = 'YOUR_DEVICE_ID';
var ACCESS_TOKEN = 'YOUR_ACCESS_TOKEN';

simply.on('singleClick', function(e) {
  console.log(util2.format('single clicked $button!', e));
  var command = '';
  if ('up' == e.button) {
    command = 'f,100,500,';
    simply.subtitle('FORWARD!');
  } else if ('select' == e.button) {
    command = 'l,100,100,';
    simply.subtitle('LEFT!');
  }
  else if ('down' == e.button) {
    command = 'b,100,500,';
    simply.subtitle('REVERSE!');
  }
  else {
    return;
  }

  ajax(
    {
      url: 'https://api.particle.io/v1/devices/' + DEVICE_ID + '/cmd?access_token=' + ACCESS_TOKEN,
      method: 'post',
      type: 'json',
      data: { a: command }
    },
    function(e){ console.log('ajax success: ' + e); },
    function(e){ console.log('ajax failure: ' + e); }
  );
});

simply.on('longClick', function(e) {
  console.log(util2.format('long clicked $button!', e));
  var command = '';
  if ('select' == e.button) {
    command = 'r,100,100,';
    simply.subtitle('RIGHT!');
  }
  else {
    return;
  }
  ajax(
    {
      url: 'https://api.particle.io/v1/devices/' + DEVICE_ID + '/cmd?access_token=' + ACCESS_TOKEN,
      method: 'post',
      type: 'json',
      data: { a: command }
    },
    function(e){ console.log('ajax success: ' + e); },
    function(e){ console.log('ajax failure: ' + e); }
  );
});

simply.setText({
  title: 'Particle bot',
  body: 'Press buttons to control the bot!',
}, true);

Node.js WASD Key Driving Script

JavaScript
This Node.js script allows you to drive the Sumo Bot from the W,A,S,D keys on your keyboard.
Save the script as bot.js in some directory on your computer.
Make sure Node.js is installed!
Run `npm install sparkjs` in the directory you saved bot.js in.
Run `npm install prompt` in the same directory.
Run the script with `node bot.js`
Login to your Particle account, and then enter the device name of the Spark Core you used on your Particle Sumo Bot. There's no need to enter the long DEVICE ID. Keep in mind this name is case sensitive. If you forgot what your device name is, you can use https://build.spark.io to find out.
Have fun!
"use strict";

var spark = require('spark');
var prompt = require('prompt');

var logged_in = false;
var DEVICE_NAME = "";

spark.on('login', function() {
  
  var stdin = process.stdin;
  stdin.setRawMode( true );
  stdin.resume();
  stdin.setEncoding( 'utf8' );
  stdin.on( 'data', function( key ){
    // ctrl-c ( end of text )
    if ( key === '\u0003' ) {
      console.log("EXITING NOW!");

      setTimeout(function(){
        process.exit();
      },1000);
        
    }

    if (logged_in) {
      if ( key === 'w') {
        console.log("Forward 500");
        spark.callFunction(DEVICE_NAME, 'cmd', 'f,100,500,');
      }
      else if ( key === 'a') {
        console.log("Left 100");
        spark.callFunction(DEVICE_NAME, 'cmd', 'l,100,100,');
      }
      else if ( key === 's') {
        console.log("Reverse 500");
        spark.callFunction(DEVICE_NAME, 'cmd', 'b,100,500,');
      }
      else if ( key === 'd') {
        console.log("Right 100");
        spark.callFunction(DEVICE_NAME, 'cmd', 'r,100,100,');
      }
    }
      
    // echo the keypress, if desired
    //process.stdout.write( key );
  });

});

// 
// Setting these properties customizes the prompt. 
// 
prompt.message = "SPARK LOGIN: ".cyan;
prompt.delimiter = "".cyan;
// 
// Start the prompt 
// 
prompt.start();

// 
// Get three properties from the user: username, password and device name (no need to type in that long ID) 
// 
prompt.get({
properties: {
      username: {
        description: "What's your username?".cyan
      },
      password: {
        hidden: true,
        description: "Now gimme da password!".red
      },
      device_name: {
        description: "What's the DEVICE NAME?".green
      }
    }
  }, function (err, result) {
  // 
  // Log the results. 
  // 
  // console.log('Command-line input received:');
  // console.log('  username: ' + result.username);
  // console.log('  password: ' + result.password);
  // console.log('  device_name: ' + result.device_name);

  spark.login({ username: result.username, password: result.password }, function(err, body) {
    logged_in = true;
    console.log('API call login completed on callback:', body);
  });

  DEVICE_NAME = result.device_name;

});

Credits

Brett Walach

Brett Walach

4 projects • 19 followers
Sr. Embedded Hardware/Software Engineer at Particle, Hacker, Maker, Musician
Thanks to Brian Evans.

Comments