


Hardware components | ||||||
| × | 1 | ||||
| × | 1 | ||||
| × | 1 | ||||
Software apps and online services | ||||||
 |
| |||||
Hand tools and fabrication machines | ||||||
 |
| |||||
Every maker should have a signature attire. Like a special hat, goggles or bow tie. When you go to a maker meeting, people recognize you based on this. Last November, I did visit Maker Faire Shenzhen. And figured that I was lacking this signature attire...
As I was in Shenzhen, I took the opportunity to visit the M5Stack office for the Open Day 2025. We did get a tour through their R&D, manufacturing and order processing departments. Great way to see in real life where our little MCU devices come from. A second great advantage from this Open Day, is that they gave out limited edition M5Stack MorseCode Matrix devices.
Junk Drawer search...A nice little MCU with Matrix LED display should not get into the Junk Drawer for too long. I was sure that I soon had to build project with this. And that is where the Hackster.io Junk Drawer competition came around, right in time for Christmas. I need a signature attire to show off at parties and gatherings! What if I make a tie with lots of LEDs? A FestiviTie!
What do I need for that;
- MCU + Display »»» M5Stack Matrix
- LED lights »»» Christmas decoration
- Something to stick it on »»» a silver tie
To start off, I've done a quick analysis of the M5Stack MorseCode Matrix:
- There are 8 x 8 = 64 LEDs on the front
- It runs on an ESP32 C3 (with WiFi and Bluetooth, but not yet enabled)
- There is one button on the top connected to GPIO9
- There is an IR sensor to load messages from the M5Stack Cardputer Keyboard
- There are some solder/testing pads on the back for 3.3V, GND and GPIO9 (same as the button)
- It has a LiPo battery and charging circuit, powered via USB-C
A special thing is how the LED Matrix display works; it uses 9 GPIO pins only, compared to the 8 columns x 8 rows = 16 pins for many other matrix screens. By applying Cathode/Anode logic to the pins, a specific LED lights up, and can be PWM (Pulse Width Modulation) driven to control brightness.
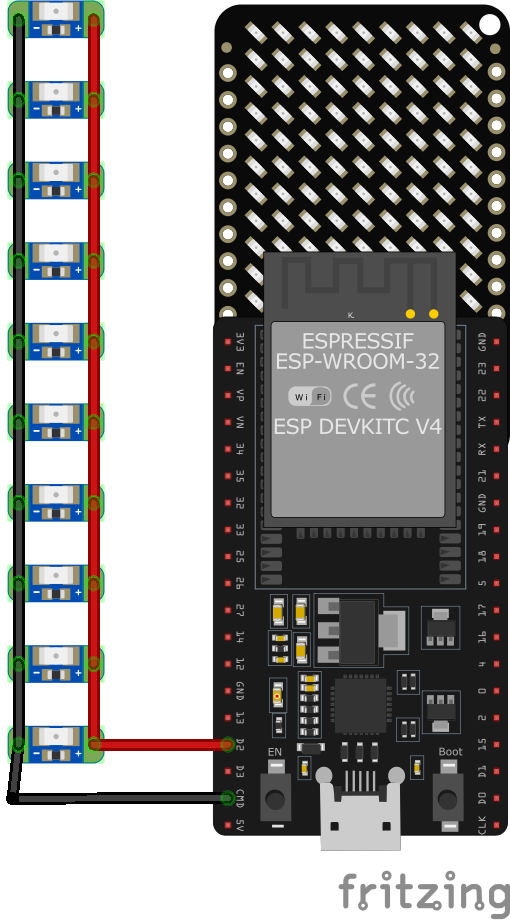
LED StringJust a simple string of 40 LEDs, 2 meter long. They are not addressable; only ON or OFF, for all 40 at the same time. It runs of 2 CR2032 coincell batteries of 3Volts. By providing different voltages, I can control the brightness. ESP32 can do that by using PWM. This means I only need 1 GPIO pin, which we have at the back of the M5Stack Matrix.
The planFor my FestiviTie, I do want it to show on screen a scrolling text or animation. As I don't have a M5Stack Cardputer Keyboard with IR, I do not need the IR. As an alternative to set the text, I need to add Bluetooth (BLE) support. I want to run a string of LED lights, for which only GPIO 9 is available, so I have to sacrifice the button, as I have to change the GPIO setup from INPUT to OUTPUT.
After soldering the 2 wires, it was time to stitch the LED string through, sew the M5Stack Matrix on it, and close the back as if nothing happened.
From the moment I started this project, till the first party, is roughly 1 week time. Luckily, there is example code from M5Stack written for ESP-IDF (Visual Studio Code), that drives the Matrix with it's special 9 GPIO pin logic. This is a good starting point, thanks M5Stack! I changed some things (removed the IR and button support) to be able to use GPIO 9 for the LED string. To store the text, I did add logic to use NVS (Non Volatile Storage), which keeps data in a flash chip. Text was loaded via the Serial connection, and then stored. This was in place right before Christmas party #1!
Good test evening, after many ours of diner and drinking, I didn't run out of battery. People liked my FestiviTie, but said the text didn’t run fast enough and the font had too much spacing. Also they challenged me to change the text on the spot (which was my plan, but not yet integrated).
Get ready for party #2!After the first party feedback, next task was to get the BLE stack running on it, but I was not able to get this done in ESP-IDF. I did see simple looking examples and guides working with Arduino IDE. And I had only one week before the next Christmas party…
I made the decision to move my code to Arduino IDE. And while doing that, I took the advantage to make it better understandable for myself. I decided to only keep the M5Stack part for the Matrix, as it did use the 9 pins logic that I didn't want to recode. The part to set the text and scroll it, was too much integrated in many places, that it didn't allow me to also play with custom animations. This made me decided to take it out and replace it with another tool.
I did find an example to run scrolling text on an 8x8 Matrix screen. It did directly address the 16 GPIOs for the matrix, meaning the code needed some adjustments. It had a slightly different font compared to the M5Stack example, but pro is that it could set the speed of the scrolling. I made it to scroll a bit faster. But then it did become a bit flickering, and it did also only accept input for 8x8 characters. Some more code changes would be needed, but I need to get ready for party #2...
One thing I wanted to add this week, is an image with snow animation. I did create an array for the image, existing of ON/OFF bits. And then applied a snow effect by having random pixels lighting up with a random brightness level. This was only applied to the pixels not lighted up by the image. My snowman was in the middle of a snowstorm now, ready for party #2!
Again lots of interest. People where still not content with the readability of the scrolling text (the mentioned flickering, the font itself and the whitespace). They liked the snow effect however! This group was less tech-savvy, so no request for changing text this time.
Get ready for party #3!Goals for party #3: better scrolling text (get rid of whitespace, no flickering, better font). More images to choose from. And of course the promised BLE support.
I did start with better isolating each part of the code into separate files and make classes from them. These classes could be started as tasks with the usage of FreeRTOS. With these changes, the scrolling speed was much better and the flickering was solved!
For the scrolling text, a more extensive library from MD Parola did had a better font and way to avoid whitespaces, but it was too complicated to get integrated into my M5Stack Matrix, because the full driver of a different Matrix IC was at the core of the code. I ended up borrowing the font-array from MD, where of course I added my own flavor; only applying the character width, not a full 8x8, and adjusted some characters to my liking.
Third is the BLE implementation, for which I followed a guide and example code. Only small changes were needed for my situation, some setbacks, but it works now! There is a website that can connect to the UUID of the FestiviTie only. This will allow to set the text and choose an animation image. The BLE server on the FestiviTie is turned on for the first 30 seconds, which is a bit of a security trick.
As all functions are finally working as I had planned, it is time to get the nice details included; multi brightness level animations! The ON/OFF array for the images is now replaced with an integer array. This enables the usage of brightness levels, which the M5Stack Matrix already provides for the LEDs.
I'm ready for party #3 now, New Years Eve!
How does it all work...Install the Arduino IDE and add the Board library for ESP32 by Espressif Systems (Tools > Board > Board Manager). I've selected the ESP32C3 DEV Module as my board. Somehow the Serial.print didn't work for me, so I've used ESP_LOG*. If you want to have output for this on the Serial Monitor, set Core Debug Level to DEBUG (Tools > Core Debug Level). This will cause a 5 second start up delay to get the Serial port running. When later turning the Debug Level to NONE, this delay will not happen.
Download the FestiviTie project from Github to get started. I'll not detail each and every line, but will take some important snippets;
1: The MatrixMost of the code for the matrix is in the M5StackMorseMatrix.* files. I won't go over that in detail, as it is the creation of M5Stack. I did translate the Chinese comments into English to understand what happens.
These are the notes on my work in the FestiviTie.ino file. In the Setup(), create the MatrixScreen object, begin the refreshing of the matrix.
void setup() {
    MatrixScreen.gpio_init();
    ESP_LOGI(TAG, "MatrixScreen.init completed");

    err = MatrixScreen.begin();
    if (err != ESP_OK) {
        ESP_LOGE(TAG, "Failed to start refresh task, error: %d", err);
    }
}Most of the code for the matrix is in the ScrollingText8x8Display.* files, more on that later. These are notes on the FestiviTie.ino file which is calling the scrolling display.
In the Setup(), initialize the scrolling8x8 object with the Right-To-Left and Top parameters:
void setup() {
    ScrollingDirection scrollingDirection = RIGHT_TO_LEFT;
    CharacterOrientation characterOrientation = TOP;
    ScrollingTextRender.init(scrollingDirection, characterOrientation);
}
In my Loop(), I do alternate between Animation and Scrolling text. For the Scrolling Text part, first initialize the refresh task. As the text runs intil 1 itteration is finished, the set the speed to 90, and execute the displayText();
void loop() {
    err = text_animation_task();
    if (err != ESP_OK) {
        ESP_LOGE(TAG, "Failed to start text_animation, error: %d", err);
    }
    float scrollingSpeed = 90;
    ScrollingTextRender.displayText(ScrollingText, scrollingSpeed);
    text_animation_running_ = false;
}
To refresh the scrolling text on the screen, I do have to transfer the scrolling8x8 array to the m5stack array. Repeat every 1 ms.
void text_animation(void* arg) {
    while (text_animation_running_) {

        ScrollingTextRender.get_frame_buffer(frame_buffer_);
        MatrixScreen.update(frame_buffer_);
        vTaskDelay(pdMS_TO_TICKS(1));

    }
    text_animation_handle_ = nullptr;
    text_animation_running_ = false;
    vTaskDelete(nullptr);
}
To explain my changes to the scrolling8x8, first have a look at how the font is build up in the file font_8x8.h : Each character is based on a maximum of 9 bytes. The first byte is a number between 0 and 8, representing how many columns this character exists off. Then there are 0 to 8 bytes with the information of each column; defining which rows are ON/OFF. For example the letter "f" does exist of 4 columns, with the bytes 8, 126, 9 and 2. The letter "j" is only 3 columns wide.
#define NUMBER_OF_CHARACTERS 256
const byte font_8x8[NUMBER_OF_CHARACTERS][9] PROGMEM = {
    {0},                                  /* 0 - Unused */
    [....]
    {4, 56, 84, 84, 24},                  /* 101 - e */
    {4, 8, 126, 9, 2},                    /* 102 - f */
    {4, 24, 164, 164, 120},               /* 103 - g */
    {4, 127, 8, 4, 120},                  /* 104 - h */
    {3, 68, 125, 64},                     /* 105 - i */
    {3, 128, 128, 122},                   /* 106 - j */
    {4, 127, 16, 40, 68},                 /* 107 - k */
    {3, 65, 127, 64},                     /* 108 - l */
    {5, 124, 4, 120, 4, 120},             /* 109 - m */
    [.....]
};
Jumping over to the file ScrollingText8x8Display.cpp, which I've altered a bit. Starting with the init() section; here I did remove the configuration for the GPIO setup.
In the function displayText() there were made changes to accommodate using smaller characters. I do not use the standard 8x8 font anymore, but as shown above, the "j" is now an 3x8 character.
To do this, I did create a circularBuffer for the full text (instead of 2 characters). To do this, at first I do reset the length, cursor and buffer. Then I'm adding 3 spaces to start with a blank screen. Next is adding the actual characters we want to see scrolling. Add another 3 spaces, and then run the animation. As the scrollingSpeed is only needed in the new animation section, it was removed from the other parts.
void ScrollingText8x8Display::displayText(String text, unsigned long scrollingSpeed) {
    /* clear any previous circular length buffer and cursor data */
    circularLength = 0;
    cursor = 0;
    for (int x = 0; x < DISPLAY_SIZE; x++) {
        for (int y = 0; y < DISPLAY_SIZE*NUMBER_OF_CHARACTER_IN_BUFFER; y++) {
            circularBuffer[x][y] = 0;
        }
    }

    /* Add 3 additional space characters (each 3 cols wide)*/
    for (int i = 0; i < 3; i++) {
        displayCharacter((int)' ');
    }

    /* Add the provided text to the circular buffer */
    int textLength = text.length();
    for (int i = 0; i < textLength; i++) {
        int charAsInt = (int)(text.charAt(i));
        displayCharacter(charAsInt);
    }

    /* Add 3 additional space characters (each 3 cols wide)*/
    for (int i = 0; i < 3; i++) {
        displayCharacter((int)' ');
    }

    /* Run the animation */
    displayScrolling_8x8_circularBuffer(scrollingSpeed);
}
In the displayCharacter() function, I've merged all following functions together for better readability. And I've added the logic to find the width of the character we are loading. Counting total width is now based on columns, which was full characters (representing 8 columns) before.
void ScrollingText8x8Display::displayCharacter(int index) {
    if (index < 0 || index >= NUMBER_OF_CHARACTERS) {
        index = UNKNOW_CHARACTER;
    }

    byte asciiCharacter[DISPLAY_SIZE];
    int characterWidth = pgm_read_byte(&(font_8x8[index][0]));
    for (int k = 0; k < DISPLAY_SIZE; k++) {
        /* `pgm_read_byte` function documentation, see: https://www.arduino.cc/reference/en/language/variables/utilities/progmem/ */
        asciiCharacter[k] = pgm_read_byte(&(font_8x8[index][k+1]));
    }

    byte character[DISPLAY_SIZE][DISPLAY_SIZE];
    for (byte k = 0; k < DISPLAY_SIZE; k++) {
        byte binary[DISPLAY_SIZE];
        for (byte n = 0; n < DISPLAY_SIZE; n++) {
            binary[7 - n] = (asciiCharacter[k] >> n) & 1;
        }
        for (byte t = 0; t < DISPLAY_SIZE; t++) {
            character[k][t] = binary[t];
        }
    }

    /* In case we need character rotation */
    switch (characterOrientation) {
    case TOP:
        rotate90Clockwise(character);
        rotate90Clockwise(character);
        rotate90Clockwise(character);
        break;
    case BOTTOM:
        rotate90Clockwise(character);
        break;
    case LEFT:
        rotate90Clockwise(character);
        rotate90Clockwise(character);
        break;
    default:
        break;
    }

    /* index is here the position where the previous character is stored. So we overwrite the previous character with the new character. */
    circularLength += (characterWidth + 1);

    for (byte r = 0; r < DISPLAY_SIZE; r++) {
        for (byte c = 0; c < characterWidth; c++) {
            circularBuffer[r][c + circularLength - characterWidth - 1] = character[r][c];
        }
    }
}
Lastly in displayScrolling_8x8_circularBuffer(), it does calculate the current window that should be shown. This is based on scrolling speed and takes the current frame from the circular buffer:
void ScrollingText8x8Display::displayScrolling_8x8_circularBuffer(unsigned long scrollingSpeed) {
    float duration = map(
        scrollingSpeed,
        MINIMAL_SCROLLING_SPEED,
        MAXIMAL_SCROLLING_SPEED,
        MAXIMAL_DURATION_FOR_ONE_CHARACTER,
        minimalDurationForOneCharacter);

    byte numberOfIteration = circularLength-DISPLAY_SIZE;
    byte charactersToDisplayRowsLength = circularLength;
    for (byte i = 0; i < numberOfIteration; i++) {
        byte windowToDisplay[DISPLAY_SIZE][DISPLAY_SIZE];
        for (byte r = 0; r < DISPLAY_SIZE; r++) {
            byte count = 0;
            for (byte c = cursor % charactersToDisplayRowsLength; count < DISPLAY_SIZE; c = (c + 1) % charactersToDisplayRowsLength) {
                windowToDisplay[r][count] = circularBuffer[r][c];
                count++;
            }
        }

        switch (scrollingDirection) {
        case TOP_TO_BOTTOM:
            rotate90Clockwise(windowToDisplay);
            rotate90Clockwise(windowToDisplay);
            rotate90Clockwise(windowToDisplay);
            break;
        case BOTTOM_TO_TOP:
            rotate90Clockwise(windowToDisplay);
            break;
        case LEFT_TO_RIGHT:
            rotate90Clockwise(windowToDisplay);
            rotate90Clockwise(windowToDisplay);
            break;
        default:
            break;
        }

        float currentDuration = frameWaitTime;

        /* Clear display. So turn all LEDs off. */
        for (int i = 0; i < DISPLAY_SIZE; i++) {
            for (int j = 0; j < DISPLAY_SIZE; j++) {
                frame_buffer[i][j] = 0;
            }
        }

        while (currentDuration < duration) {
            for (int r=0; r < DISPLAY_SIZE; r++) {
                for (int c = 0; c < DISPLAY_SIZE; c++) {
                    byte shouldTurnLedOn = windowToDisplay[r][c];
                    if (shouldTurnLedOn) {
                        /* a LED is ON only when a row is HIGH and the column LOW else OFF. */
                        frame_buffer[r][c] = 7;
                    } else {
                        frame_buffer[r][c] = 0;
                    }
                }
                delay(frameWaitTime);
                currentDuration = currentDuration + frameWaitTime;
            }
        }

        cursor++;
    }
    /* so the cursor doesn't go out of range */
    cursor = cursor % charactersToDisplayRowsLength;
}For the animations we have to look at the animations_8x8.h file first. Here the images needed are defined. And don't think I'm an artist, this is so damn difficult to make something recognizable with only 8x8 dots...
In the array you can see I used brightness levels to give the images a bit of depth. As explained above; there will be snow around the image on the bits that are 0.
const uint8_t ANIMATIONS[NUMBER_OF_ANIMATIONS][8][8] = {
[.....]
    { /* SNOWMAN */
        {0,0,0,7,7,0,0,0},
        {0,0,7,4,4,7,0,0},
        {0,0,7,4,4,7,0,0},
        {0,0,0,7,7,0,0,0},
        {0,0,7,4,4,7,0,0},
        {0,7,4,4,4,4,7,0},
        {0,7,4,4,4,4,7,0},
        {0,0,7,4,4,7,0,0}
    },
[.....]
};
Now to our FestiviTie.ino file, where the magic happens. From the loop(), with a FreeRTOS task, there is started the function snow_animation(). This function finds the defined array of pixels for our animation, and then pushes this to the frame_buffer. Which is, like shown above, regularly pushed to the Matrix screen.
void snow_animation(void* arg) {
    /* Load the animation into the pixel array */
    uint8_t pixel;
    for (int i = 0; i < MatrixHeight; i++) {
        for (int j = 0; j < MatrixWidth; j++) {
            pixel = ANIMATIONS[ImageAnimation][i][j];
            pixels[i][j] = pixel;
            frame_buffer_[i][j] = pixel;
        }
    }
    MatrixScreen.update(frame_buffer_);

    /* Keep running until the loop() does set this to false */
    while (snow_animation_running_) {

        int x = random(0,MatrixHeight);
        int y = random(0,MatrixWidth);
        uint8_t level = random(0,BrightnessLevelCount);
        /* We do not want bright snow and/or snow everywhere, above level 4 should be blanks */
        if(level >= 4) {
            level = 0;
        }
        /* Only if the random pixel is NOT part of the currently shown image (level=0), show it */
        if(pixels[x][y] == 0) {
            frame_buffer_[x][y] = level;
            MatrixScreen.update(frame_buffer_);
            vTaskDelay(pdMS_TO_TICKS(20));
        }

    }
    snow_animation_handle_ = nullptr;
    snow_animation_running_ = false;
    vTaskDelete(nullptr);
}While there is shown an animation or scrolling text, there are different ways how the LED string lights up. These are also started from the loop() by creating FreeRTOS tasks.
Snow effect (during animation):
void snow_ledstring(void* arg) {
    /* Keep running until the loop() does set this to false */
    while (snow_animation_running_) {

        /* Generate a random number between levels 2 and 8 (effectively returning 2-7) */
        uint8_t level = random(2,BrightnessLevelCount);
        analogWrite(ledstringPin, level * 5);
        vTaskDelay(pdMS_TO_TICKS(200));

    }
    analogWrite(ledstringPin, 10);
    snow_ledstring_handle_ = nullptr;
    vTaskDelete(nullptr);
}
And slowly breathing (during scrolling text). Reason I'm not using a standard for/while loop to go up and down, is that I want to quit the task as soon as the text_animation_running_turns into false, I don't want to complete a cycle of breath:
void text_ledstring(void* arg) {
    int min_i = 2;
    int max_i = 10;
    int cur_i = max_i;
    int dir_i = -1;

    /* Keep running until the loop() does set this to false */
    while (text_animation_running_) {

        if(dir_i == 0) {
            cur_i = cur_i + 1;
        } else {
            cur_i = cur_i - 1;
        }

        if(cur_i == max_i) {
            dir_i = -1;
        }
        if(cur_i == min_i) {
            dir_i = 0;
        }

        analogWrite(ledstringPin, cur_i);
        vTaskDelay(pdMS_TO_TICKS(200));

    }
    analogWrite(ledstringPin, max_i);
    text_ledstring_handle_ = nullptr;
    vTaskDelete(nullptr);
}To change the scrolling text and animation, I've implemented a Bluetooth Low Energy server. I do keep it only running for the first 30 seconds after turning the FestiviTie ON. Reason is that the BLE page for setting the FestiviTie is publicly available, so that you can build your own tie and use the same page for controlling it. But that means that any funny person could use that page too, and change the scrolling text to something offensive. As I sacrificed the usage of the button to run the LED string, that is no option for enabling Bluetooth anymore. So the 30 seconds limitation it is.
As a guide on how to create the BLE server and page, I've used the ESP32 Web Bluetooth (BLE): Getting Started Guide from Random Nerd Tutorials. Really very good explanations. Read it and try it out for your projects!
I did make some adjustments, just to make it cooler and fit my purpose. When you go to festivitie.bastiaanslee.nl you will see the BLE setup page. Connect to your FestiviTie and update the text or animation. Updated settings on the FestiviTie are visible with the next text or animation cycle.
Specific for my implementation; there are 2 callbacks, one for each setting on the BLE setup page:
In the HTML file the function that sends the text value via BLE to the FestiviTie:
textButton.addEventListener('click', () => writeOnCharacteristicText(textValue.value));


function writeOnCharacteristicText(value){
    if (bleServer && bleServer.connected) {
        bleServiceFound.getCharacteristic(textCharacteristic)
        .then(characteristic => {
            console.log("Found the Scrolling Text characteristic: ", characteristic.uuid);
            const arrayBuffer = new ArrayBuffer(value.length);
            const dataView = new DataView(arrayBuffer);
            for (let i = 0; i < value.length; i++) {
                dataView.setUint8(i, value.charCodeAt(i));
            }
            const data = new Uint8Array(arrayBuffer);
            return characteristic.writeValue(data);
        })
        .then(() => {
            console.log("Value written to Scrolling Text characteristic:", value);
        })
        .catch(error => {
            console.error("Error writing to the Scrolling Text characteristic: ", error);
        });
    } else {
        console.error ("Bluetooth is not connected. Cannot write to characteristic.")
        window.alert("Bluetooth is not connected. Cannot write to characteristic. \n Connect to BLE first!")
    }
}
And in the FestiviTie.ino file:
class MyTextCharacteristicCallbacks : public BLECharacteristicCallbacks {
    void onWrite(BLECharacteristic* pTextCharacteristic) {
        String value = pTextCharacteristic->getValue();

        /* If there is received something */
        if (value.length() > 0) {
            String ScrollingText_temp = "";

            /* unpack the arrayBuffer into a readable string */
            for (int i = 0; i < value.length(); i++) {
                char c = static_cast<int>(value[i]);
                ScrollingText_temp += c;
            }

            ESP_LOGI(TAG,"Characteristic event, written: %s",ScrollingText_temp); /* Print the Scrolling Text value */

            /* if the text is different compared to current, update the displayed text and store in memory */
            if (ScrollingText != ScrollingText_temp) {
                ScrollingText = ScrollingText_temp;
                FlashMemory.putString("ScrollingText", ScrollingText_temp);
            }
        }
    }
};
Same for the images, in the HTML file:
animationButton_snow.addEventListener('click', () => handleanimationButtons(0,"write"));
animationButton_snowman.addEventListener('click', () => handleanimationButtons(1,"write"));
animationButton_cocktail.addEventListener('click', () => handleanimationButtons(2,"write"));

function writeOnCharacteristicImage(value){
    if (bleServer && bleServer.connected) {
        bleServiceFound.getCharacteristic(animationCharacteristic)
        .then(characteristic => {
            console.log("Found the Animation characteristic: ", characteristic.uuid);
            const data = new Uint8Array([value]);
            return characteristic.writeValue(data);
        })
        .then(() => {
            console.log("Value written to Animation characteristic:", value);
        })
        .catch(error => {
            console.error("Error writing to the Animation characteristic: ", error);
        });
    } else {
        console.error ("Bluetooth is not connected. Cannot write to characteristic.")
        window.alert("Bluetooth is not connected. Cannot write to characteristic. \n Connect to BLE first!")
    }
}
And in the FestiviTie.ino file:
class MyImageCharacteristicCallbacks : public BLECharacteristicCallbacks {
    void onWrite(BLECharacteristic* pImageCharacteristic) {
        String value = pImageCharacteristic->getValue();

        /* If there is received something */
        if (value.length() > 0) {

            /* Convert the received String value into a number */
            int ImageAnimation_temp = static_cast<int>(value[0]);

            ESP_LOGI(TAG,"Characteristic event, written: %d",ImageAnimation_temp); /* Print the Animation Integer value */

            /* if the text is different compared to current, update the displayed text and store in memory */
            if (ImageAnimation != ImageAnimation_temp) {
                ImageAnimation = ImageAnimation_temp;
                FlashMemory.putInt("ImageAnimation", ImageAnimation_temp);
            }
        }
    }
};
For handling the connection of the BLE server, there are 2 tasks created. One to start and keep the connection updated, and one to stop the BLE server after 30 seconds:
void BLE_start_server(void* arg) {
    while (BLE_start_server_running_) {

        /* disconnecting */
        if (!deviceConnected && oldDeviceConnected) {
            ESP_LOGI(TAG, "Device disconnected.");
            oldDeviceConnected = deviceConnected;
            BLE_start_server_running_ = false;
        }

        /* connecting */
        if (deviceConnected && !oldDeviceConnected) {
            oldDeviceConnected = deviceConnected;
            ESP_LOGI(TAG, "Device Connected");
            /* Once connection is made, send the current animation and text settings */
            pTextCharacteristic->setValue((String)ImageAnimation + ";" + ScrollingText);
            pTextCharacteristic->notify();
        }

        vTaskDelay(pdMS_TO_TICKS(1));
    }

    /* disconnecting */
    BLEDevice::stopAdvertising(); /* stop advertising */
    BLEDevice::deinit(true); /* also release memory */

    BLE_start_server_handle_ = nullptr;
    BLE_start_server_running_ = false;
    vTaskDelete(nullptr);
}

void BLE_stop_server(void* arg) {
    /* Only start this task after 30 seconds */
    vTaskDelay(pdMS_TO_TICKS(30000));

    while (BLE_start_server_running_) {

        if (!deviceConnected) {
            ESP_LOGI(TAG, "BLE 30sec passed, stop BLE");
            BLE_start_server_running_ = false;
            break;
        } else {
            vTaskDelay(pdMS_TO_TICKS(10));
        }

    }

    BLE_stop_server_handle_ = nullptr;
    vTaskDelete(nullptr);
}
Updating the text and animation on the HTML side is done in this part:
// Connect to BLE Device and Enable Notifications
function connectToDevice(){
    console.log('Initializing Bluetooth...');
    navigator.bluetooth.requestDevice({
        filters: [{name: deviceName}],
        optionalServices: [bleService]
    })
    .then(device => {
        console.log('Device Selected:', device.name);
        bleStateContainer.innerHTML = 'Connected to device ' + device.name;
        bleStateContainer.style.color = "#24af37";
        device.addEventListener('gattservicedisconnected', onDisconnected);
        return device.gatt.connect();
    })
    .then(gattServer =>{
        bleServer = gattServer;
        console.log("Connected to GATT Server");
        return bleServer.getPrimaryService(bleService);
    })
    .then(service => {
        bleServiceFound = service;
        console.log("Service discovered:", service.uuid);
        return service.getCharacteristic(textCharacteristic);
    })
    .then(characteristic => {
        console.log("Characteristic discovered:", characteristic.uuid);
        CharacteristicFound = characteristic;
        characteristic.addEventListener('characteristicvaluechanged', handleCharacteristicChange);
        characteristic.startNotifications();
        console.log("Notifications Started.");
        return characteristic.readValue();
    })
    .then(value => {
        console.log("Read value: ", value);
        const decodedValue = new TextDecoder().decode(value);
        console.log("Decoded value: ", decodedValue);

        /* Value received is animation and scrolling text at once. Split them here */
        handleanimationButtons(decodedValue.substring(0,1),"set")
        textValue.value = decodedValue.substring(2,1000);

        textValue.style.color = "#5f6c6d";
        textValue.disabled = false;
        textButton.style.background = "#1b8a94";
    })
    .catch(error => {
        console.log('Error: ', error);
    })
}Compile your code and once it runs smooth, don't forget to change the Debug Level to NONE.
Now it is time to show off your FestiviTie to the world :-)


Comments