
Hardware components | ||||||
 |
| × | 1 | |||
Hand tools and fabrication machines | ||||||
| ||||||
| ||||||
| ||||||
| ||||||
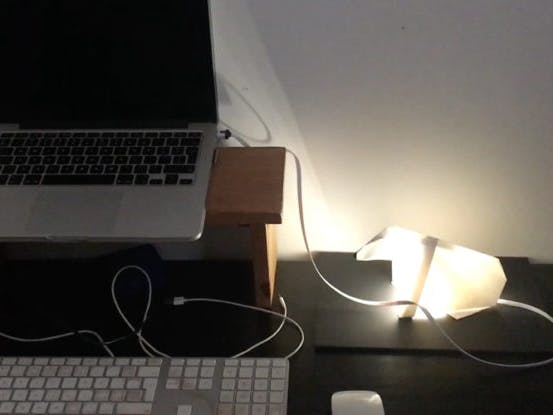
We love projects from our community! This time, we present you Ross’ (aka White On Rice) Origami Polar Bear Lamp project. Ross is an origami artist who used our Electric Paint Lamp Kit to create this beautiful origami lamp.
Here’s what Ross had to say about how he came up with this idea.
“After attempting to create an interactive lamp using a piece of paper for the shade I decided to create something slightly different using the Electric Paint Lamp Kit. Being an origami artist I thought it would be cool to integrate some origami into the design. I could have used any origami figure to create this lamp, and you literally can, with a bit of messing around, but I went for a shape that looked similar to the lampshade that comes standard with the kit. So I made an Origami Polar Bear Lamp.
When I looked at the polar bear I thought, how cool would it be if the nose was the switch? So that was my only design requirement. I had to hack the kit instructions a little, also understand how the lamp board functioned first, in order to get this right.”
You can see more of Ross’ work on his Instagram or Youtube account.
Materials: To begin you will need:
Electric Paint Lamp Kit
-
white paper
glue
tin foil
thick black card
Step 1: Watch the video
You can either watch the video or use the instructions below. Enjoy!
Links
Step 2: Fold the polar bear
First, make the polar bear origami. You can use any paper but just make sure that the paper you use is sturdy. The thickness of the paper depends on how you want the light to shine through and how big you want the lamp to be. I went with 130gsm watercolour paper.
The origami polar bear is a design from a book called “Love Origami” which you can find here. Alternatively, you can find a list of great origami designs and tutorials that range from simple to advanced on this website here.
Links
Step 3: Apply some foil
Then, fold the tin foil into a long strip. Place the strip of foil down the centre of the figure so you don’t see it showing when the model is folded closed. Stick the foil down onto the paper but not the entire strip. Leave the ends unattached. Feed one end through the hole of electrode E0 and cold solder it with the Electric Paint. Wait until the paint has dried before you continue.
Links
Step 4: Paint the switch
Now, paint the tip of the nose, which will act as the switch. While the paint is still wet, place and hold the other end of the foil onto the paint until it dries. This will connect the switch to the electrode E0 via the foil.
Links
Step 5:
The black card is going to be our base. Place the Light Up Board on the base and mark off with a pencil where electrodes E9 and E10 pins will be situated. Now paint a line connection with Electric Paint between E9 and E10. Place 2 or 3 dots of glue onto the bottom side of the board, underneath the tabs of the board. While the Electric Paint and glue are still wet, place the lamp board onto the base, making sure that pins E9 and E10 are directly over the painted connection ends you just painted. Once the board is securely fastened to the base, cold solder E9 and E10.
Links
Step 6:
When everything has dried, place the origami figure on the base and stick it down using glue. Connect the USB cable to the Light Up Board and the other end to a power source.
Links
Step 7: Touch the nose
When you now touch the nose of the bear, the origami should light up!
Thank you for this awesome tutorial Ross!
We’d love to see your creations. Feel free to send us images to info@bareconductive or via Instagram or Twitter.
Comments